In the following documentation, you will know about how to use the Variant Landing Page WordPress Theme on your website. Following are the points that have been explained:
- Introduction to Variant theme.
- How to install Variant theme?
- How to install Variant theme demo contents?
- How to setup landing pages?
- How to use various function of the theme options panel?
- How to create a menu?
- How to create pages?
- How to create a Blog post?
Here is the link demo link of Variant Landing Page
Wedding Planer https://www.inkthemesdemo.com/wptheme/variant-wedding-planner-landing-page/
Tour and Travel https://www.inkthemesdemo.com/wptheme/variant-travels-landing-page/
Hotel Page https://www.inkthemesdemo.com/wptheme/variant-hotel-landing-page/
Fitness Center https://www.inkthemesdemo.com/wptheme/variant-fitness-center-landing-page/
Taxi Booking https://www.inkthemesdemo.com/wptheme/variant-taxi-booking-landing-page/
For demo purpose we have created this landing page, however, you can create a landing page for any product and services with any template. There is no bar.
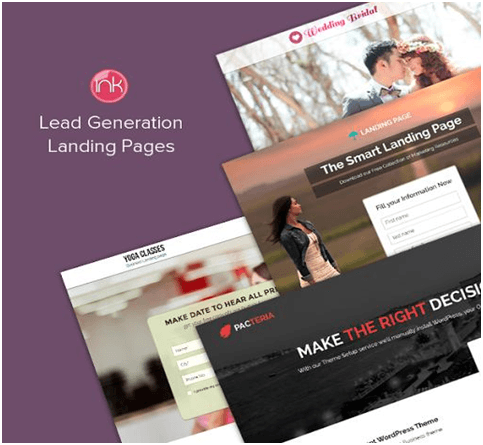
Introduction to Variant Landing Page Theme
The Variant is an awesome landing page WordPress theme with 5 different landing page design, useful for collecting leads and generating revenues.
This theme lets you represent your business services very effectively.
Creating your landing page is super simple, even for a beginner.
If you want a theme to hold your hand through the design process, then this landing page theme could be for you.
The core features of the Variant theme are as follows:
- 5 Different Landing Page Design.
- Home Page Feature Section.
- Home Page Video Section.
- Home Page Testimonial Section.
- Clients’ Logos Section.
- Home Page Form Section.
The theme features can be easily customized from the Theme Options Panel.
How to Install Variant theme?
Variant theme is extremely easy to install and use
It allows you to create your website within no time and any business professional can create a website with the theme without any difficulty.
Before installing this Variant theme on your website make sure that:
- You have installed WordPress on your server.
- Installing the theme is very simple and easy. It will hardly take a minute. Just follow the simple steps given below.
Go to your WordPress dashboard to install the theme and follow these steps. Dashboard >Appearance >Themes >Add New
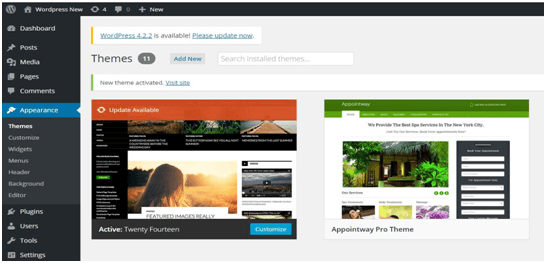
Choose the downloaded ‘varianttheme.zip’ and upload it on your dashboard.
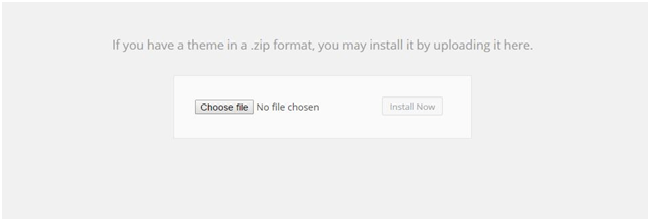
Upload >Choose File >Install Now
Click on ‘Activate’ and your Website is ready.
How to install Variant theme demo contents
Variant WordPress theme comes with OptionTree – Theme Options panel and you can easily import the demo contents by following the below steps:
- Login to your member’s area: https://www.inkthemes.com/members/member/index
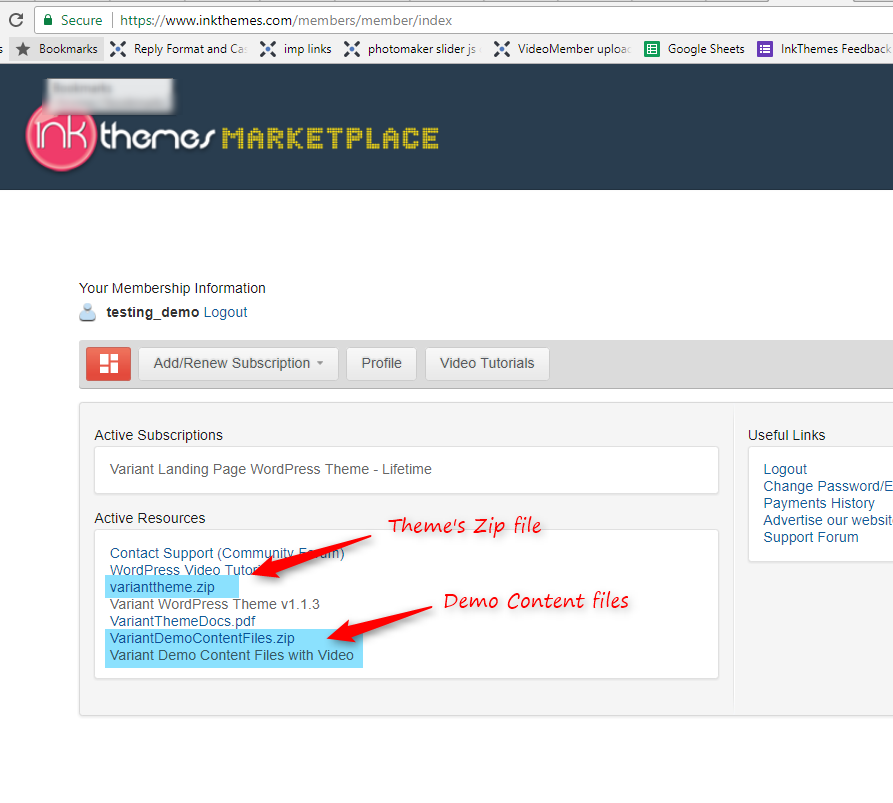
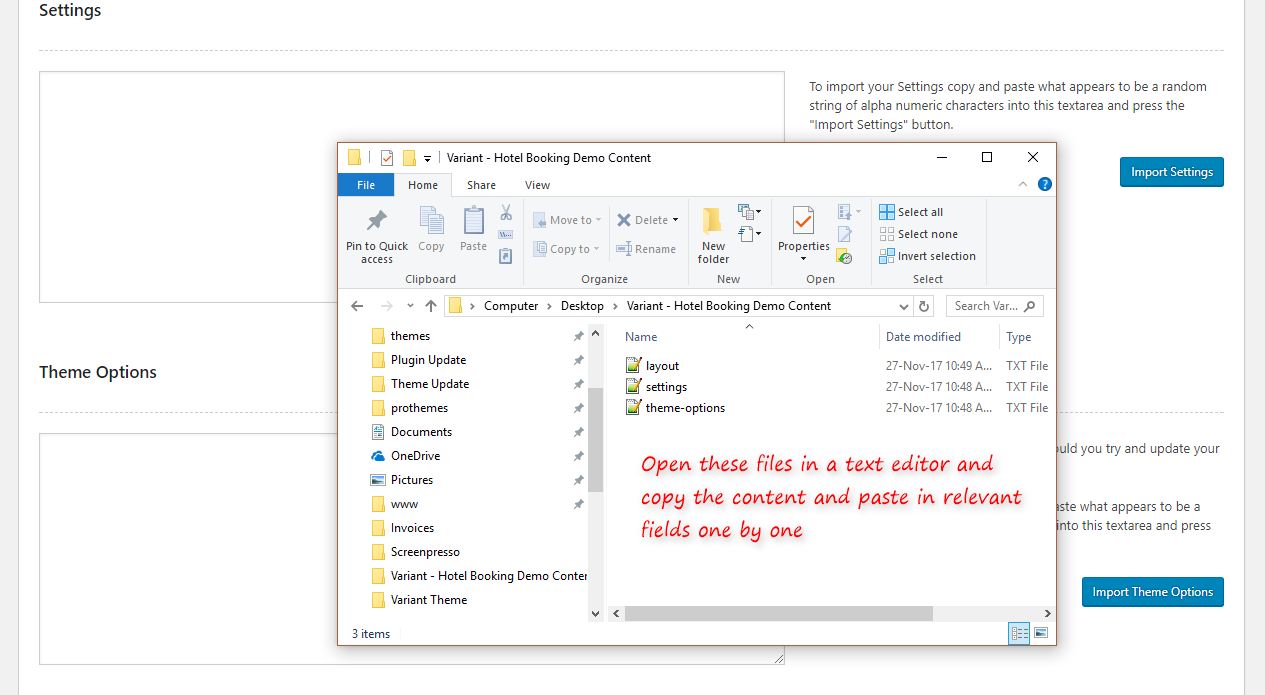
- Download the zip file “VariantDemoContentFiles.zip“.
- Extract the zip, you will get 5 folders containing the demo content files.
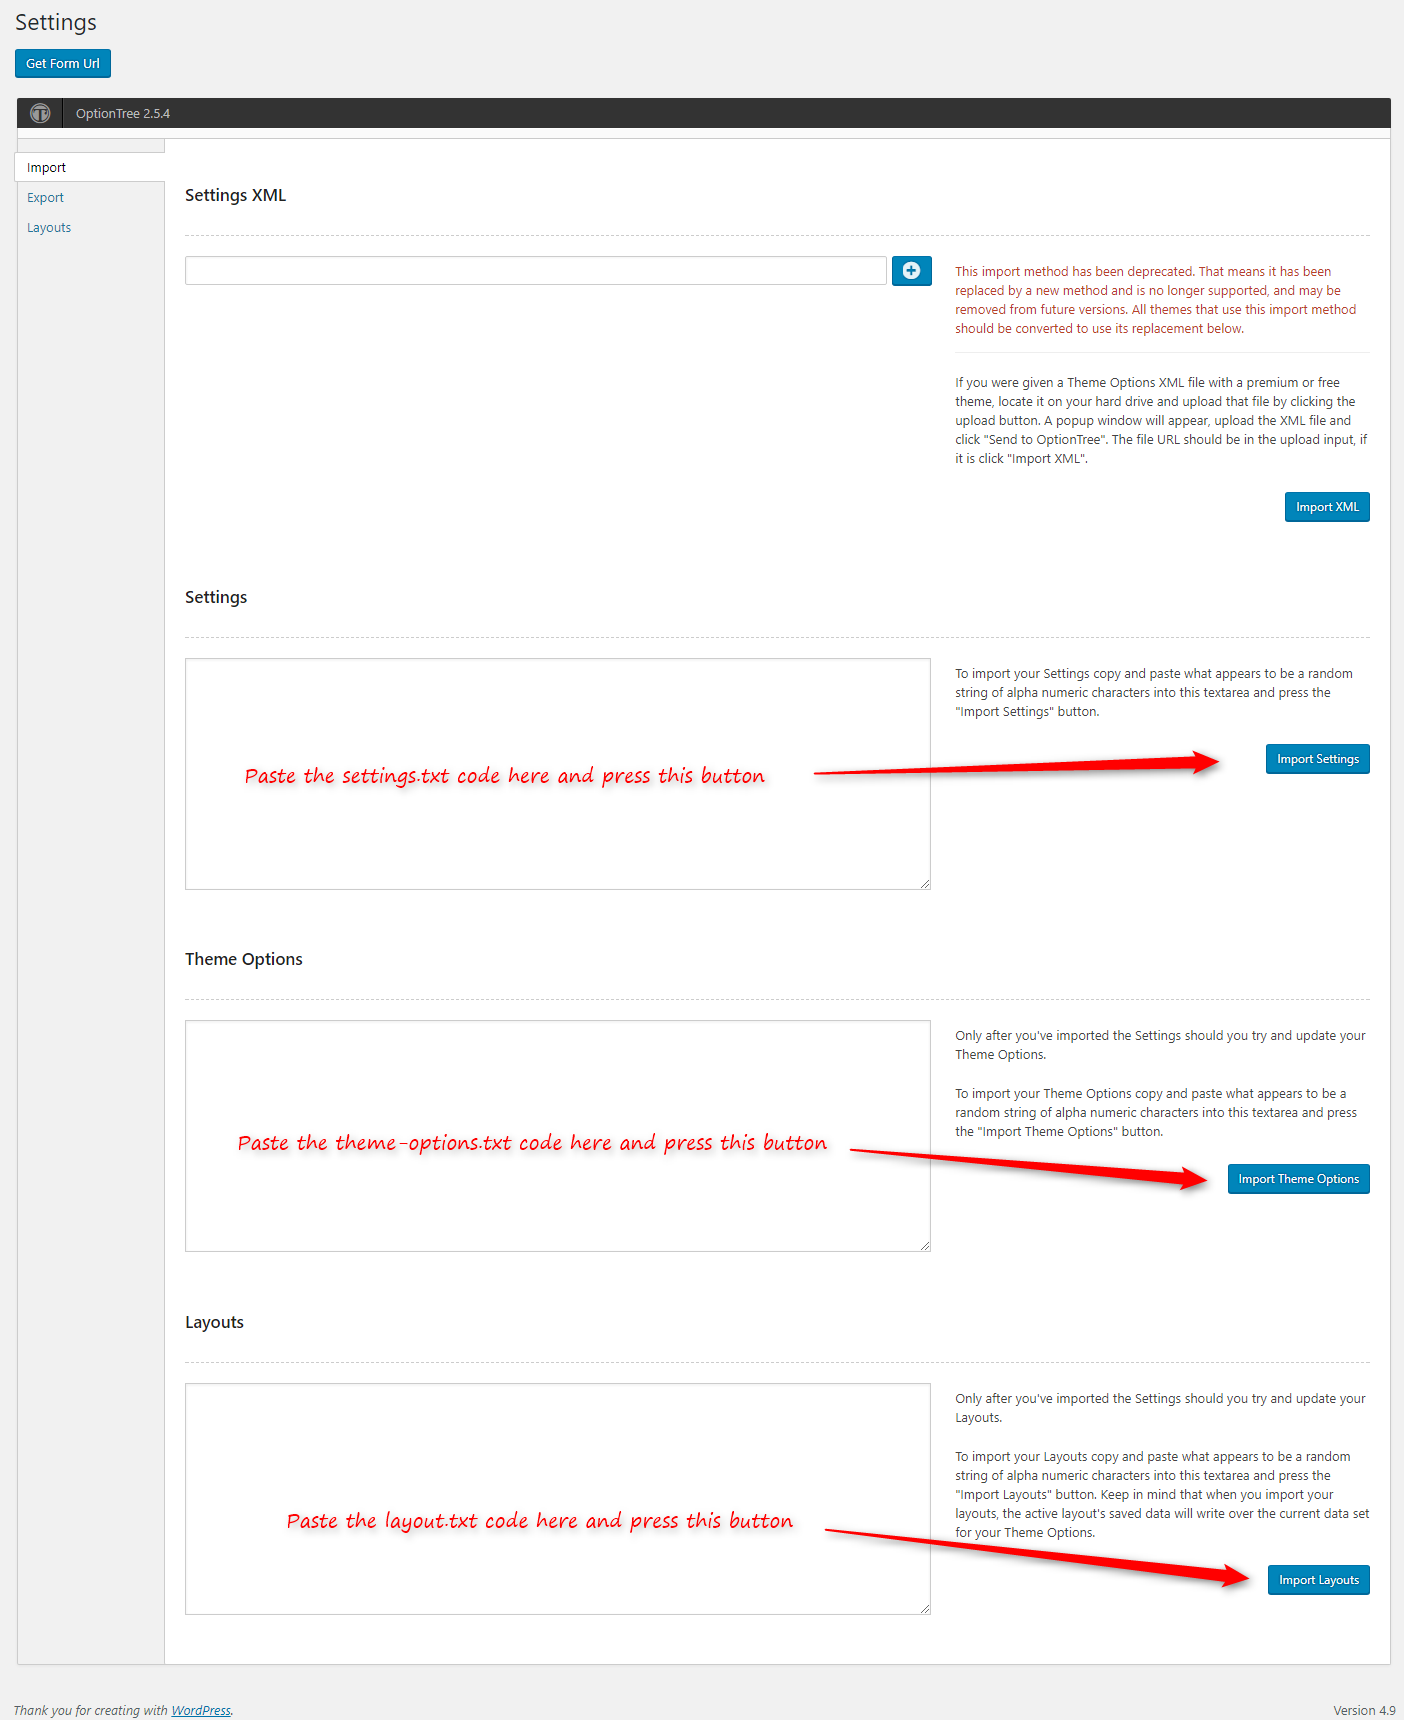
- Now, visit your WordPress Dashboard->OptionTree->Settings.
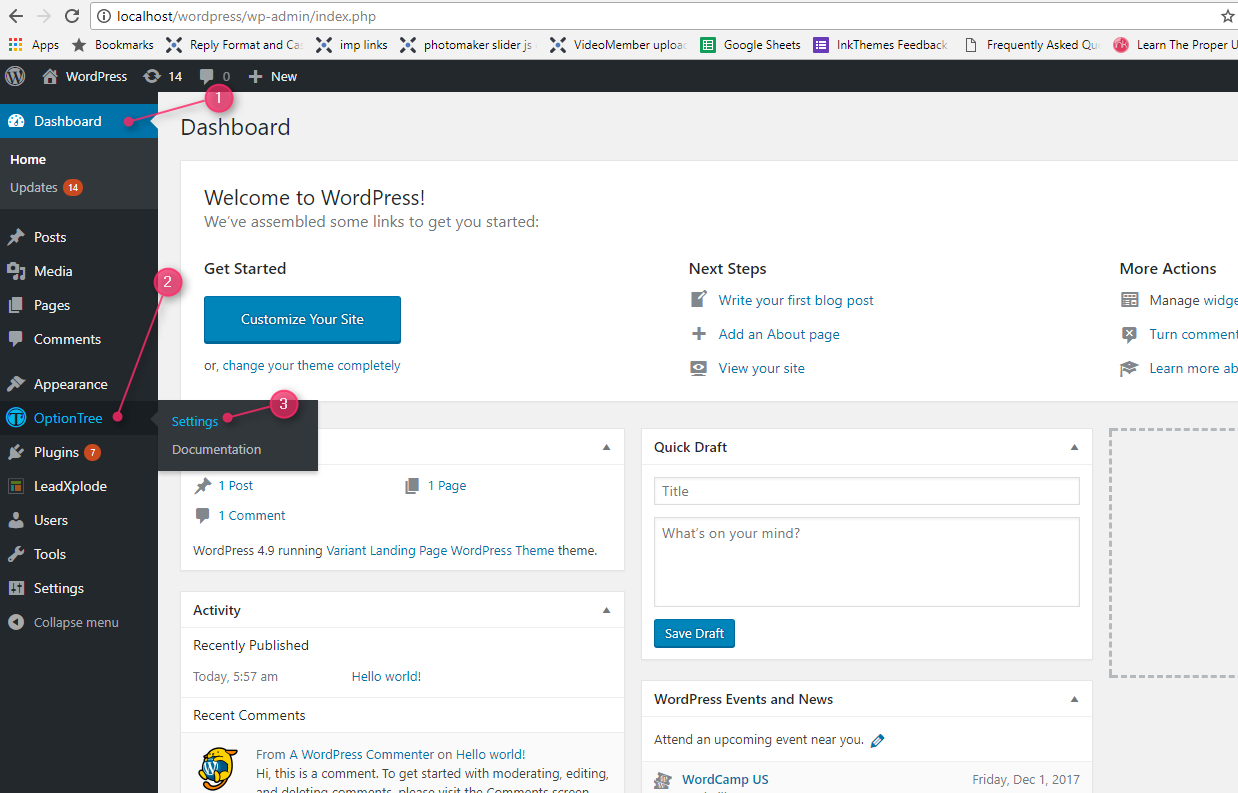
- You can see Settings, Theme Options, and Layouts fields under Import option there.
- Now, open the files of your desired demo and copy paste the code into the relevant fields one by one:
Also, watch this video of importing demo contents:
This way, you will be able to import the demo contents on your site.
How to Set Up Landing Page
Before we go ahead with setting up a landing page you first need to create a form to do so just follow the below steps.
First steps involve creating your account. Here I will show you a sequence showing, registering on FormGet, creating form and embedding it in your website.
- First of all, we will start with, how to register in FormGet?
Here are the few simple steps.
- Go to formget.com.
- There you will see an option for Sign Up in the top right corner.
- Just click on it and fill out the required form fields.
- Then click on create account button.
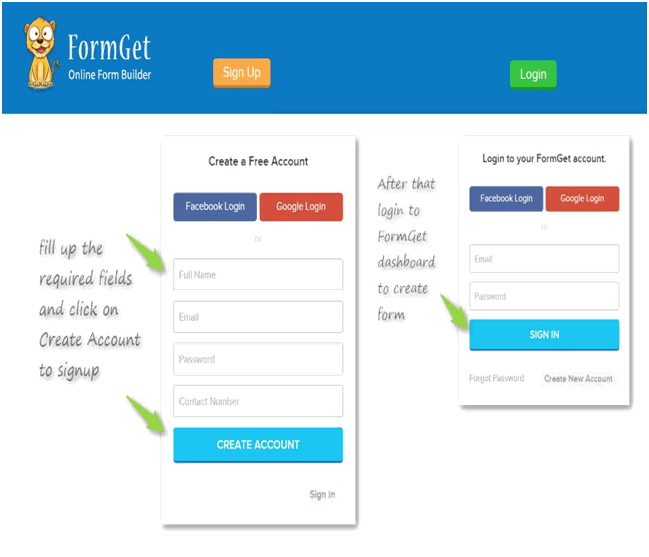
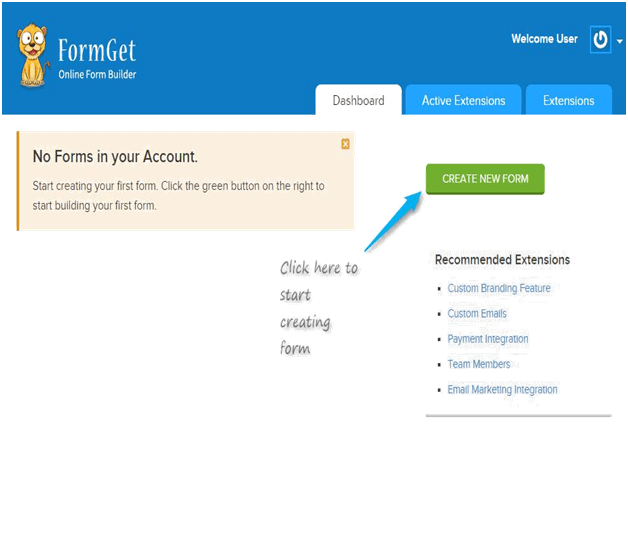
You have now successfully registered. Now the time is for creating a web form. Here we go.
- How to create form.
- Login to your FormGet dashboard with the login credentials you have signed up.
- There you will see an option Create New Form, click on it to start building form.
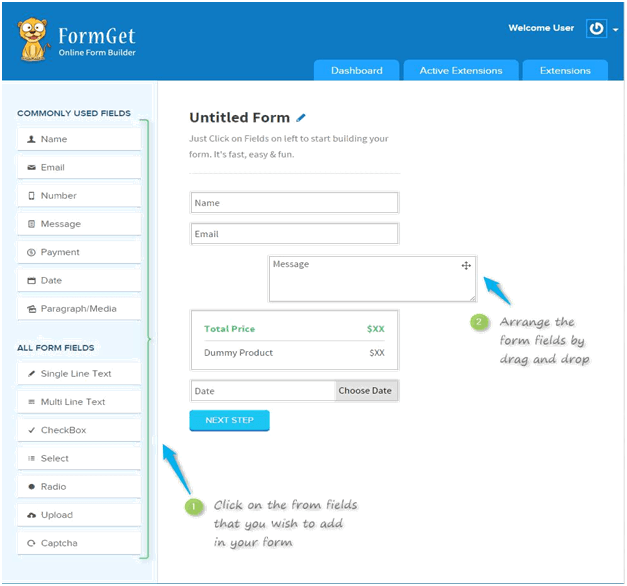
- Now you will see FormGet App page, where you have to create form.
- In that page, you will see commonly used form fields on the left side of the window.
- Click on to the fields that you wish to add in your form.
- Here you have a special drag and drop feature with which you can arrange the form fields and place them in a sequential manner in which that you wish.
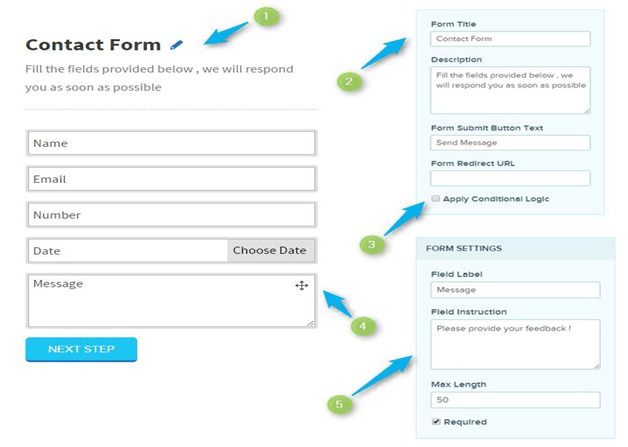
- How to edit the form title, subtitle and form fields text.
- Click on to the title to edit it, an editor will open up in the right side, do the required changes in title and subtitle there.
- You will see an option Apply Conditional Logic. Using that you can apply conditional logics in form fields.
- Again follow the same process for the form fields too.
- In that editor for the fields, you can change the text and can also set up other provided options.
- Other provided options are like, if you wish to keep the field required while filling out the form, then check(tick) the option provided.
- You can also limit the field values, using Max Length option provided.
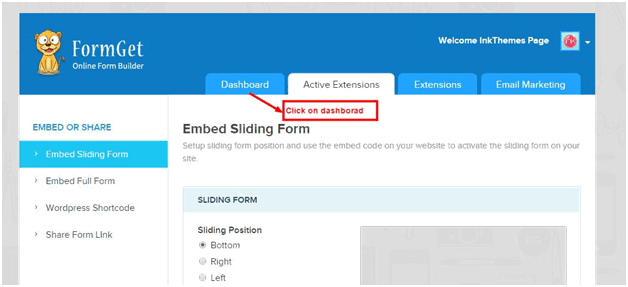
Now as you complete building your form, then click on Next Step to save the form, and to move on to design section of the form. In the design section, you don’t need to do anything because this form will hold the theme styles so just simply click on save changes button present at the right bottom of the design page. Now you will redirect to the FormGet dashboard. Click on the dashboard button as shown in the image.
There you will get the list of all created form, hit on the view form
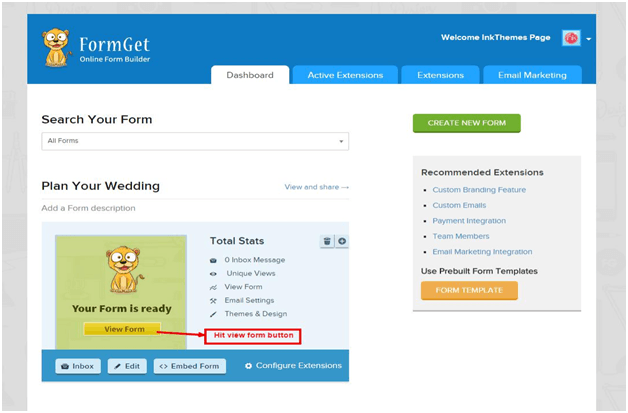
You will be redirected to form page copy that links and save it with you, we need this link later on.
Theme Option Panel Settings
Now get back to your site to create a landing page, follow these steps.
Go to Dashboard > Appearance > Theme Options
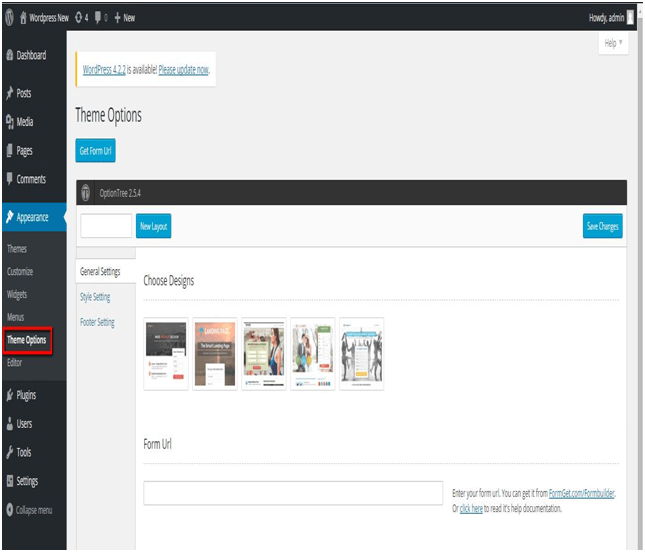
Theme Options Panel write layout name and then hit the button “New Layout” by doing this you are saving the setting of the layout so that if you want you can use the same layout in future as you can create as many as a number of layouts you want.
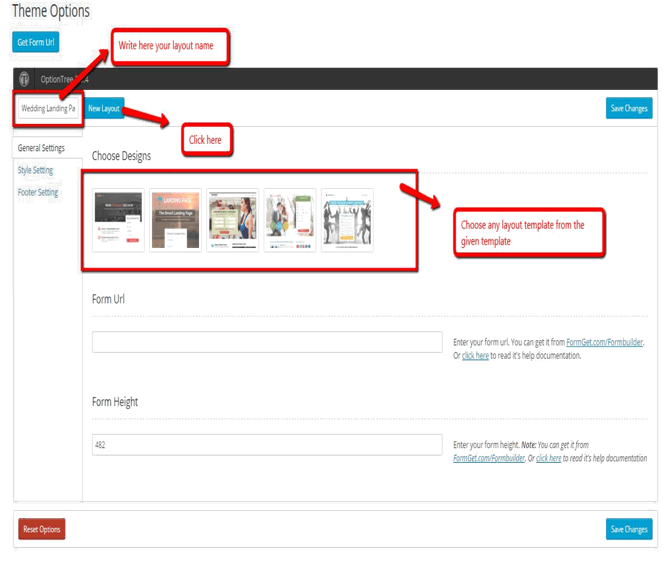
Choose any designs from the given design options just by clicking it and the setting fields will appear according to selected design just enter the desired value and here you go your landing page it ready. Among five different landing page template, I choose the wedding one in which wedding image is given.
General Setting
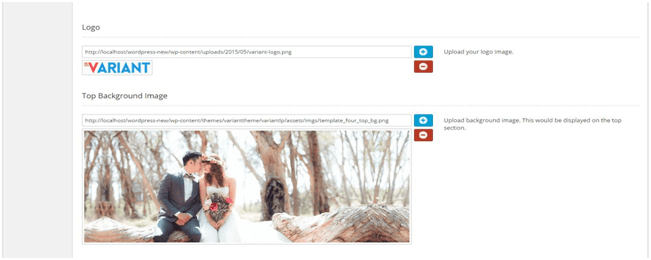
Upload Logo and Header background In this section we will upload logo and header background, for that just follow the below steps
- Click on the blue color “plus button“.
- A WordPress media panel will open upload the image you want to add and then click on send tree.
- To remove image click on red color “minus button” the upload image will be removed and you can upload the new one.
- Click on Save button
Bubble Section This section will show the text in the header like the image shown below. All you need to do is just enter the desired text and then hit save button
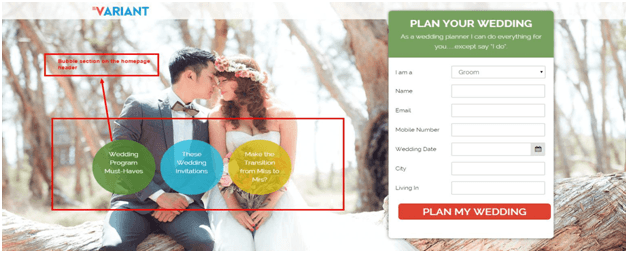
The form that displays at header Follow the below steps to set the form that is showing in the above image.
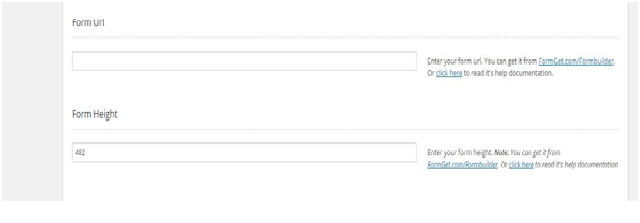
- Enter the form URL that is saved with you.
- Adjust the height of the form by default it’s 480 increase or decreases the value accordingly.
If get any kind of trouble you can contact us at [email protected] we will help you out to set it.
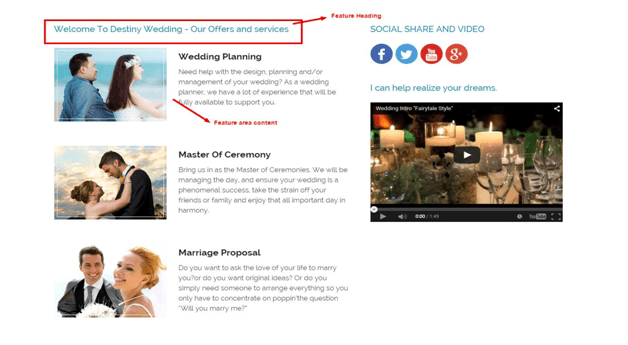
Feature Section This section you can mention about your product features or your services.
To achieve this follow the below mention steps.
- In General Settings > header section > Enter your heading in the input text. Have a look at the image.
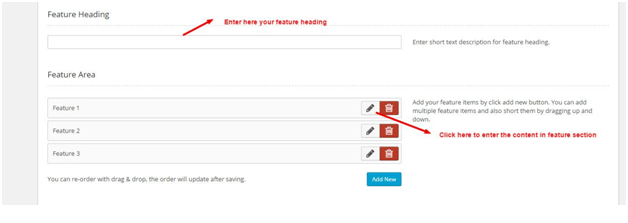
- For Content> under heading Feature Area click on edit button as shown in above image now the feature panel will open filled the panel with required content
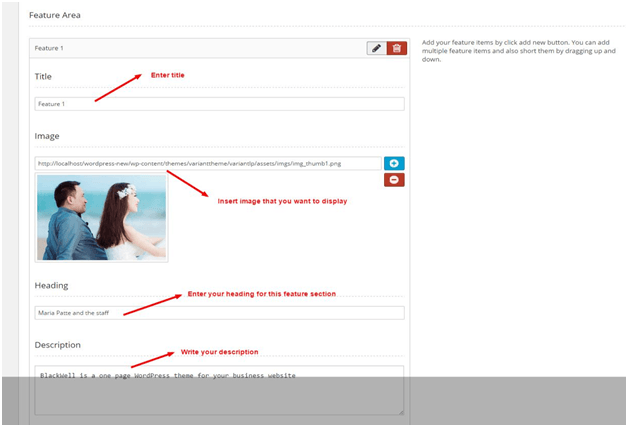
- You can add as many numbers of feature you want to do so click on “Add New” button and enter the required content.
- Hit save button to save all your setting and values.
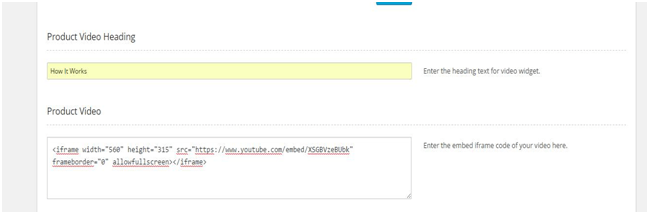
Add Video To display a video about your product on homepage Go To Theme options panel> general setting> video section enter a suitable heading in product video heading section. Enter your video embed iframe code and then hit the save button to see the changes.
Add Social Icons To add a social icon on your site all you need to do is just add your social account link on given input fields present in Social icon section then hit save button, you can see social icon added to your account.
To Set, Footer To set your own footer text
Go to theme options panel-> Footer text Here you can enter a text that will be displayed in the footer of the Homepage.
Follow the same method with other landing pages just click that template fill it up with your desired value and follow the instruction given on the right side of the theme options panel.
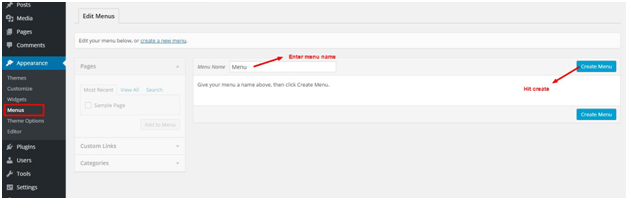
How to Create Menu Not all but some template design support menu at the bottom of the page so if you want you can add menu and let your users navigate to other related pages.
Creating the menus is very simple. Follow the directions provided below: Go to Dashboard >Appearance >Menus
Then, click on ‘create a new menu’ >Enter Menu Name, let’s say ‘Menu’. Click on Create Menu. The menu is created.
Now select the menu location where you want this menu to appear. Check mark both Main Menu and FrontPage menu if you want to show the same menu in both the locations.
Next step is to add the menu you can add the menu list from the left side panel. If you want your pages to add in the menu select the pages and then click “Add Menu button”.
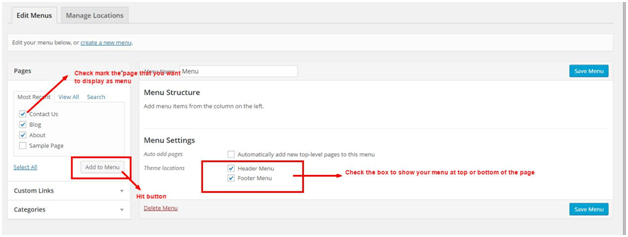
To add the custom link click on Custom Link Just below the Pages, as soon as you click on link 2 input field will appear in the first field enter the URL and on the second field enter the name and then hit “Add Menu” button.
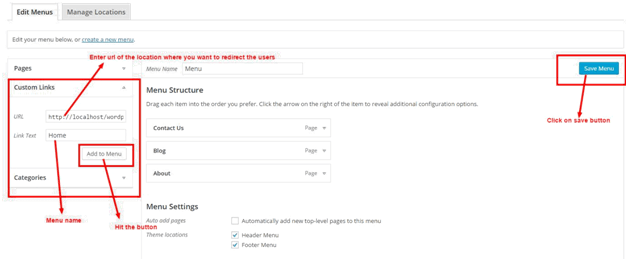
Same way you can add a category to a menu. you can also drag and drop your fields to change the position of the menu.
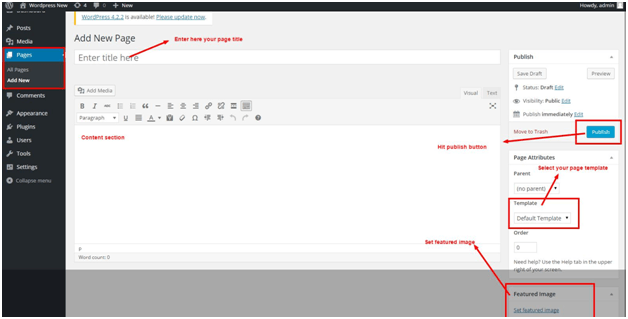
Create Pages To create a page, follow these steps:
Go to Dashboard ->Pages->Add New
Enter your page title and content, select page template if you want, and then click on ‘Publish’.
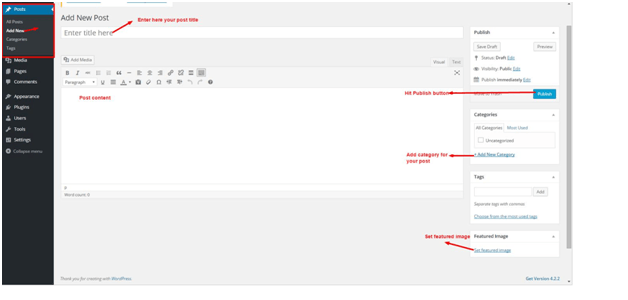
How to Create Blog Page and Blog Post Just follow the above mention
steps to create a blog page and in template option choose a blog and click “Publish” button.
Follow these steps for creating a blog post: Go to Dashboard >Posts >Add New Create your post, add images from the ‘Add Media’ option.
Like other themes of InkThemes, this Variant Landing Page Theme is also extremely easy to install and setup and you’d love creating your website with this theme.
Let us know if you need further assistance, you can contact us from here: https://www.inkthemes.com/contact-us/
We will be glad to assist you.
For more help, you can explore our Support Forum and FAQs –
Forum Link: InkThemes Community
FAQs Link: https://www.inkthemes.com/community/forums/frequently-asked-queries-faq.174/
