“Themia Pro WordPress Theme” Documentation by InkThemes.com
Introduction : Themia Pro is one of the most uniquely designed WordPress themes to build your responsive business website and works for various niches, it combines pure elegance with superb technical qualities and timeless design. It saves time and lot of hassles if you need a website that perfectly represents your business.
Themia Pro comes with WooCommerce Integration that will help you to create your online stores in minutes.
It just requires a single click to get installed and requires less than a minute to get your website ready.
Documentation guides in the following sections:
1). To Install The “Themia Pro” Theme
2). Easy “InkThemes Pro” Options
3). WooCommerce plugin Integrated
4). Creating Different Pages
5). To Add New Post on the blog page
6). Building Menus
7). Adding Widgets
To Install The “Themia Pro” Theme
To install this theme you must have a working version of WordPress. If you need help installing WordPress.
Then, Follow this link: https://codex.wordpress.org/Installing_WordPress
After Installing WordPress you can see “Dashboard” which is also known as
“Administration panel” through which all settings can be managed and it helps you to easily customize your website.
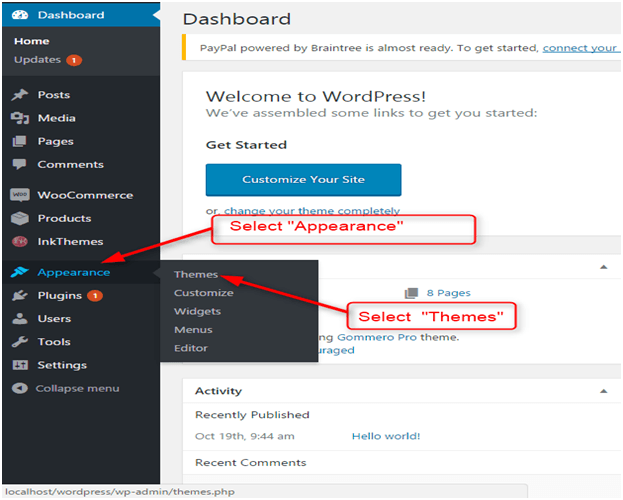
Step 1 – For installing Themia Pro theme, you have to select “Appearance” click on “Themes” and upload the theme. Just follow the simple process given below:
Dashboard➡Appearance➡Themes
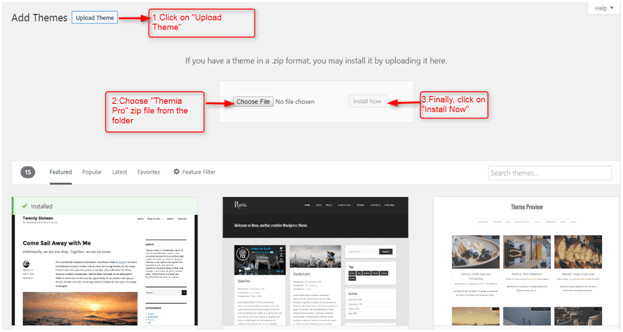
After selecting “Themes”, a new window will appear with some sample themes.
Step 2 – To upload your theme choose “Add New” then click on the “Upload Theme” button to upload your theme from the respective folder. You can install the “Themia Pro Theme” by uploading it from destination folder and “Activate” it.
Dashboard➡Themes ➨ Add New ➨ Upload Theme
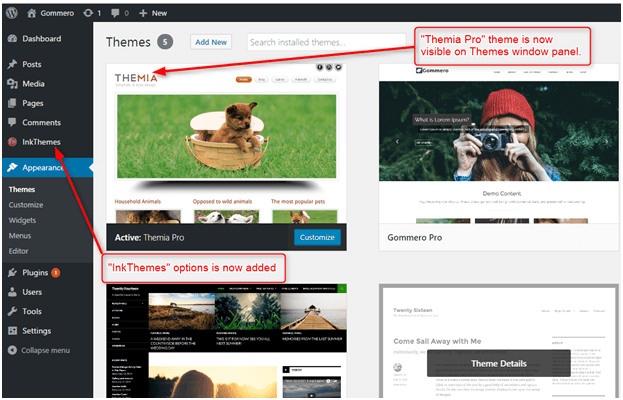
After installing the theme, it will automatically appear on “Themes window panel” and you can also see “InkThemes” option added in the “Dashboard” sidebar.
Easy “InkThemes” Options
It comes with “Themia pro options” panel through which you can control almost everything in your website. You can operate all settings from the “InkThemes” options.
-
General Settings
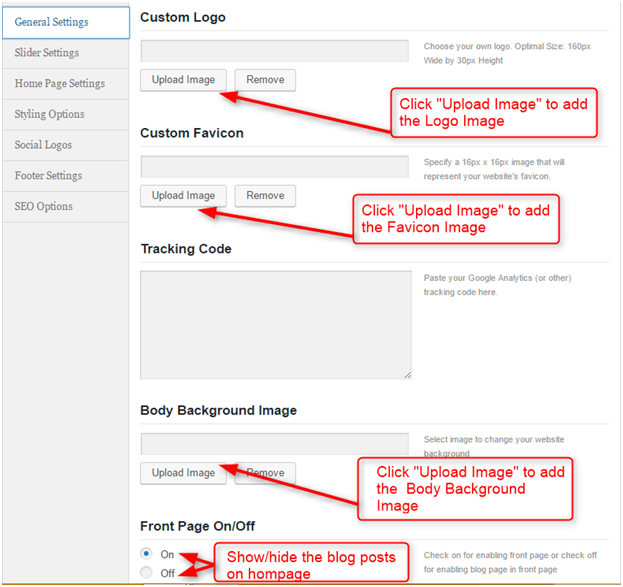
Dashboard➡InkThemes➡General Settings
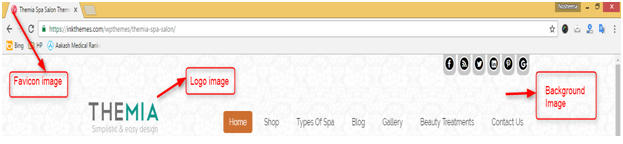
Upload Logo & Favicon of your website:
It grants you to upload your own business logo, favicon and body background Image. You have to just click on “Upload Image” button and choose the specific image from the folder. Through “General Settings” you can also track the status of your website by pasting “Google analytics (or other) tracking code” in a “Tracking Code field” which helps in collecting data from the websites. Moreover, you can turn on/off the blog section on your homepage. Then, finally click on “Save All Changes” to save all the settings.
See how it appears in the front end:
-
Slider Settings
You can upload the images for your slider through the “Slider Settings” option. You can provide the link URL for that particular slide.You can embed high-quality images in slider section.
Dashboard➡InkThemes➡Slider Settings
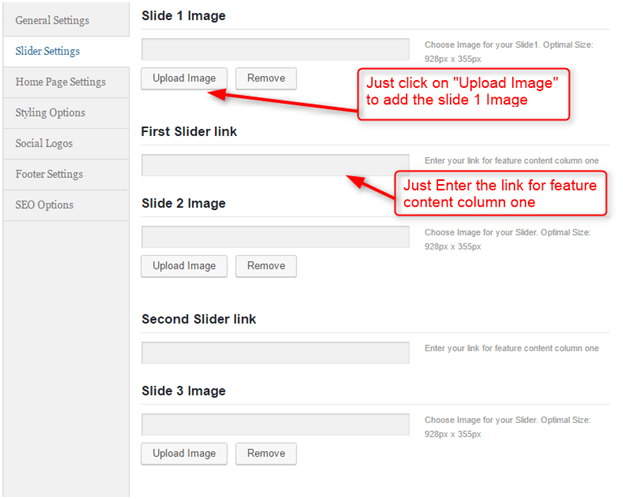
You can follow this similar process to fill all the fields of the slider images. You can set maximum of six images with links given in “slider settings” option and you can put the images according to the optimal recommended size. Then, click on “Save All Changes” button to save the settings.
Now, See the snapshots of the slider Images added:

-
Home Page Settings
Homepage settings will help you to customize the homepage of your website.
Dashboard➡InkThemes➡Home Page Settings
Three column feature area :
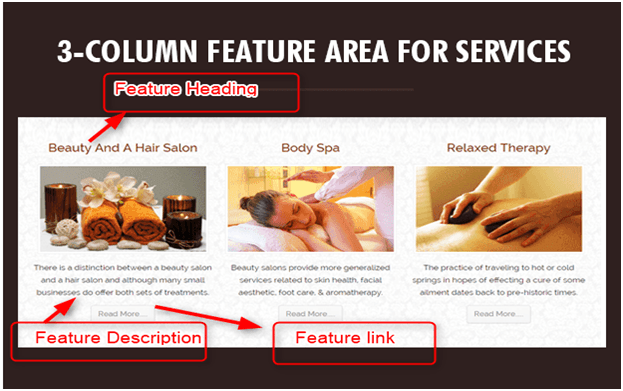
You can showcase your team members or business features through the feature area column and it allows you to display all feature images along with the proper heading and description. You can also provide the link for your particular service through the Feature link option.
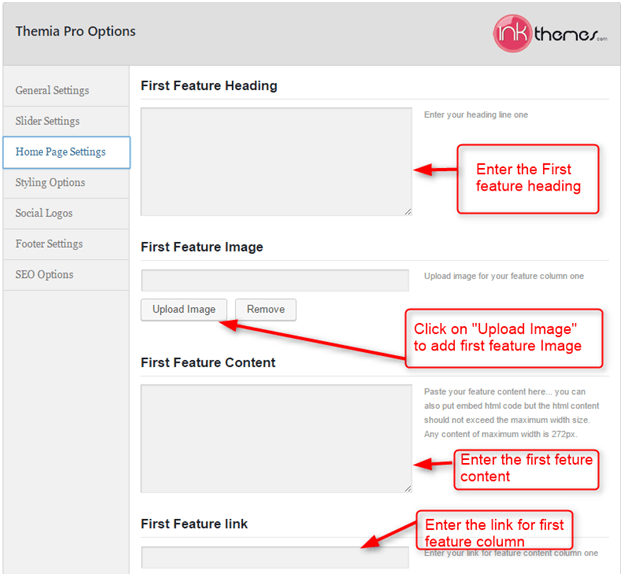
Follow the same procedure to fill all the required fields to show all the three column feature area. Then, finally you save the content by clicking on “Save All Changes” button.
Your 3-column feature area on front end will be displayed as:
Add multiple feature boxes by using the shortcode:
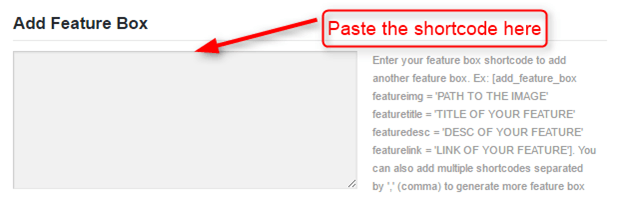
You can add more feature boxes according to your need by writing shortcodes separated by comma.
Shortcode is here:
[add_feature_box
featureimg = ‘PATH TO THE IMAGE’
featuretitle = ‘TITLE OF YOUR FEATURE’
featuredesc = ‘DESC OF YOUR FEATURE’
featurelink = ‘LINK OF YOUR FEATURE’]
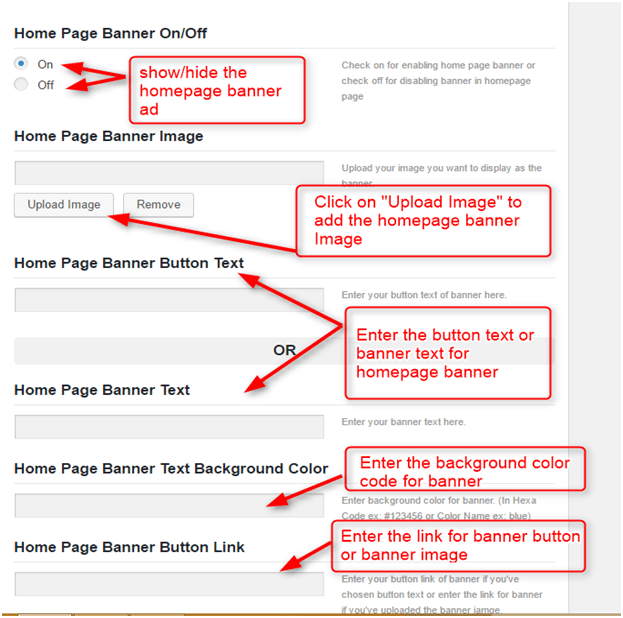
Option to show Ad banner on the homepage :
Themia Pro WP Theme lets you put a Banner Image on the homepage along with the description and a Banner Button. You can show/hide the Banner Section by selecting on/off Option. You can set the background color for your banner text by using color code ex- #455543 or color name ex – blue.

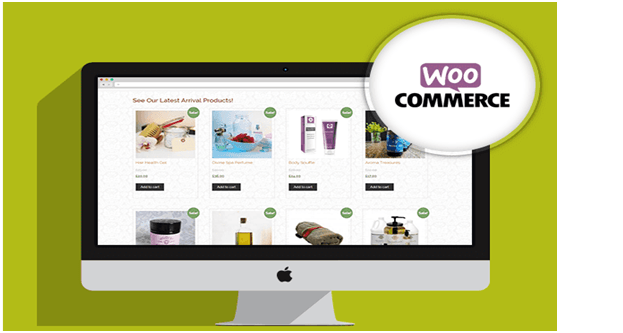
WooCommerce Plugin
WooCommerce is a powerful, extendable eCommerce plugin that helps you sell anything. First, you have to download the plugin through this link
https://wordpress.org/plugins/woocommerce/ Then, go to
Dashboard➡Plugins➡ Add new➡Upload plugins
Then, choose the appropriate zip file and from the folder and click on “Install Now” button to install it. After installing you can learn about each and every menu option through WooCommerce documentation by visiting this link: https://docs.woocommerce.com/documentation/plugins/woocommerce/getting-started/
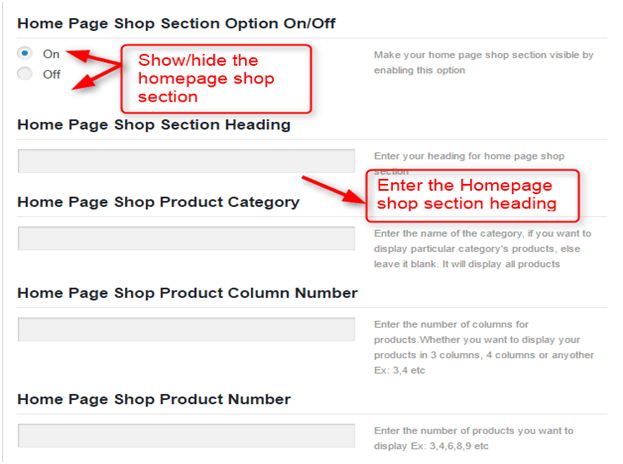
You can show all the products through the Home page Settings option with the Homepage shop section. You can provide the headings to this section and also present them according to your wish.
After Integrating the WooCommerce plugin and setting up wizard automatically shop, cart and checkout page will be created on the homepage.
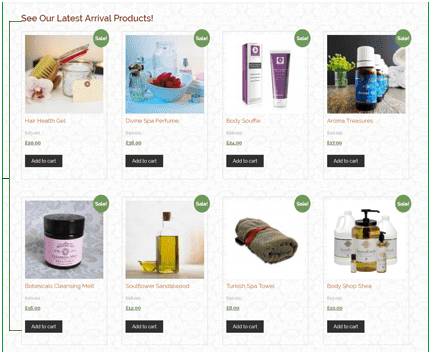
Manage the product on homepage by filling the required options –
After adding products your shop page will look this:
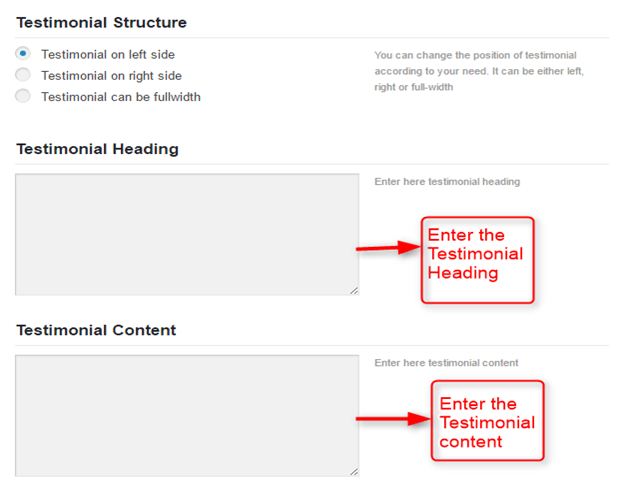
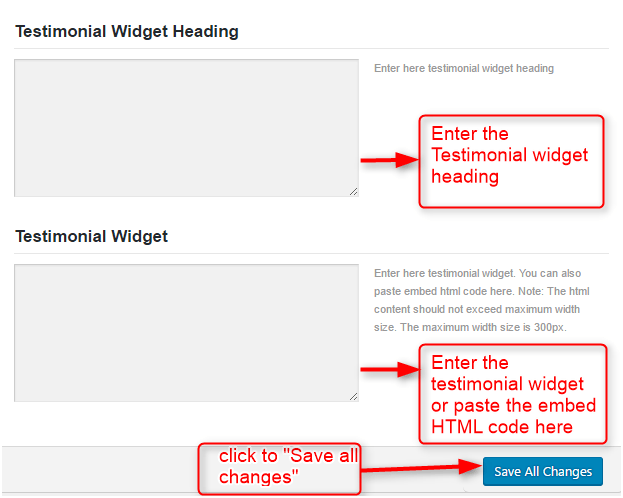
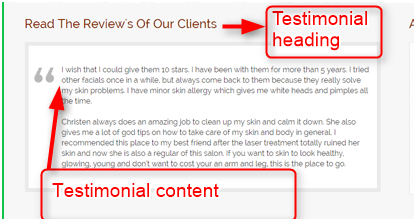
Testimonial section:
You can write the best reviews for your business services. You can change the structure of the testimonial division as you can set it as left, right or full width.
See how it looks :
-
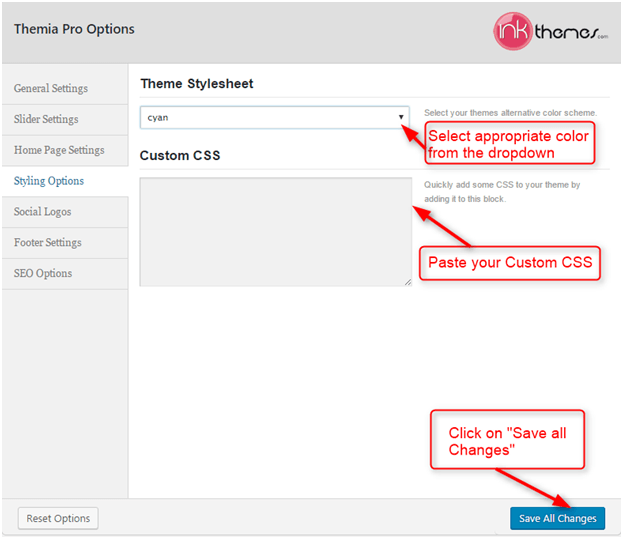
Styling Options:
You can change the style of your website with the “Styling Options”. You can change the color of your theme by choosing 9 different predefined colors to make your website more attractive. There is “Custom CSS” field in the “styling options” where you can write HTML or CSS code and make small tweaks to the website
Dashboard➡InkThemes➡Styling Options
-
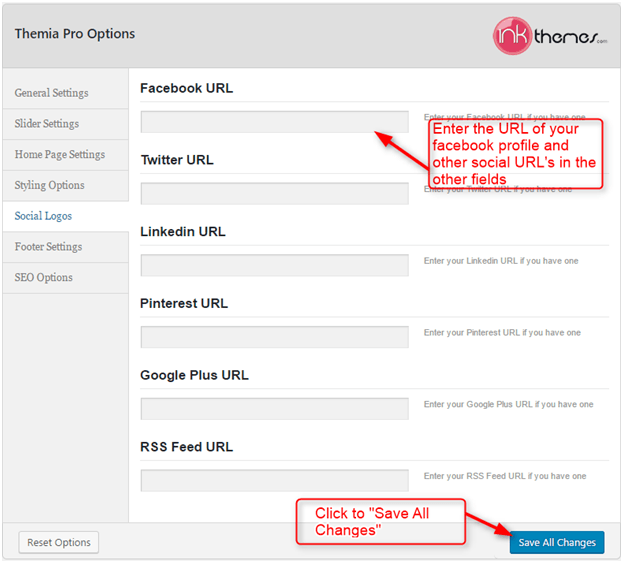
Social Logos:
If you want that the visitors can see your business profile on Facebook, Twitter and RSS feed. Then, they can click on a particular social icon to visit your profile. All the social icons will display in the footer.
Dashboard➡InkThemes➡Social Network Icons
-
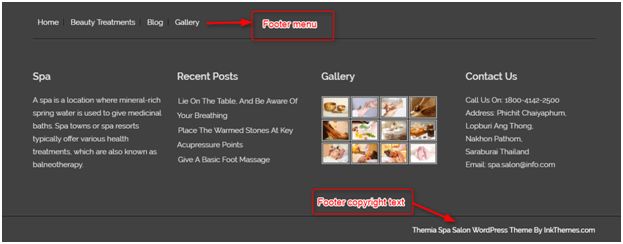
Footer Settings:
You can write the copyright text at the footer section. You can also turn on/off the footer menu by choosing the suitable radio button.
Dashboard➡InkThemes➡Footer Settings

How it appears in the front end:
Creating Different Pages
-
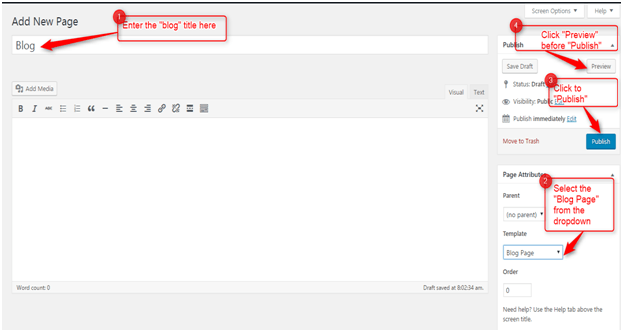
Blog Page
Blog page shows all your blogs post in a separate page. WordPress comes with built-in support for creating a custom home page (static front page), and a separate page for blog posts. To create the Blog page for your website you just have to choose “Blog Page” from the “Page Attributes”.
Dashboard➡Pages➡Add New
How To Add New Post on the blog page
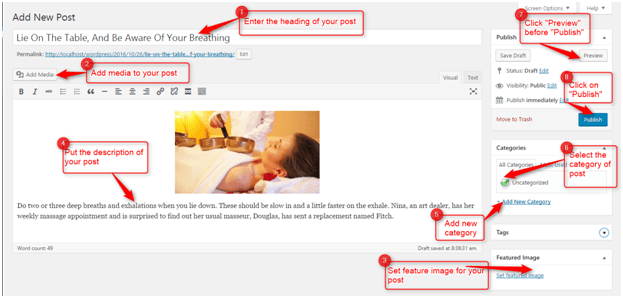
Themia provides many features that blogger will love it. Sticky post, Social share in each post. For creating a new post, just go to “Posts” and click “Add New” from the “dashboard” and start filling the required fields.
Dashboard ➨ Posts ➨ Add New
-
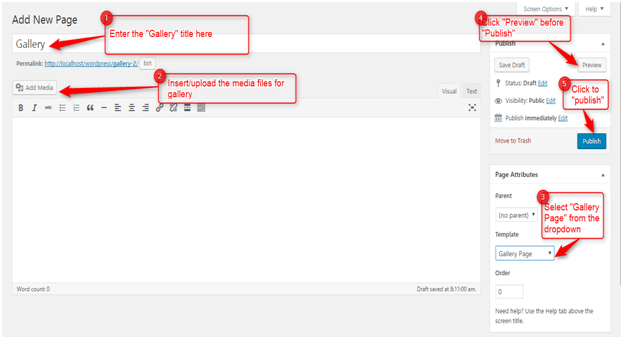
Gallery Page
To create the Gallery page for your website you just have to choose “Gallery Template” from the “Page Attributes”.
Dashboard➡Pages➡Add New
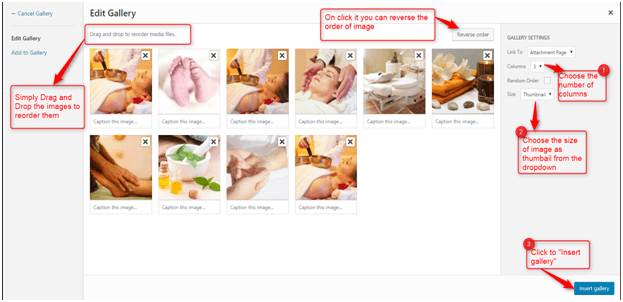
After choosing “Add media” there is an option for “Create Gallery” through which you can create a gallery by selecting files from the folder and click on “Create a new Gallery”.

After clicking “Create a new gallery” there is an option “Edit Gallery” through which you can reorder the images by drag and drop feature and select the file size and define a column to represent them. Then finally click on “Insert gallery”.
-
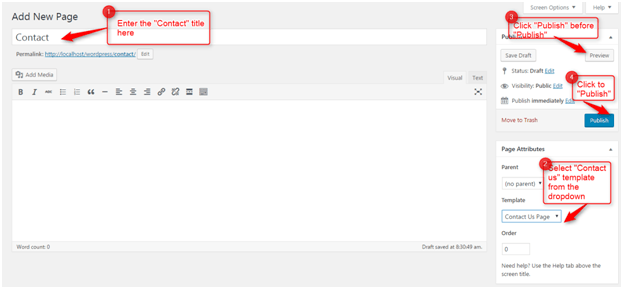
Contact Page
To create the Contact page for your website you just have to choose “Contact Us Page” from the “Page Attributes”.
Dashboard➡Pages➡Add New
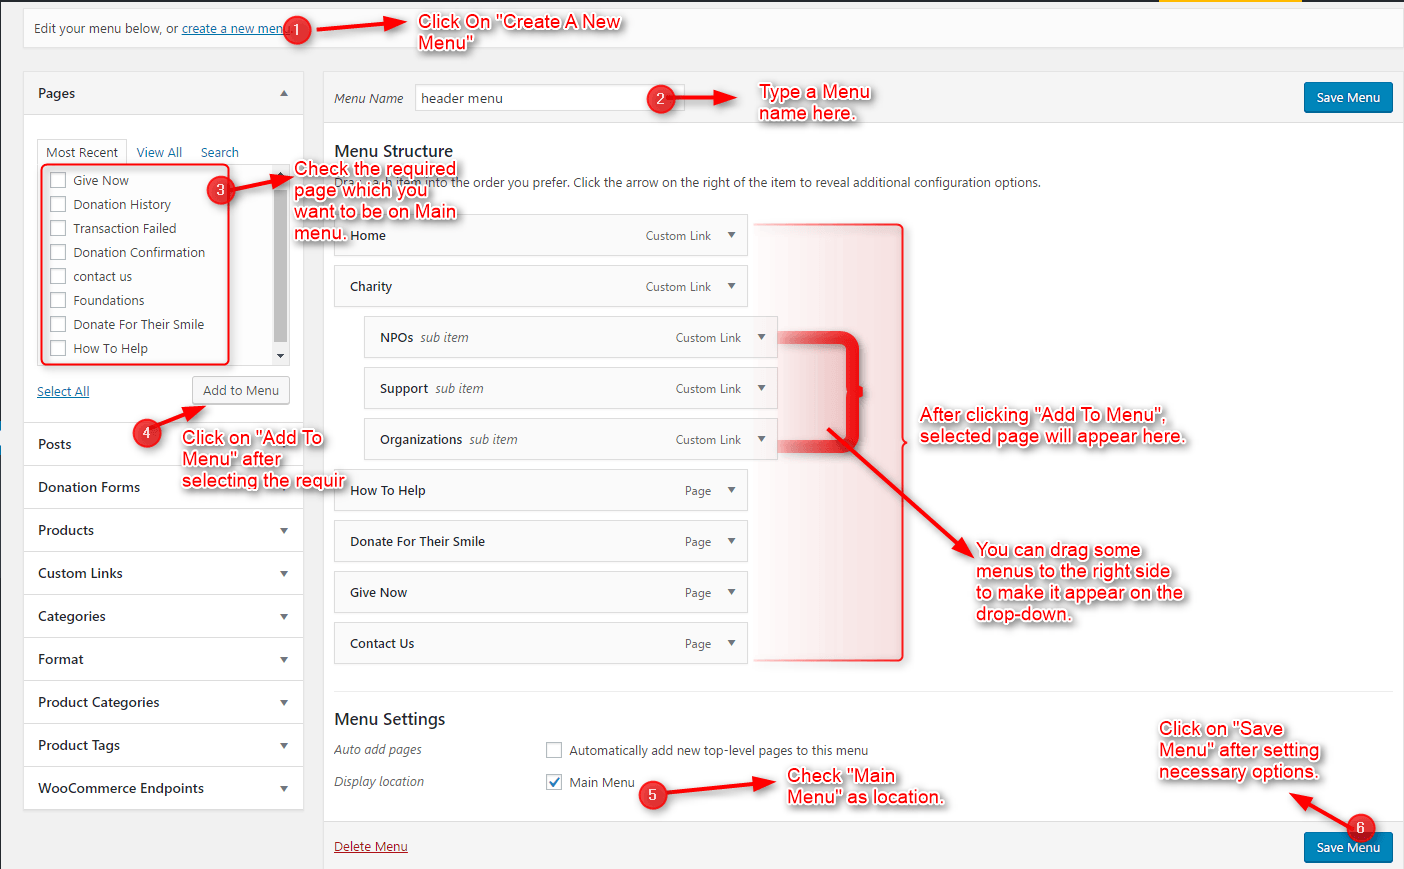
Building Menus
The Theme had a prebuilt feature of displaying all the pages and subpages in the menu.
However, you can also build a custom menu using the Menus option under the “Appearance” Section.
You can also change the order of the menu according to your requirement by simply drag and drop the menu items.
Building Dropdown Menus
For making drop-down menus all you have to do is add a new page.
Then name it for eg. Submenu 1 and set any of your pre-developed pages as a parent page for which you want to create drop-down, after that select template & click publish button.
The similar process you can follow making multiple Submenus.
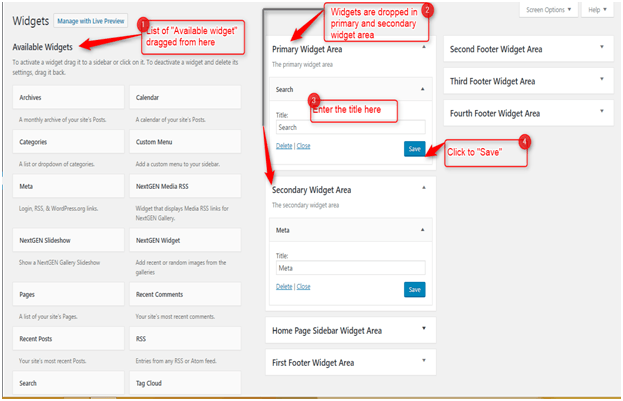
Adding Widgets
A WordPress “Widget” is a small block that performs a specific function. You can add these widgets to sidebars and Footer are also known as widget-ready areas on your web page. WordPress widgets were originally created to provide a simple and easy-to-use way of giving design.
Add widgets in the sidebar:
To add widgets in the sidebar you have to select the particular widget from the “Available Widget” area and simply “Drag and Drop” it into the primary or secondary widget area.
Dashboard➡Appearance➡Widgets
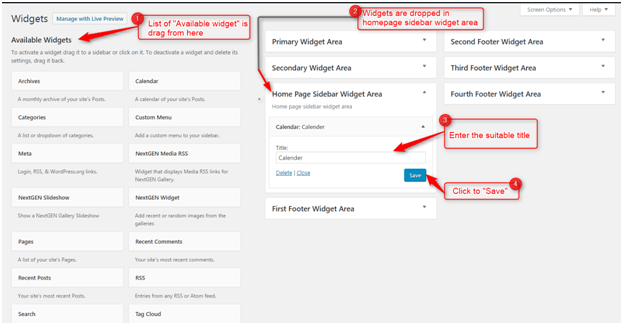
Add widgets in the Homepage sidebar widget area:
You can add the widgets in the homepage sidebar widget area. To add widgets on the homepage you have to select the particular widget from the “Available Widget” area and simply “Drag and Drop” it into the Homepage sidebar widget area.
Dashboard➡Appearance➡Widgets
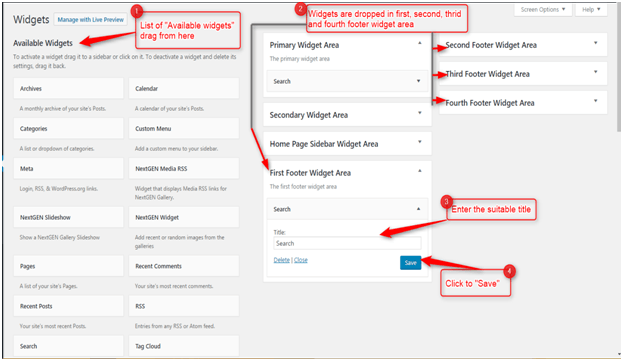
Add widgets in the Footer:
To add widgets in the footer you have to select the particular widget from the “Available widget” area and simply “Drag and Drop” it into the first, second, third or fourth footer widget area.
Dashboard➡Appearance➡Widgets
We would like to thank you for purchasing “The Themia Pro WordPress Theme”. We would be glad to help you if you have any questions relating to this theme. If you have any queries that are apart from the scope of this help file, please feel free to ask any type question on our support forum at https://www.inkthemes.com/support/.
