Description
VendorPro plugin is the latest WooCommerce extension plugin from the Inkthemes which specializes in converting your e-commerce web store into a full-fledged Multi-Vendor site.
Speaking in the simpler terms, the plugin will facilitate the selling of digital as well as physical products by adding various vendors on your multi-vendor platform. As a site admin, you have the right to set a commission rate, create/delete/edit vendors, associate them with certain products, etc.
The VendorPro plugin is a one-click WooCommerce extension compatible with all the WordPress themes.
How To Install The Plugin?
There are two ways to install the plugin on WordPress –
1. Using The WordPress Admin Plugin Upload –
In order to install the plugin through the upload option, you have to follow the path Dashboard → Plugins → Add New → Upload Plugin.
Once you click on the upload plugin button, you are presented with the option to upload the plugin file in the .ZIP format.
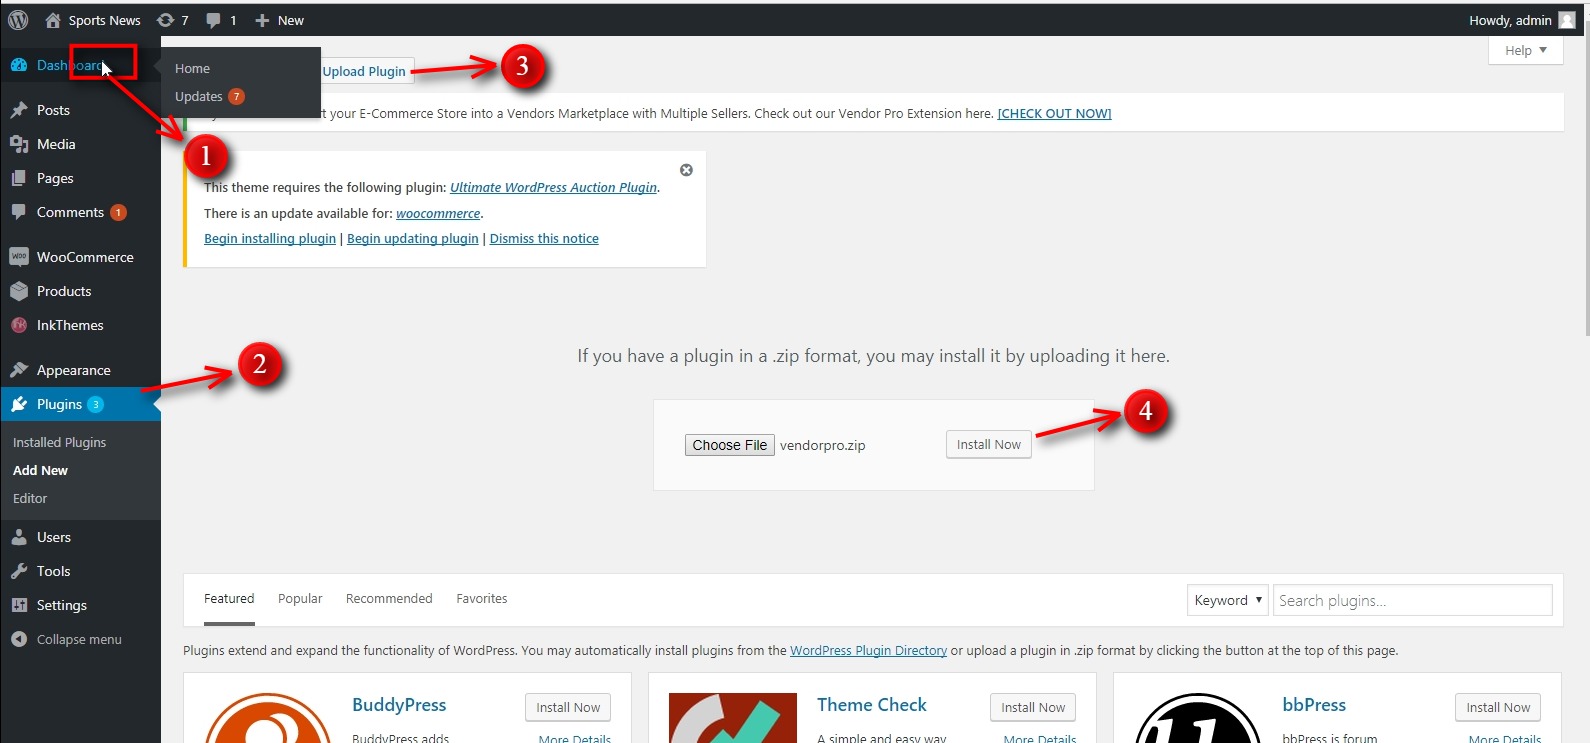
Click on the install button to complete the installation process.
2. Manual Installation Using FTP –
Manual installation of the plugin can be carried out by using FTP client. For this, you have to extract the zip file of the plugin on your computer.
Once the zip file is extracted, you have to manually upload it by accessing the host through the FTP manager.
After the successful installation of the plugin, you can configure its setting to create a multi-vendor environment.
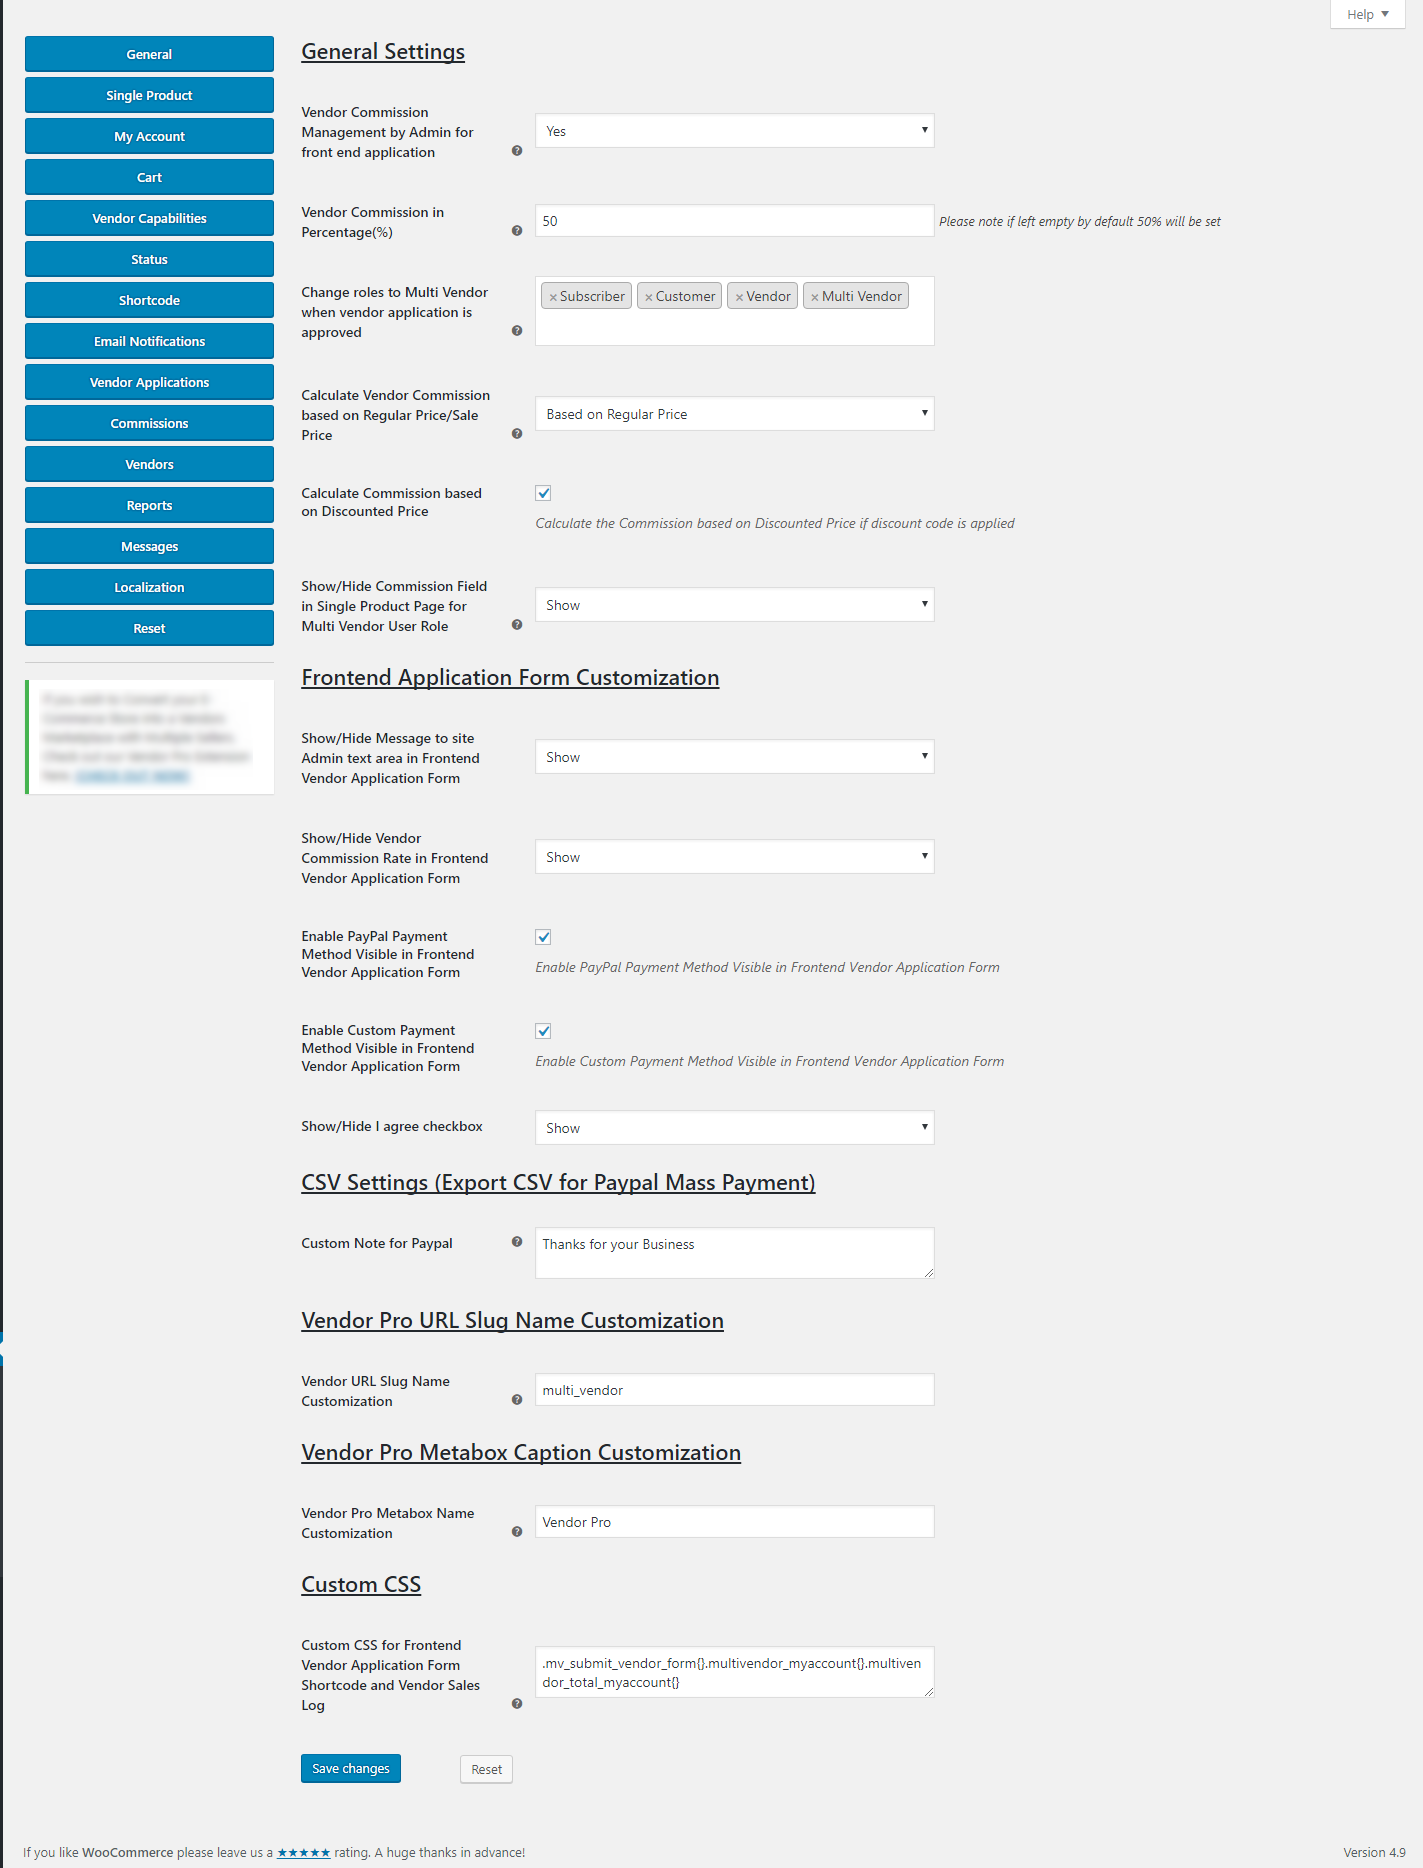
Customizing General Settings Of The Plugin
As said earlier, the VendorPro plugin packs a ton of features and to access/customize the General settings, you have to follow the path –
Dashboard → WooCommerce → VendorPro Options → General
Through general settings, you can set a global commission rate for the vendors, manage frontend application form settings along with other options.
Remember to click on Save Changes button.
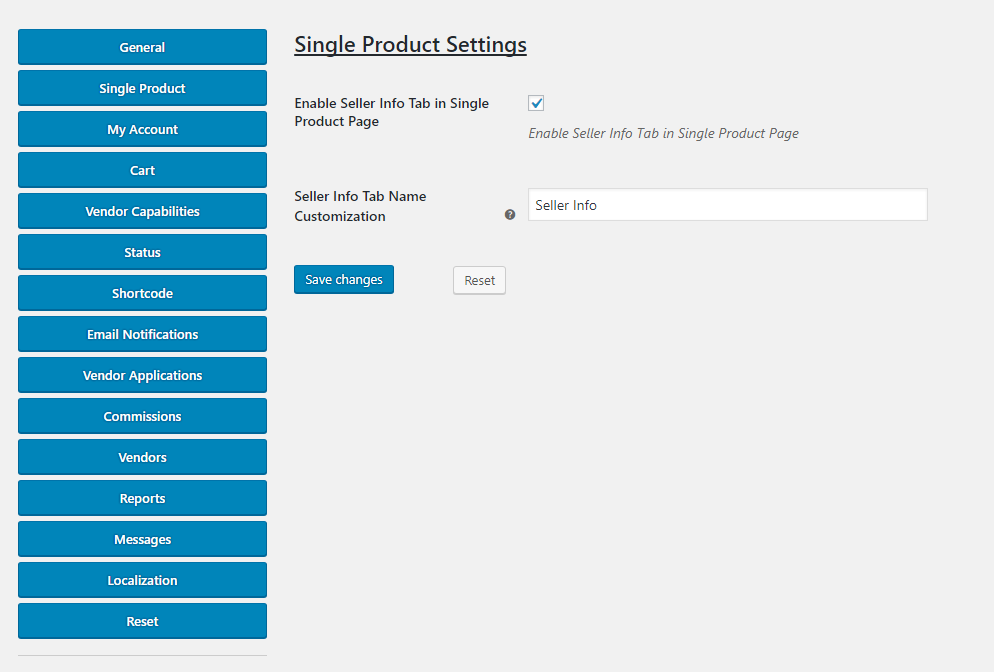
Changing Single Product Settings
The single products setting grants you, as a site admin the privilege to show/hide seller information tab on the single product page.
Follow the path – Dashboard → WooCommerce → VendorPro Options → Single Product
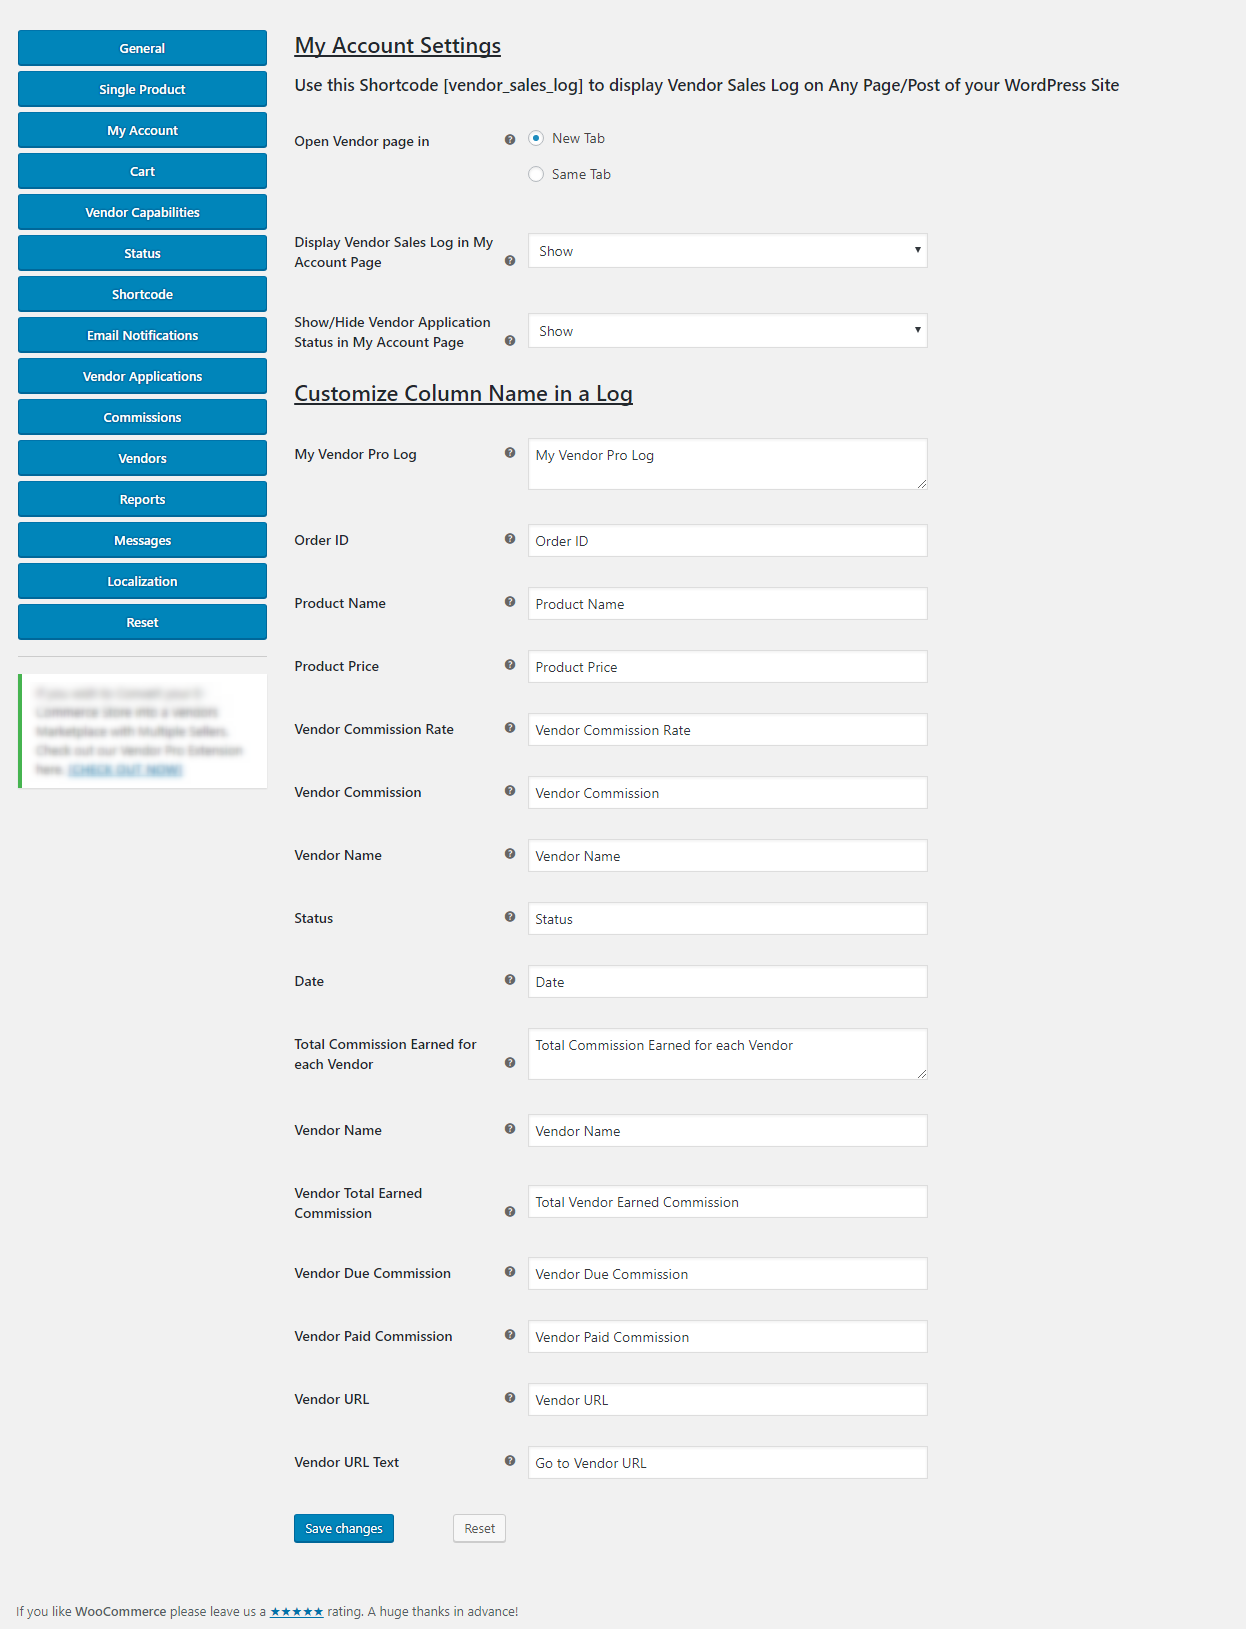
Authorize Vendors To Manage Their Accounts Using My Account Settings –
As an admin, you have the authority to set up a My Account page for vendors on the site. The My Account setting will allow you to showcase many attributes like vendor sales log, application status, product name, price, commission rate, etc.
Just follow the path – Dashboard → WooCommerce → VendorPro Options → My Account
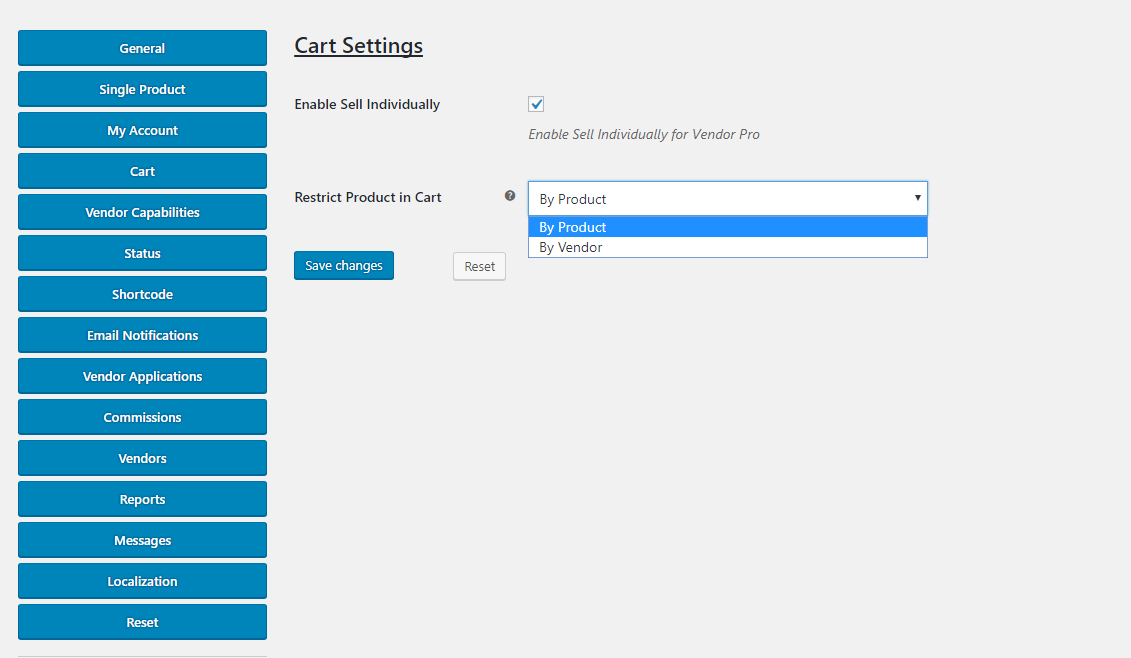
Configure Cart Settings –
This setting is responsible for enabling/disabling vendors to sell individually on your site. You can also restrict product in the cart on the basis of Vendors or Products itself.
Configure the Cart settings by Dashboard → WooCommerce → VendorPro Options → Cart
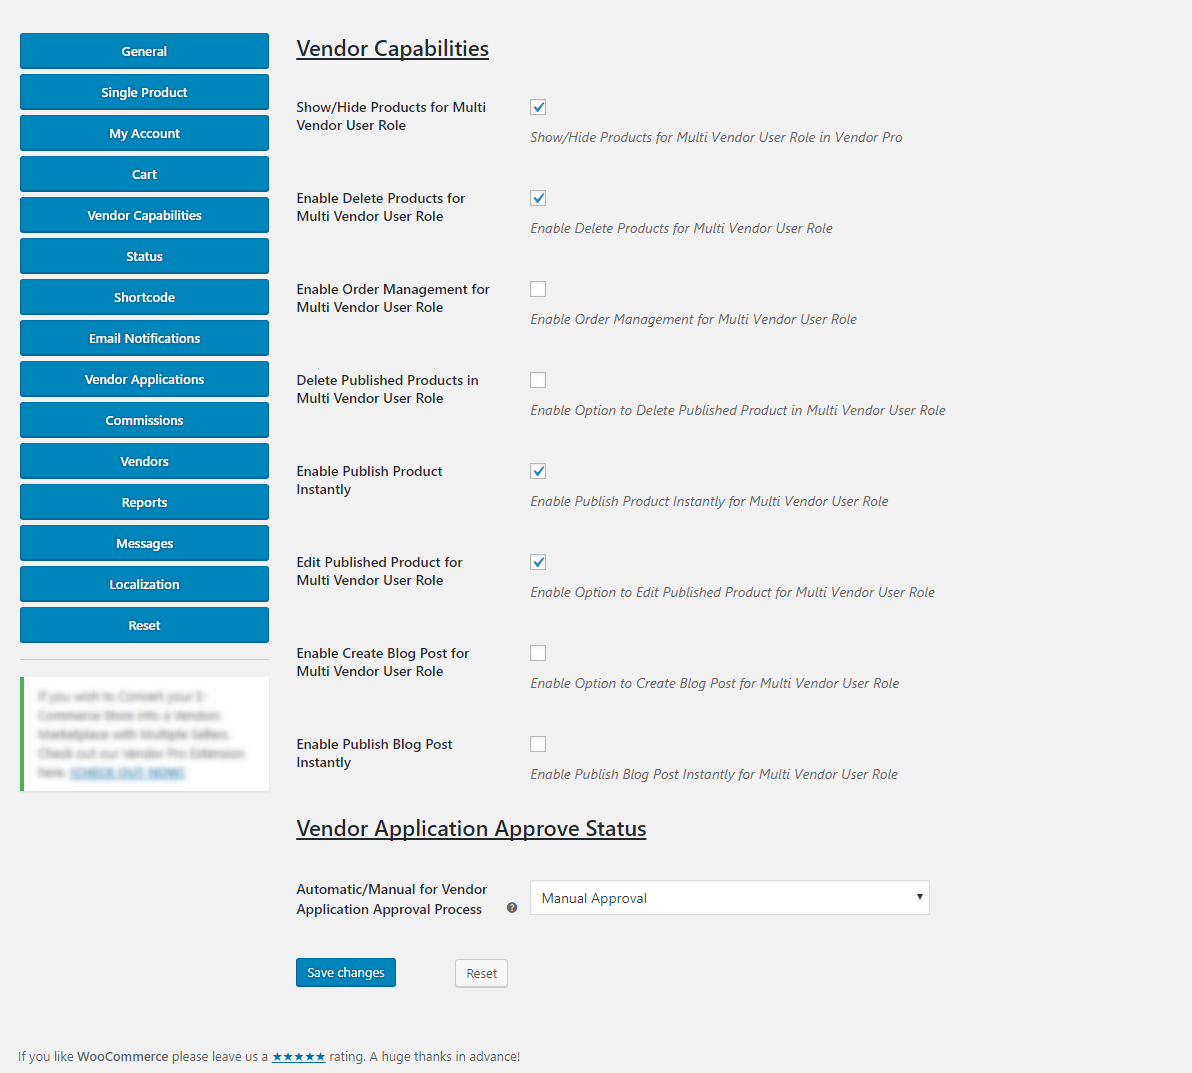
Grant Certain Abilities To Vendors
The Vendor Capabilities setting is responsible for granting certain privileges to vendors like –
- Ability to show/hide products for multi-vendor user role.
- Ability to delete products for multi-vendor user role.
- Enable order management.
- Capability to edit published product for multi-vendor user role.
And various other capabilities.
Follow Dashboard → WooCommerce → VendorPro Options → Vendor Capabilities
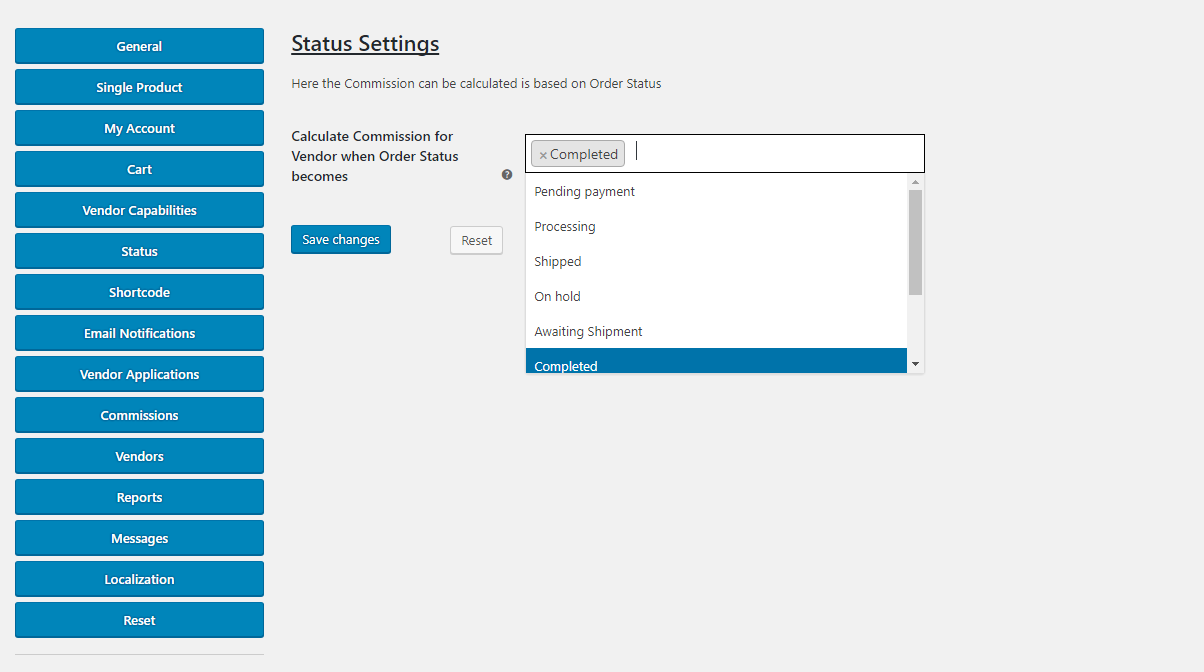
Calculate Commissions Based On Order Status
The Status Setting is responsible for calculating the vendor’s commission rates based on the status of the orders.
The status parameters include –
- Pending payments
- Processing
- Shipped
- On hold
- Awaiting shipment
- Completed
- Cancelled
- Refunded
- Failed
In order to do so, just follow the path – Dashboard → WooCommerce → VendorPro Options → Status
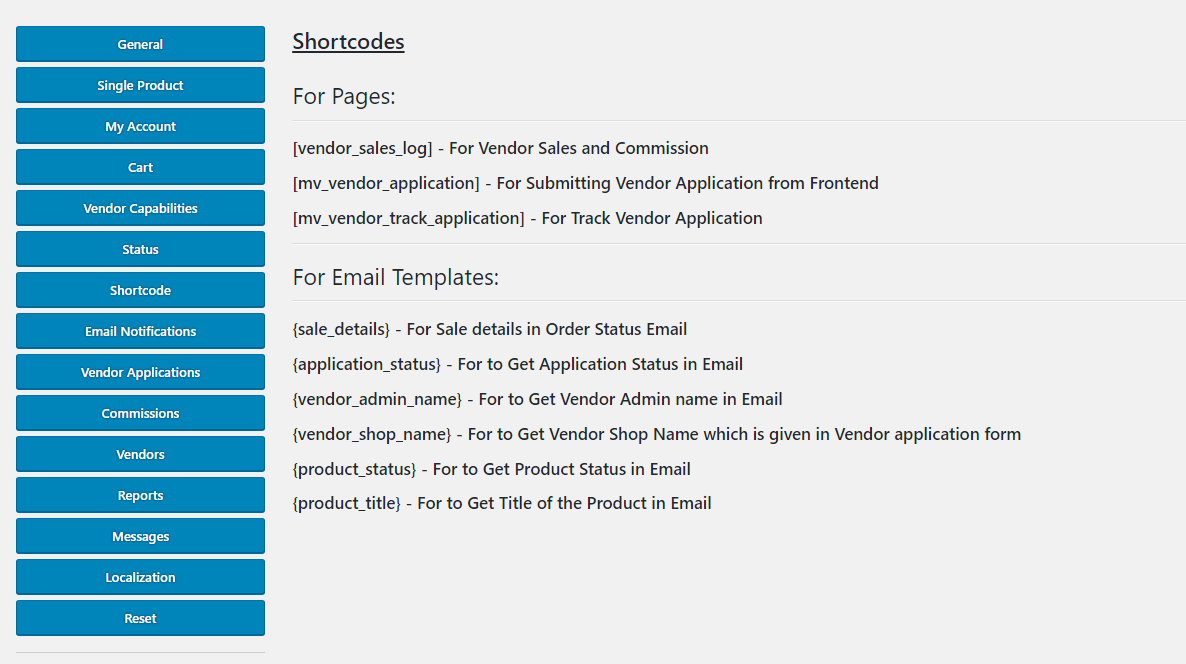
Create Pages or Send Descriptive Emails Using Shortcodes
If you are looking to create a page which displays certain vendor details then you can make use of Shortcodes. The Shortcode for vendors can be helpful in creating pages that feature vendor’s sales and commission, front-end application form for vendors and a page to track vendor application.
Similarly, you can trigger emails which can be made descriptive using Shortcodes. With the help of Shortcodes, emails can now include sale details, vendor’s application status, product status, etc.
You can use these Shortcodes by following – Dashboard → WooCommerce → VendorPro Options → Shortcode
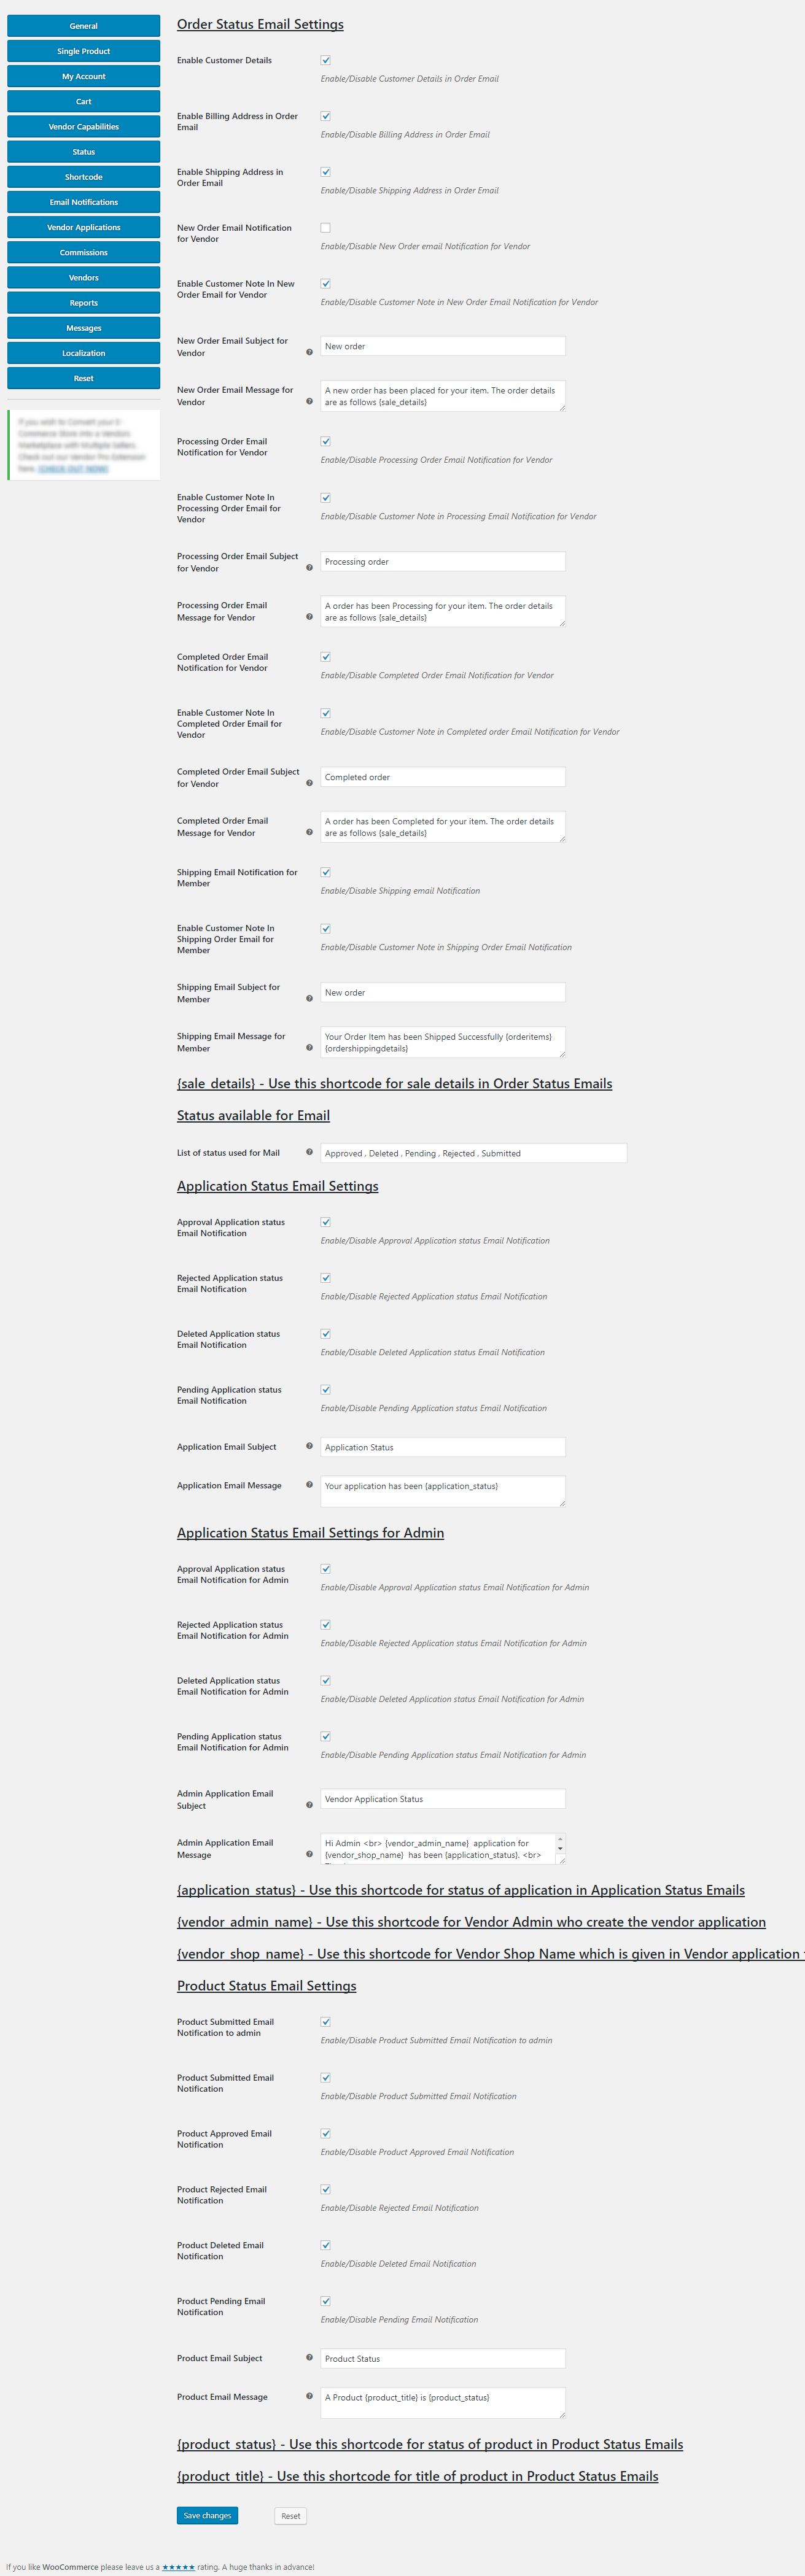
Configure Email Notification Settings –
You get to customize the emails that you send using the Shortcodes using Email Notifications setting along with other basic and advanced settings.
Through Email Notification setting you can customize –
- Order Status Email Settings.
- Application Status Email Settings.
- Application Status Email Settings for Admin.
- Product Status Email Settings.
Follow – Dashboard → WooCommerce → VendorPro Options → Email Notifications
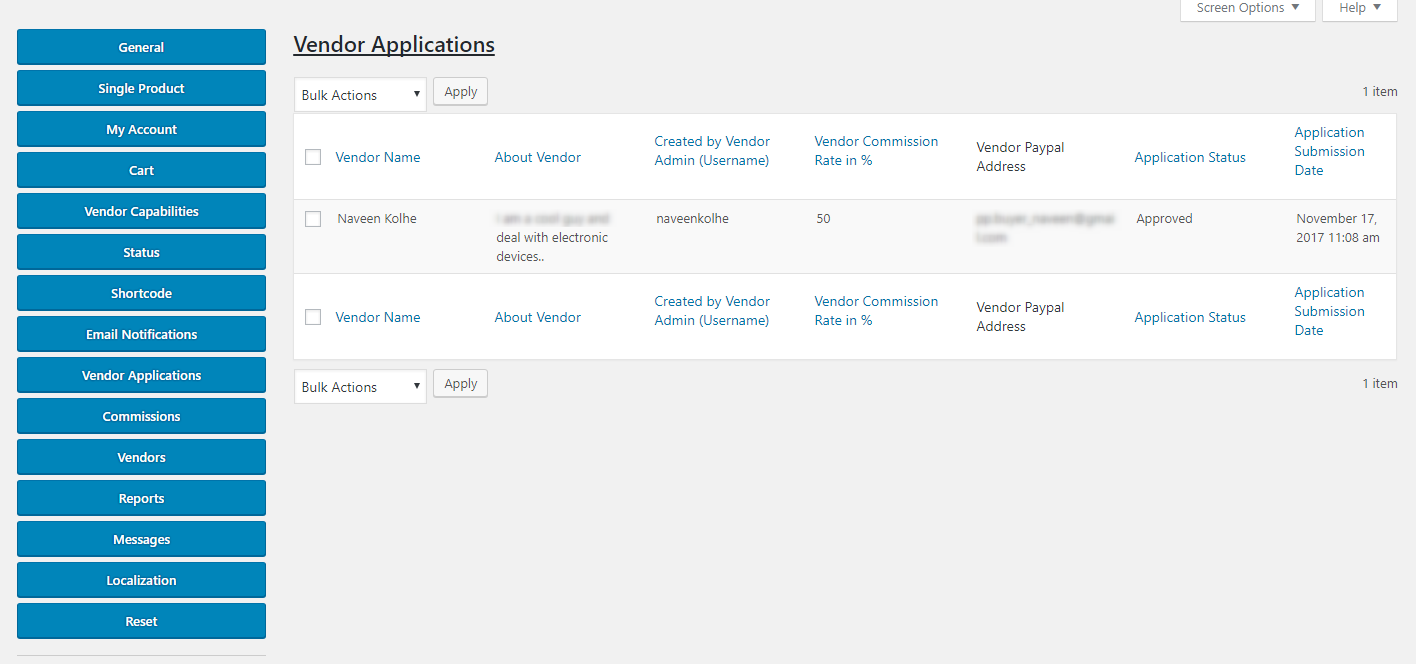
Monitor Incoming Vendor Applications
In order to maintain incoming vendor application, you’ve got to make use of Vendor Application setting.
The setting displays details of vendors like its name, description, commission rate, PayPal address and most importantly application status, along with other information.
The Vendor Application settings can be accessed via Dashboard → WooCommerce → VendorPro Options → Vendor Applications
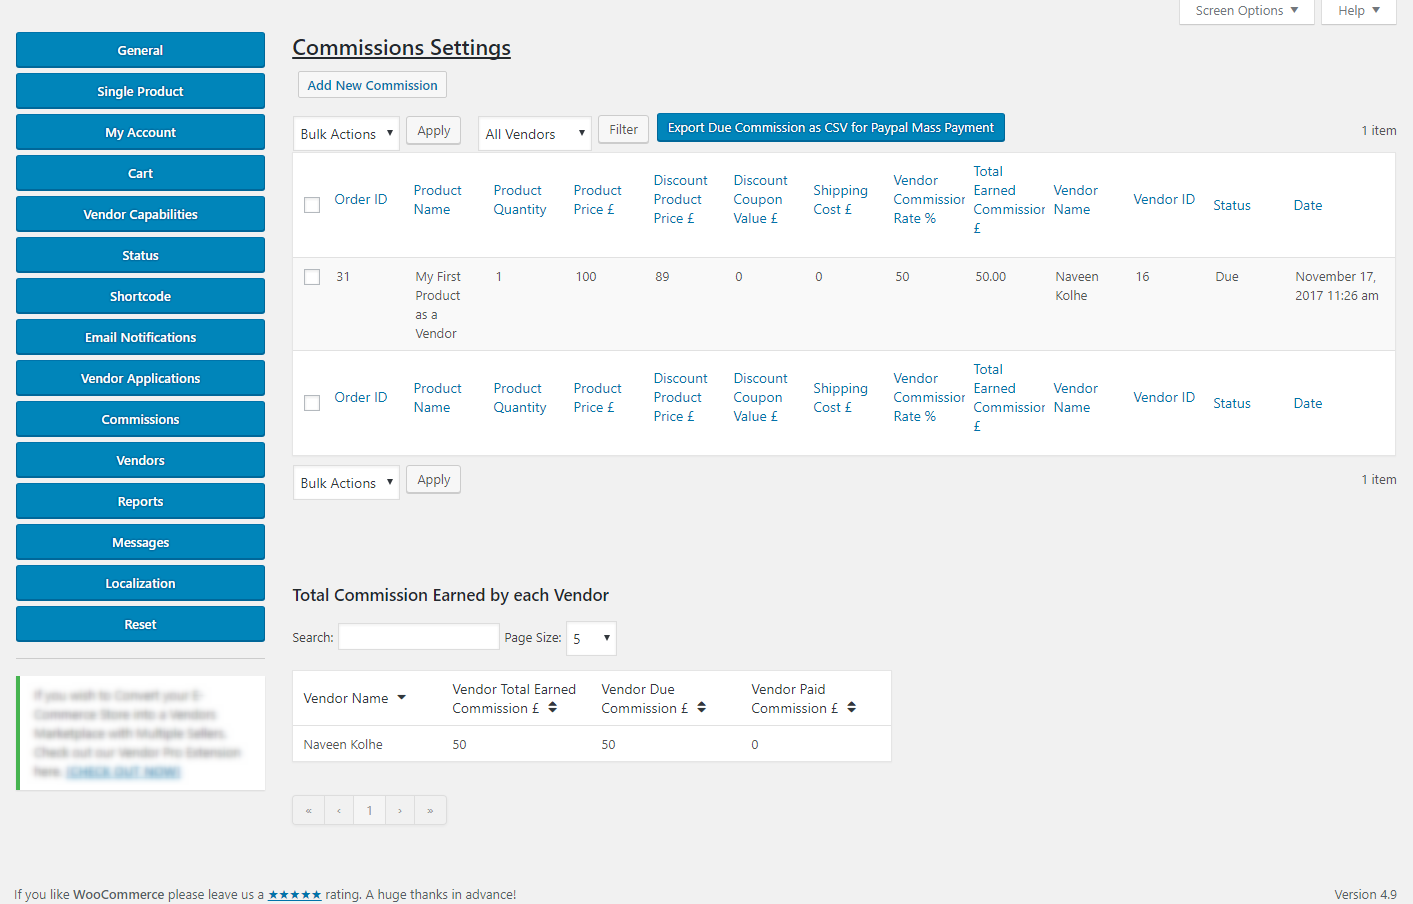
Manage Commissions
This setting lets you monitor and manage incoming commissions from vendors. Along with commission management, you can also see the other associative properties like product name, quantity, price, vendor name, vendor ID, etc.
The setting also enables you to export Due Commission as CSV for PayPal Mass Payment.
Follow the path – Dashboard → WooCommerce → VendorPro Options → Commissions
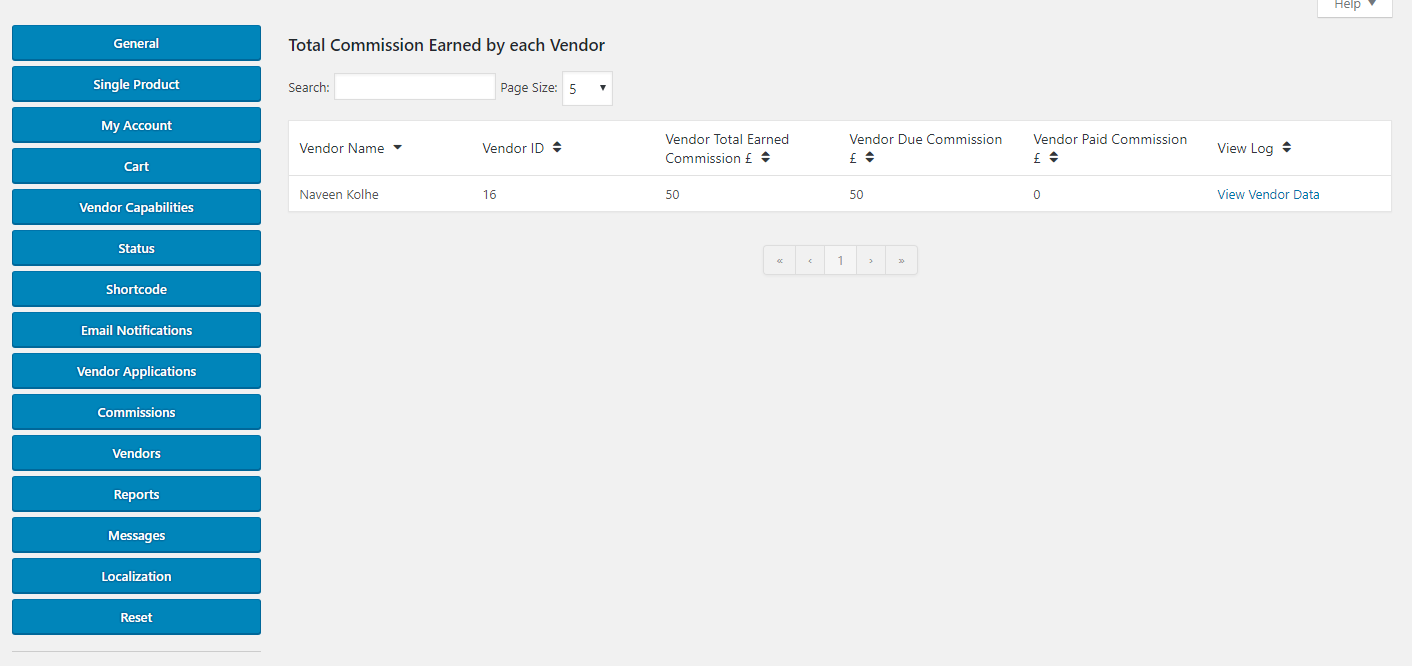
Keep A Tab On Your Vendors
The Vendor setting offers a dedicated display of your vendors along with the total commission earned by each vendor list.
This setting can be accessed by following the path – Dashboard → WooCommerce → VendorPro Options → Vendors
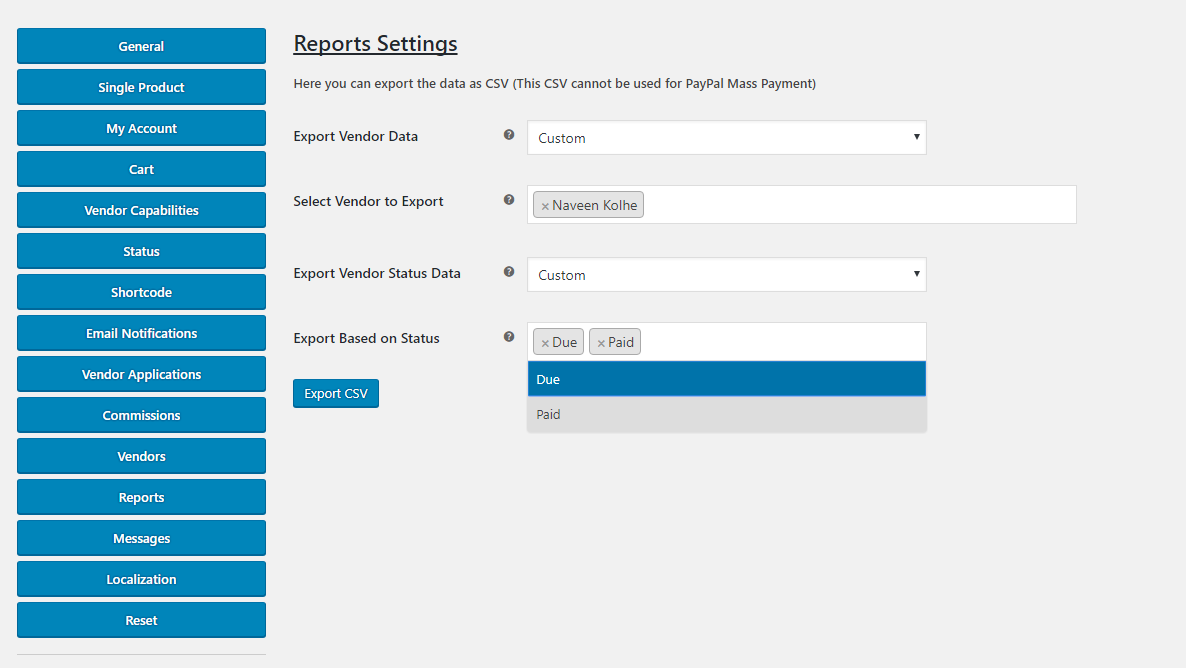
Analyze Your Growth Via Reports
The Vendor Pro plugin permits you to analyze your growth by exporting reports of the following two factors –
- Vendor data – All or custom.
- Vendor status data – All or custom
In order to initiate your exporting process, simply follow the path – Dashboard → WooCommerce → VendorPro Options → Reports
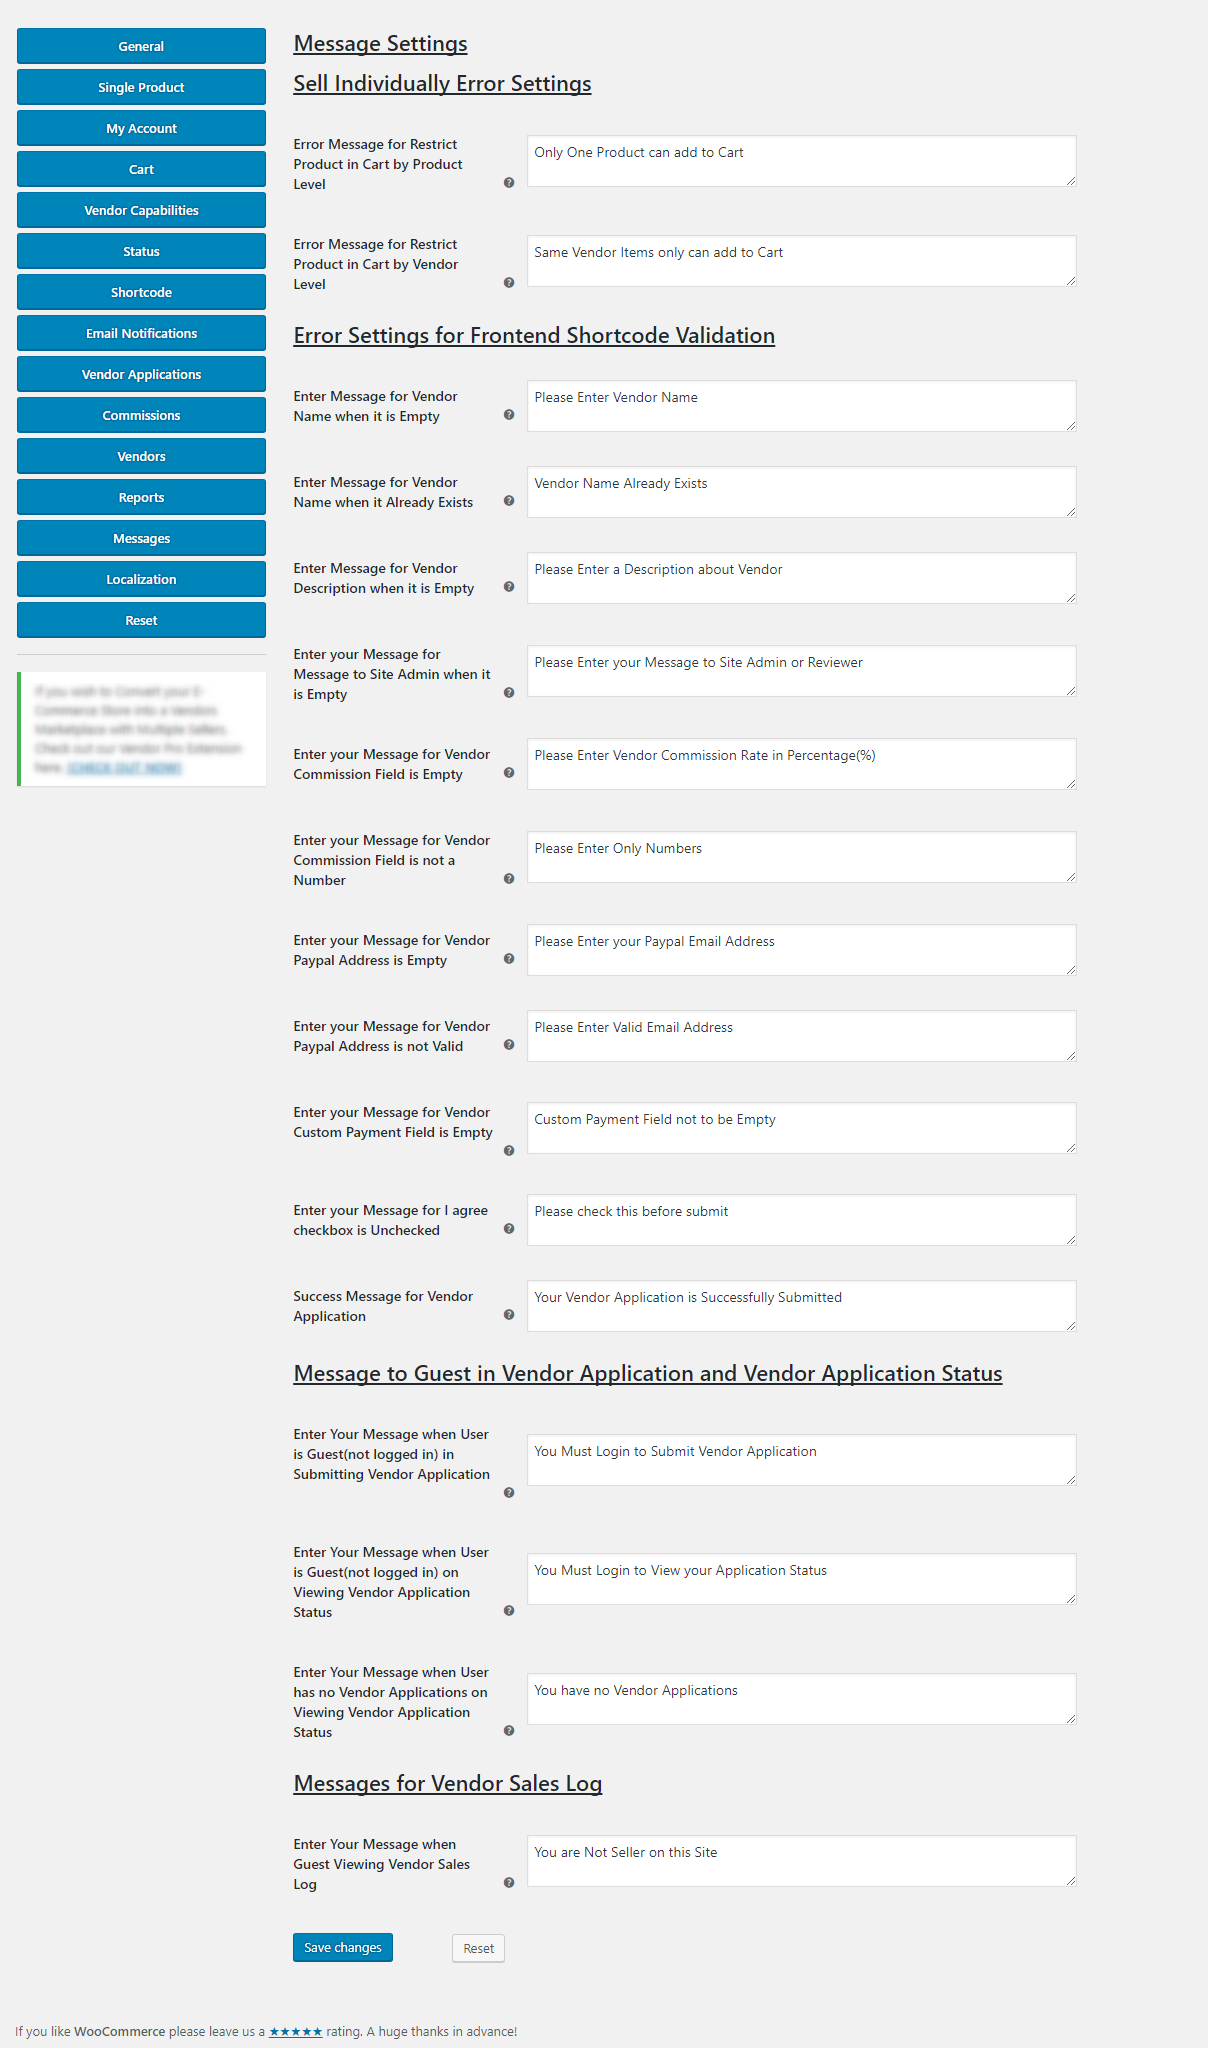
Guide Your Visitors Or Potential Vendors Via Onsite Error Messages
More often than not the visitors/vendors on your site may perform an unauthorized action like viewing vendor application status without logging in the account, incomplete form, etc. So to guide or inform them, the Message setting allows you to customize the error messages.
The list of error messages include setting for –
- Sell individually error setting.
- Error setting for front-end shortcode form validation.
- Message to guest in vendor application and vendor application status.
- Vendor sales log.
Dashboard → WooCommerce → VendorPro Options → Messages
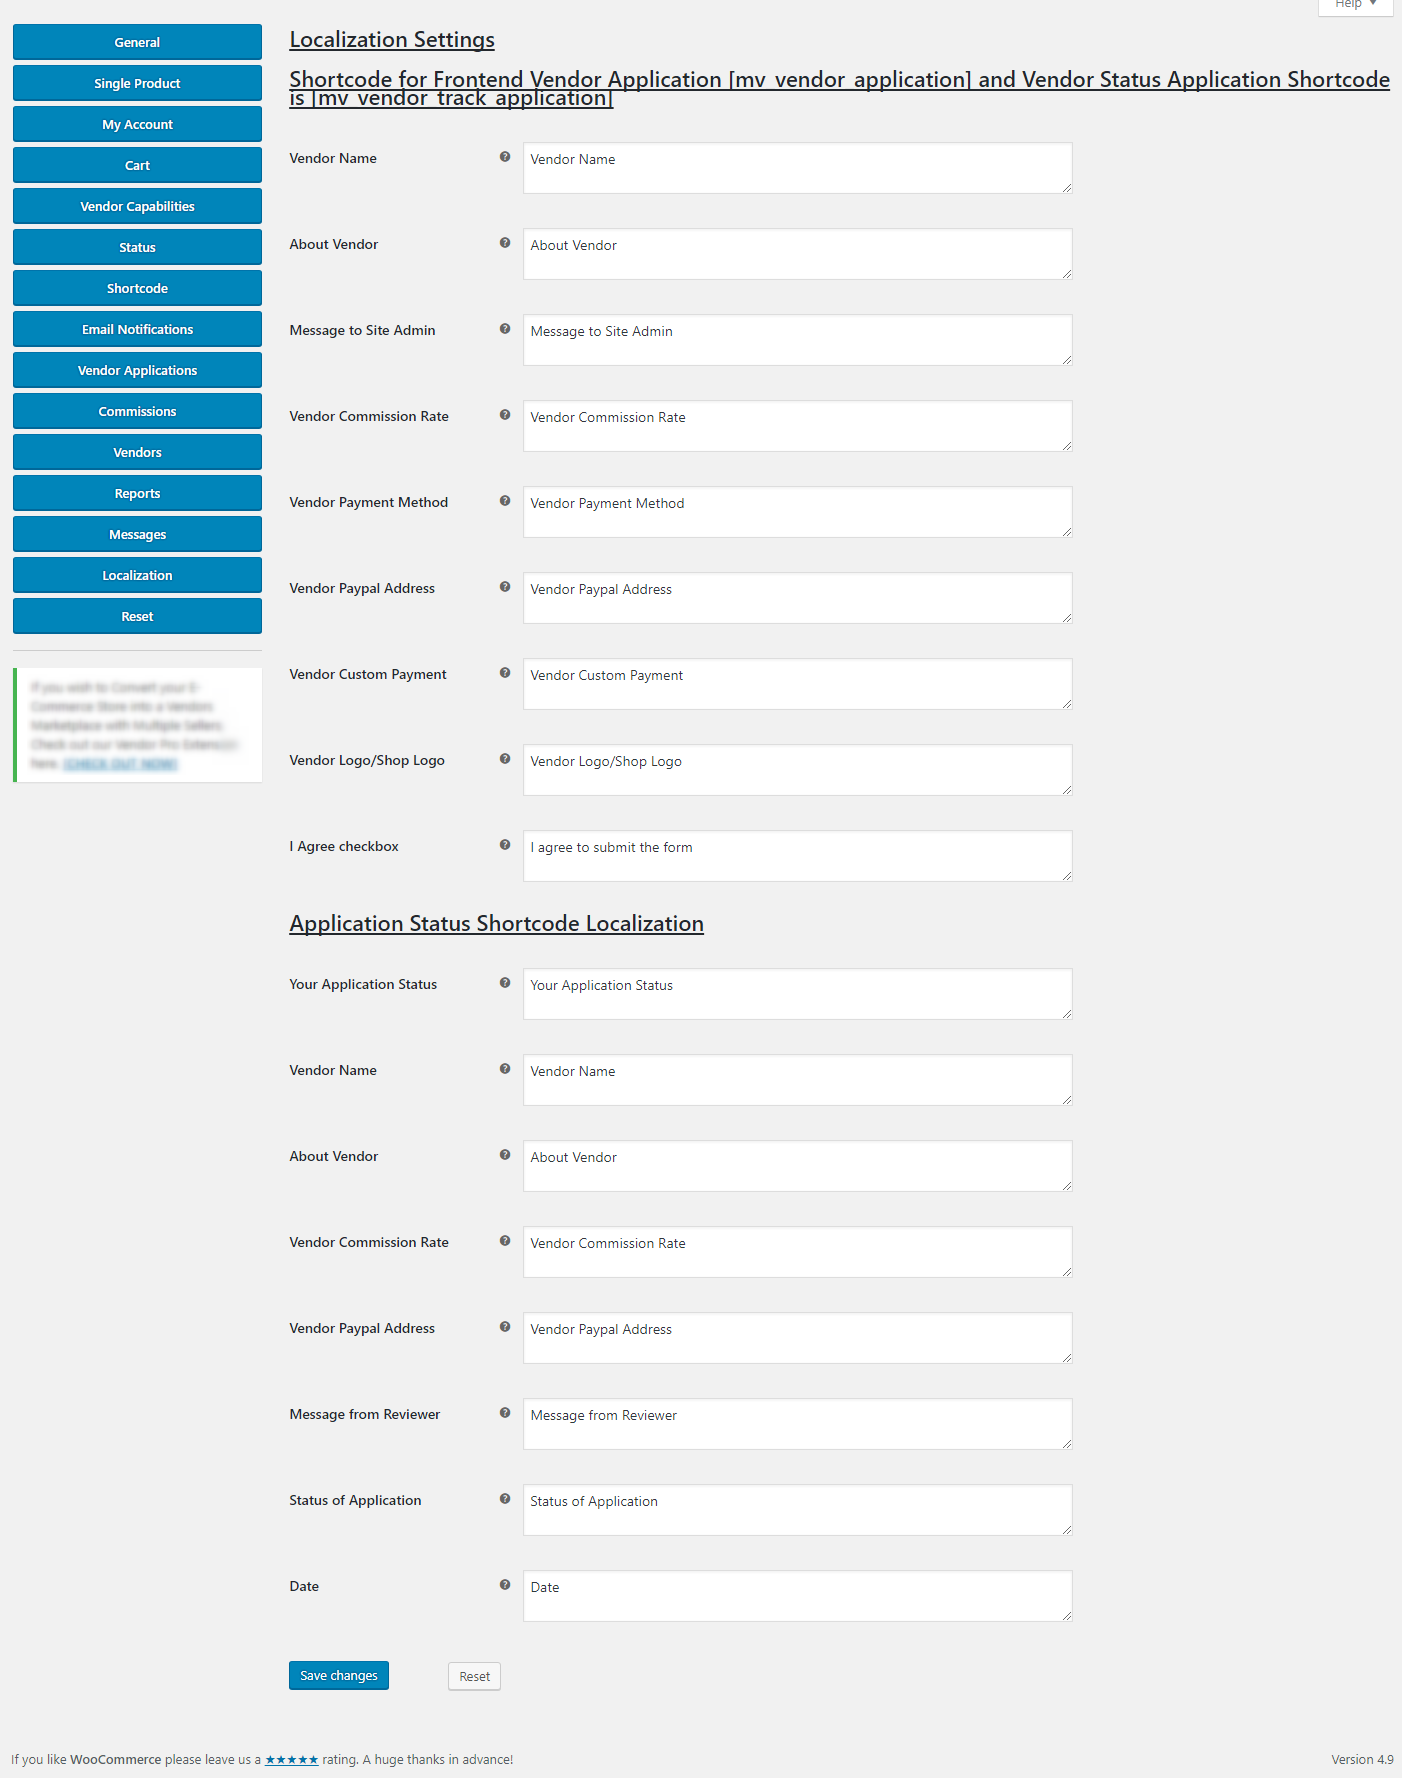
Configure Localization Settings
Through localization setting, you can customize the placeholders of the front-end vendor’s application form and vendor status application.
After making all the required changes you are required to press the Save Changes button.
Dashboard → WooCommerce → VendorPro Options → Localization
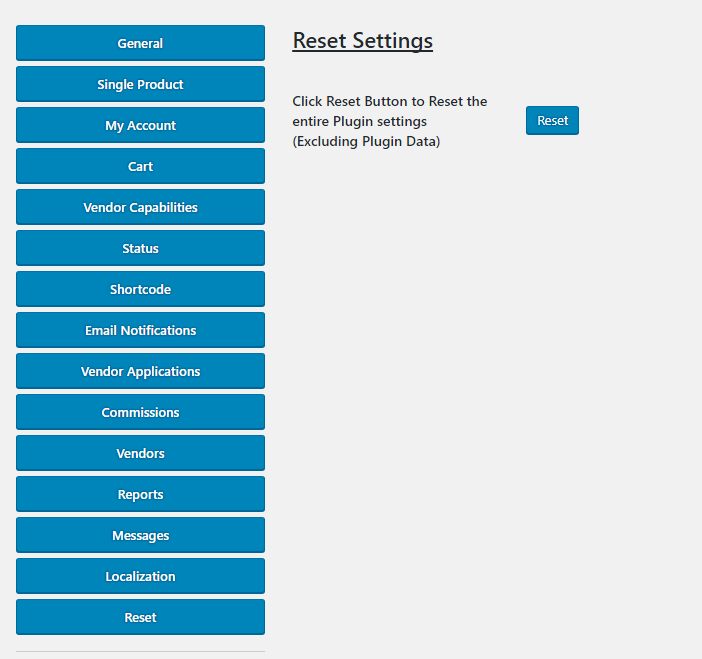
Reset The Plugin Preferences
Lastly, if you want to completely reset the entire plugin setting then you’ve got to follow the path –
Dashboard → WooCommerce → VendorPro Options → Reset and click on Reset button.
Additional Settings For Front-end Display –
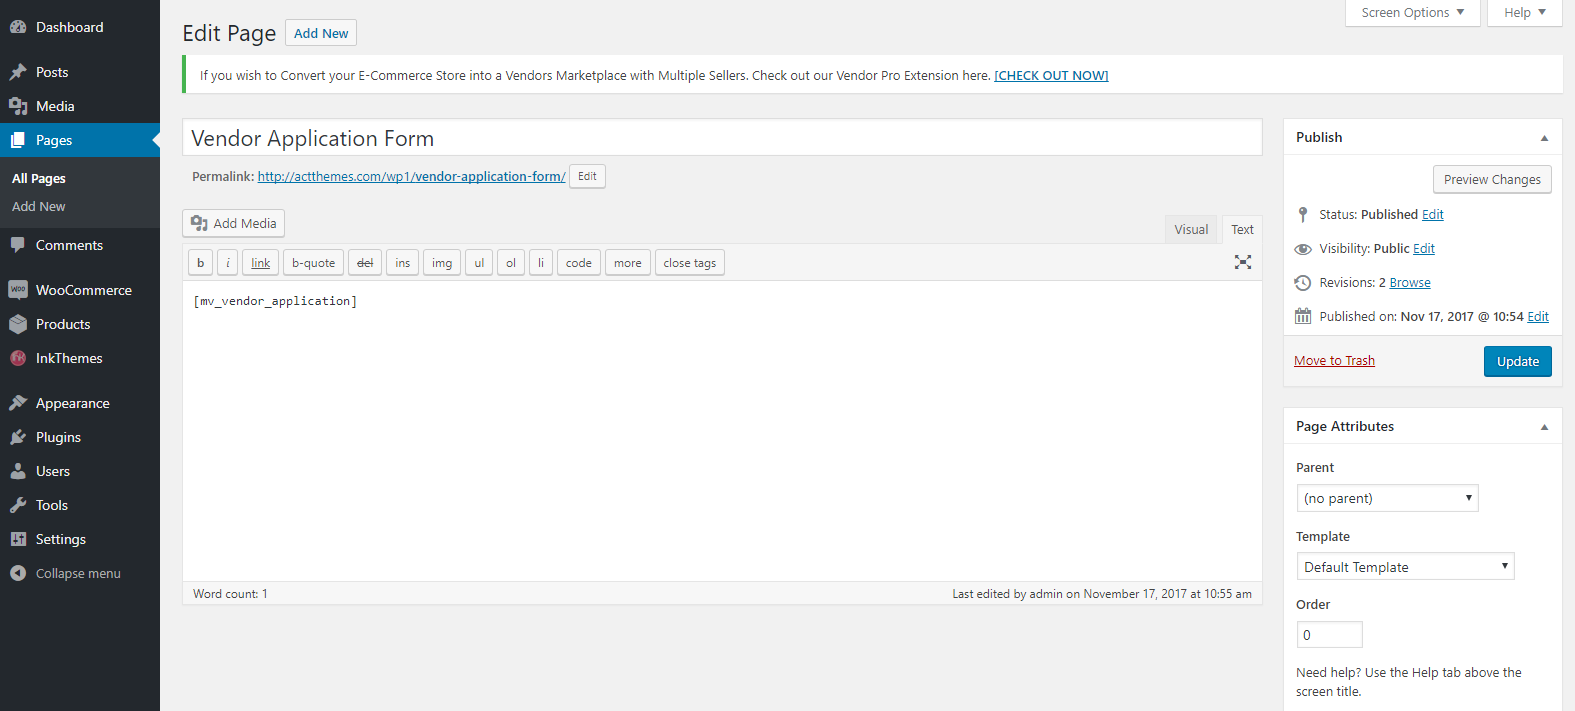
In order to create front-end vendor application form, you have to add the corresponding shortcode on one of your site’s page –
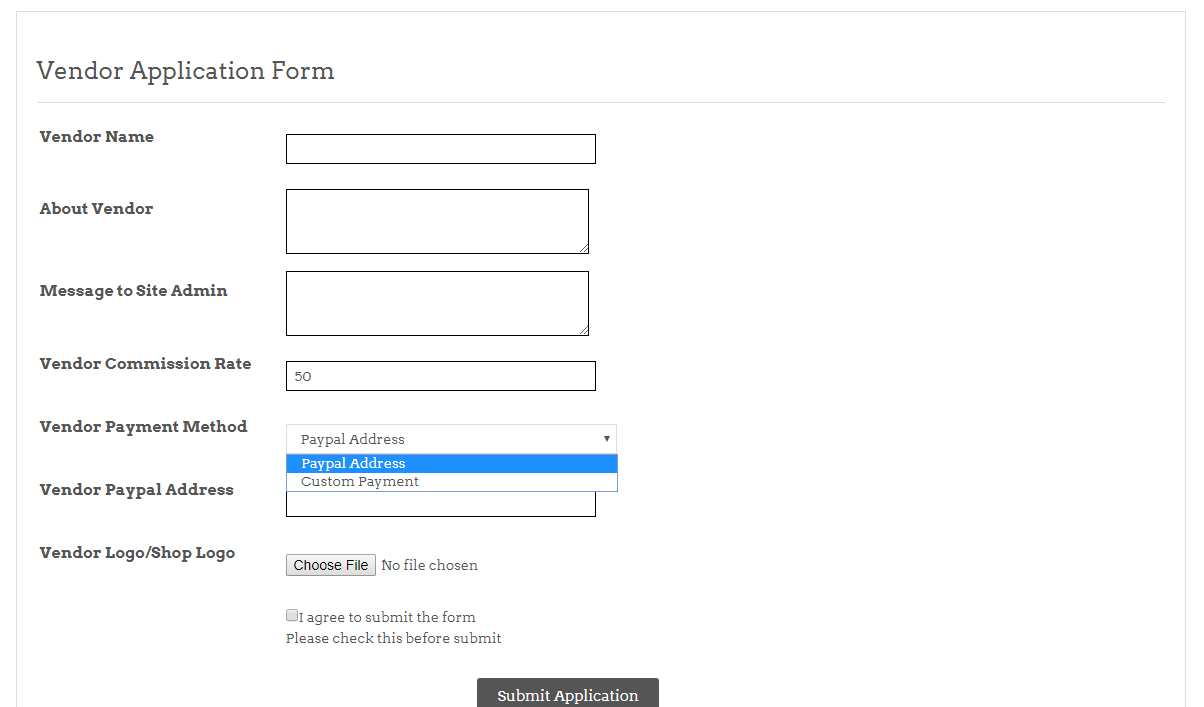
Once published, the vendor application form will look like –
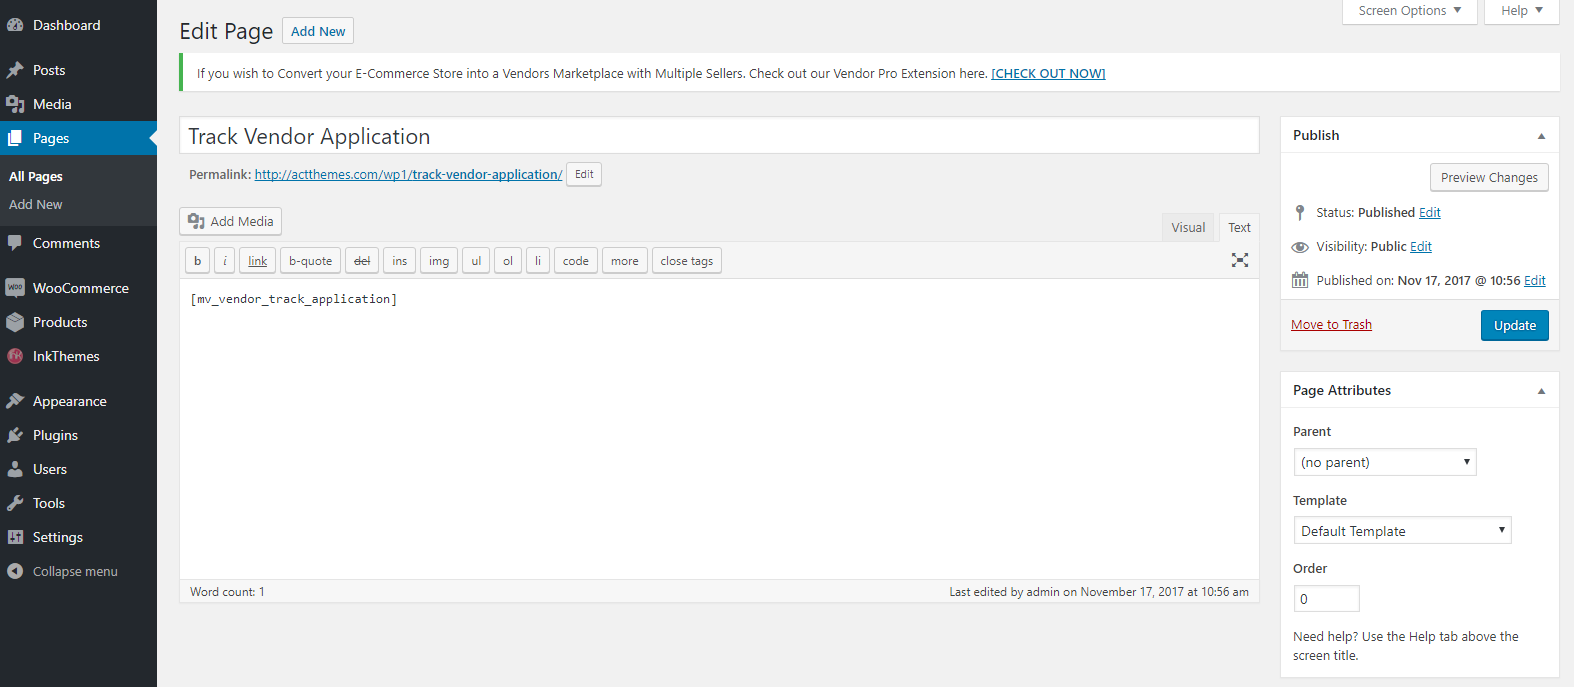
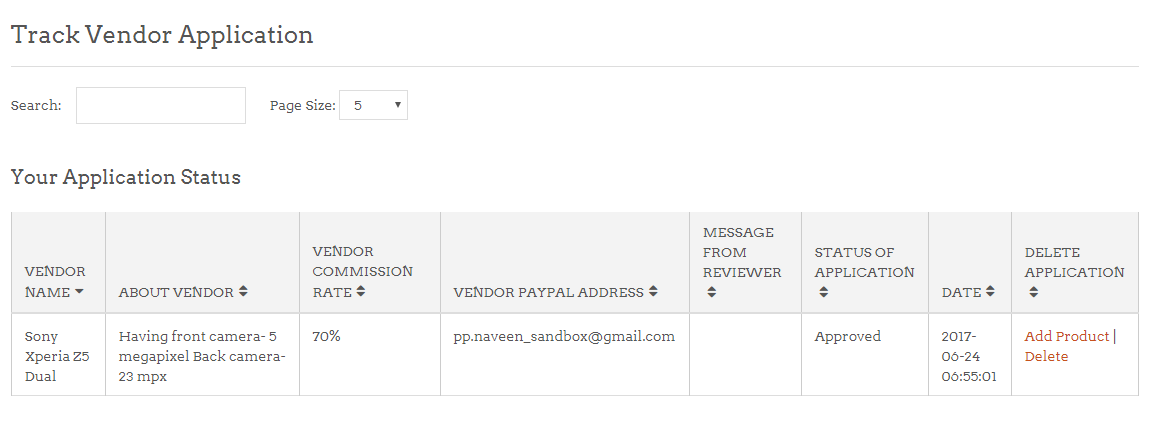
Similarly, front-end page to track vendor application status can be set up like so –
Thanks for purchasing the VendorPro plugin.
If you need further assistance, you can contact us from here: https://www.inkthemes.com/contact-us/
We will be glad to assist you.
For more help, you can explore our Support Forum and FAQs –
Forum Link: https://www.inkthemes.com/community/
FAQs Link: https://www.inkthemes.com/community/forums/frequently-asked-queries-faq.174/
