Listing & classified websites have now become most common web portals that we almost use on a daily basis.
Whether user wants to promote their business, post commercial ads or explore the locality of their market store, they are always in search for classified sites.
So, build your own ad listing or classified website quickly & become a large brand with ClassiCraft WordPress theme.
The theme allows you to create professional style listing website without touching a single line of technical code.
It is fully customized in nature & its responsive behavior gives flexibility to run your hierarchical portal on any portable devices.
Below are the detailed description of ClassiCraft template, take step-by-step walk to start an Ad-Listing website.
What is ClassiCraft?
ClassiCraft is a WordPress theme to create classified ad listing website. Users can easily post free/paid ads on the website using the ClassiCraft WordPress Theme.
Under the ClassiCraft theme there are two sections:
• Classified Ads
• Theme Options Settings.
In the following article I have covered the following points:
1. How to install ClassiCraft
2. How to add new Classified Ad from Front End
3. How to add new Classified Ad from Back End
4. How to add Categories
5. How to add Category tags
6. How to upload background images, favicon & logos
7. How to Import/Export CSV in ClassiCraft
8. How to set up Payment Gateways: PayPal and PayFast?
9. Selecting Payment Packages
10. Customization of Fields
11. How to add Widgets
12. How to build menus with Menu Manager
13. User Registration Module from Front End Let’s start from the scratch.
1. How to install ClassiCraft
The steps for installing the ClassiCraft theme:
Follow the simple nine steps given below and install ClassiCraft on your website.
1. Go to your WordPress Dashboard.
2. Click on the “Appearance” option.
3. Now select the “Install Themes” option.
4. Click on “Upload” option.
5. Click on “Choose file” button.
6. Now select your zip file and open it.
7. Click on “Install Now” button.
8. After installing the theme click on “Activate” option. This will activate the theme on your website.
9. Now visit your Web site.
2. How to add new Classified ad (from Front End)
A Listing Owner can follow the steps and add a new classified ad on the website.
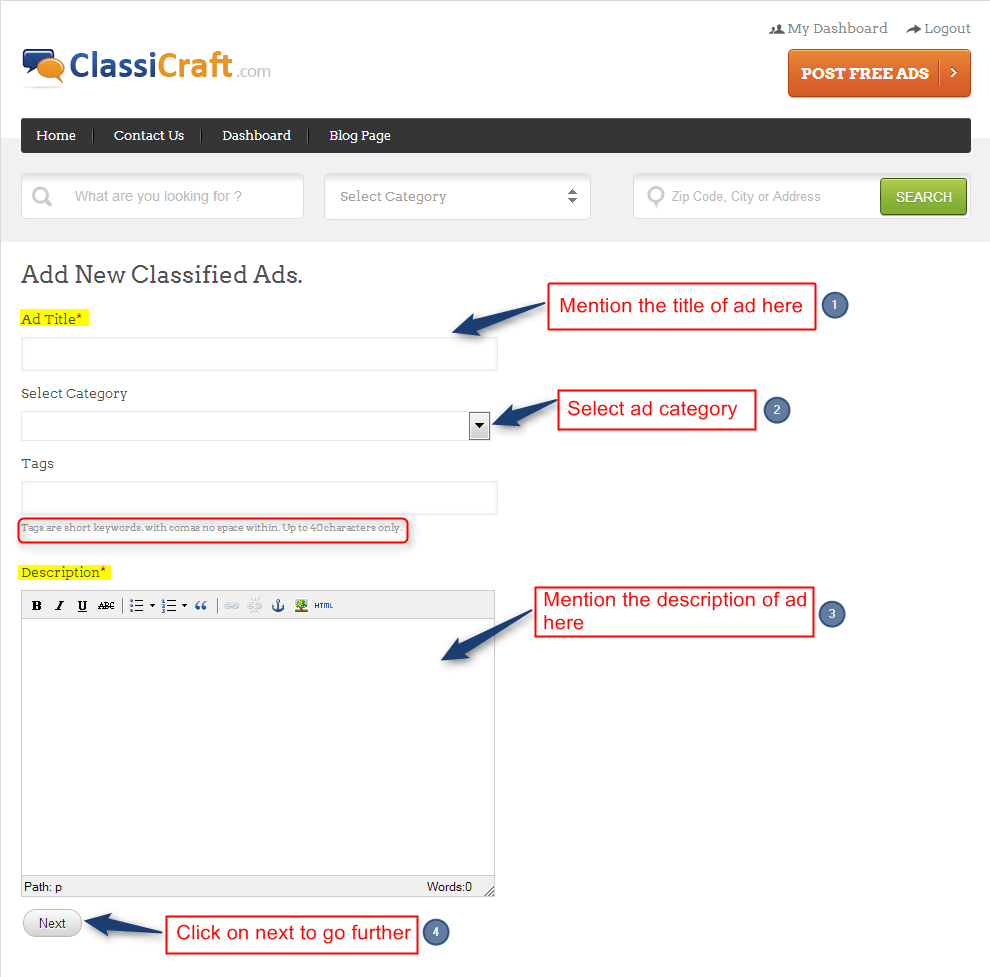
Go To Website –>Click on “POST FREE ADS” to Add New Classified Ads on the website & mention the following things on the page:-
• Ad Title – Mention the title of your ad. It is mandatory.
• Select Category – Categories are decided by the admin which will be available on the website. A listing owner has to choose the category for his ad from the available category lists.
• Tags – Use tags for better search results.
• Description – It is mandatory. Mention the description of your ad. • At last click on “Next” button.
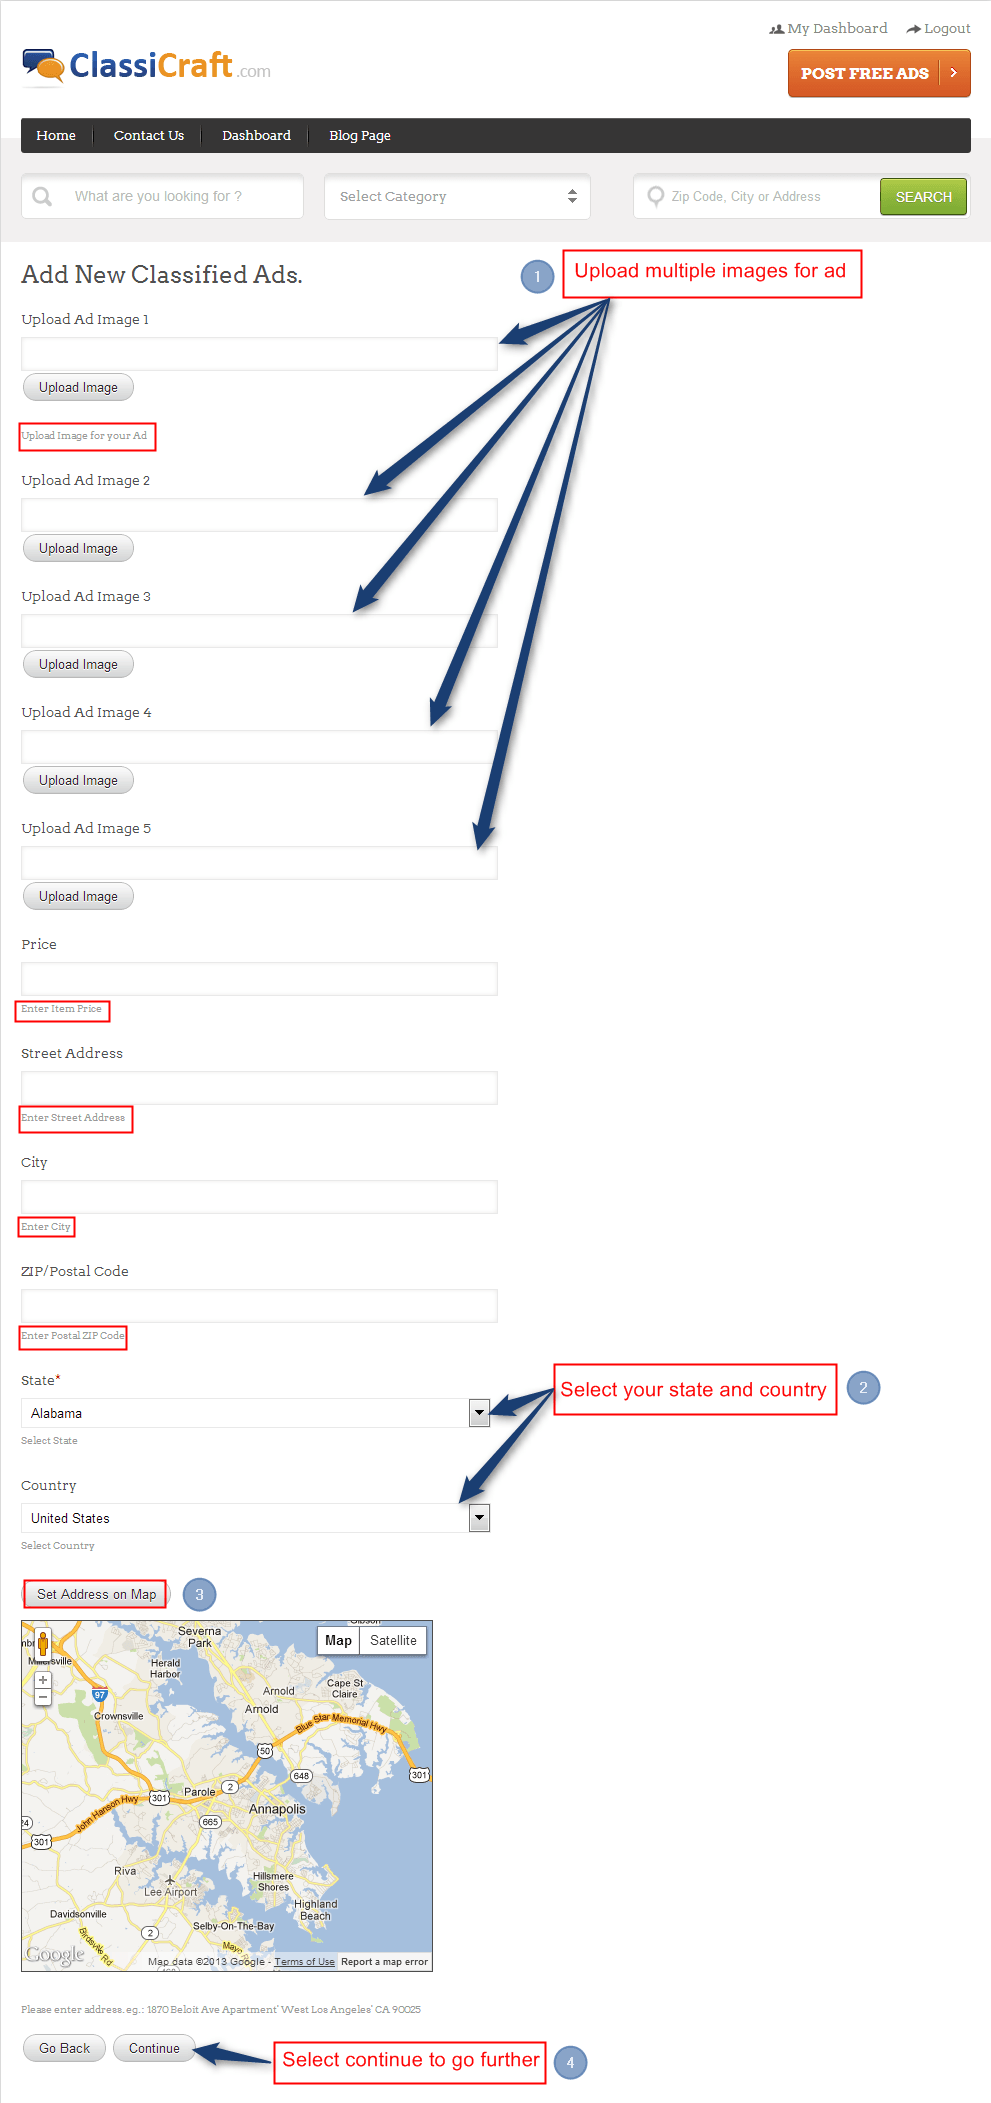
• On the next page, upload multiple images for your ad.
• Price – Set the price of the item.
• Mention the address, city, zip/postal code.
• State – Select the state. It is mandatory.
• Select your country and set your map location.
• Now if you want to make changes in the previous page click on “Go Back” button otherwise select “Continue” to go further.
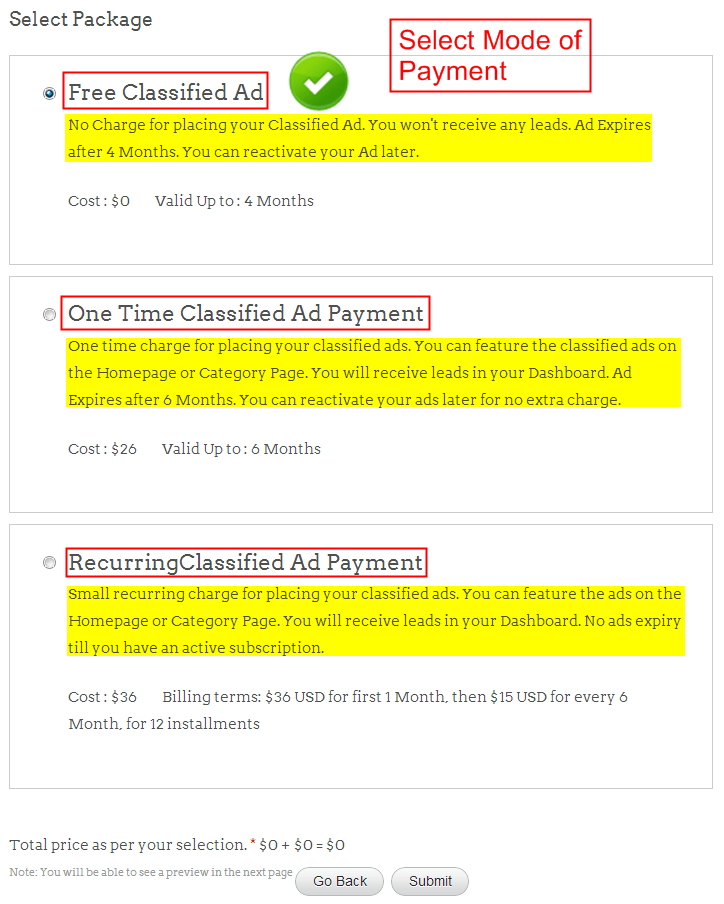
• On the next page, select the mode of payment ads whether as the free classified ad, one time classified ads or recurring classified ad payment.
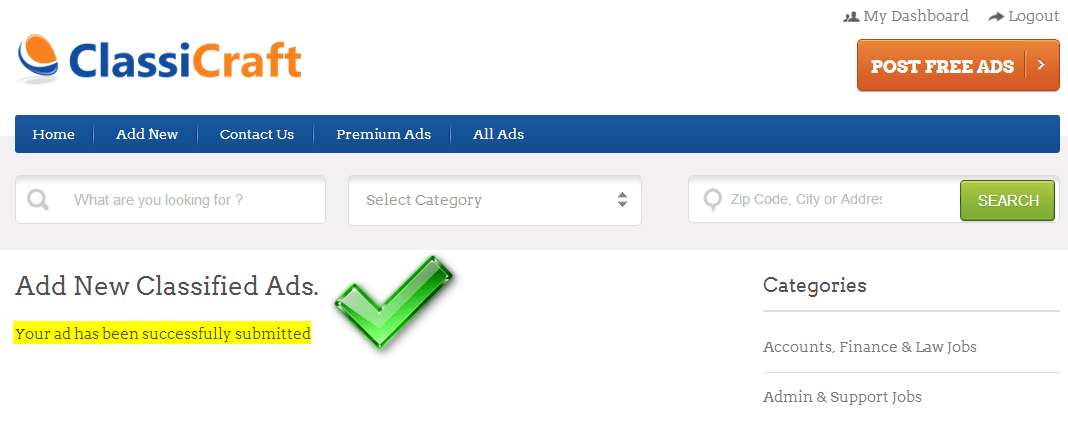
• After this click on “Submit” button. A message will display on the next page “Your classified ads has been successfully submitted”.
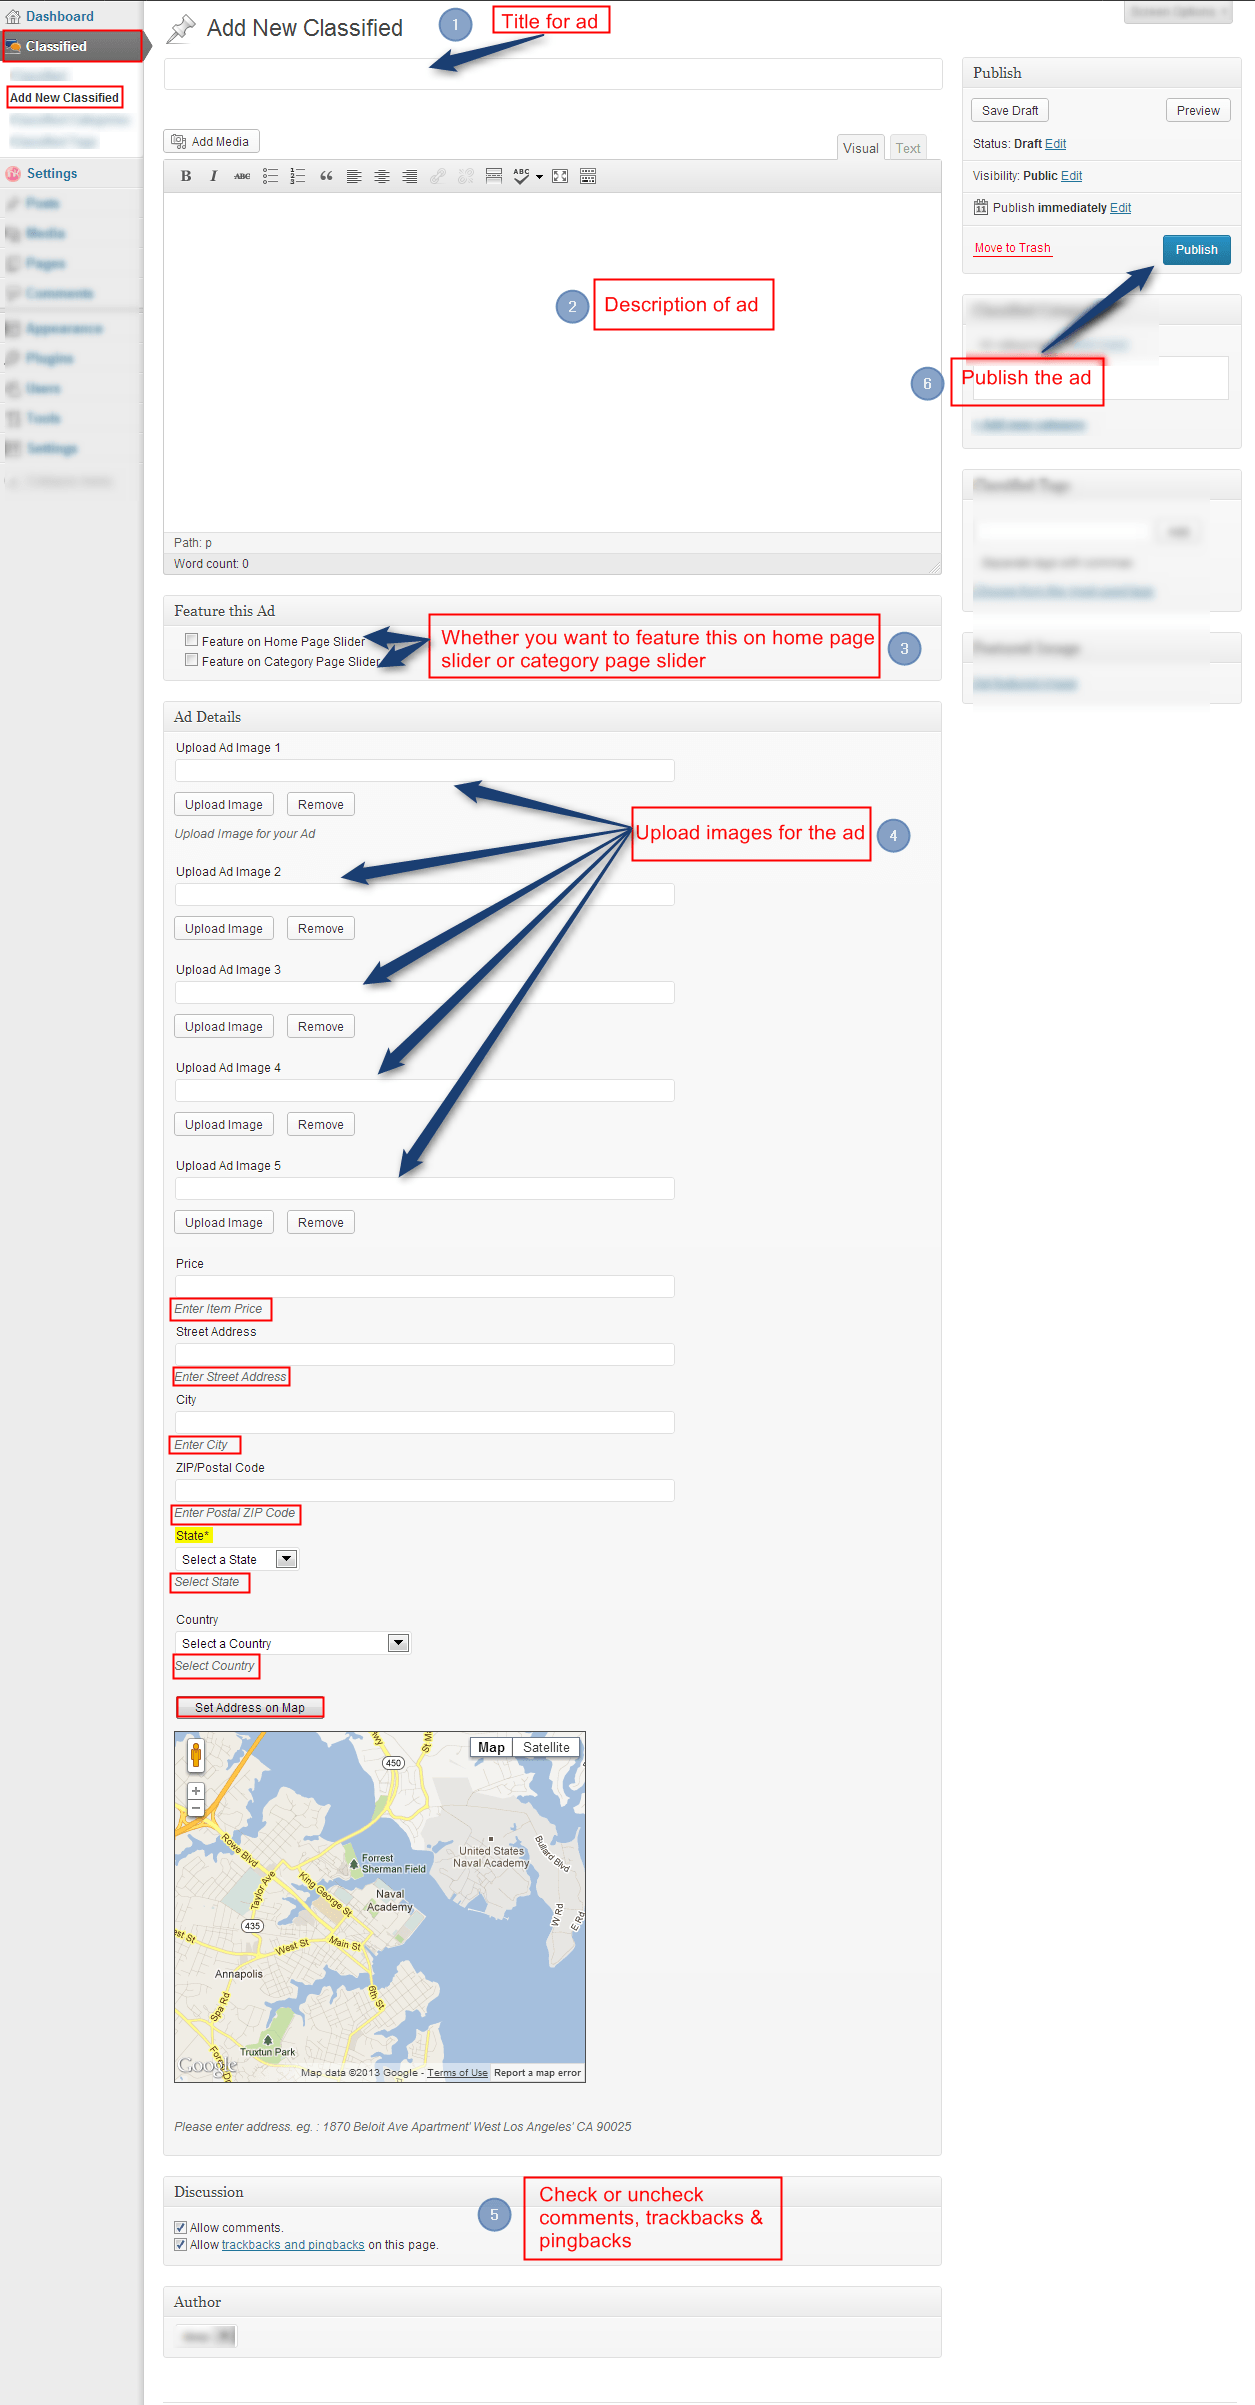
3. How to add new Classified ad (from Back End)
An admin can follow the steps and add a new classified ad on the website.
Dashboard –>Classified –>Add New Classified
After managing all the above contents click on “Publish” button.
Watch this video: Posting Advertisement with Classicraft Theme
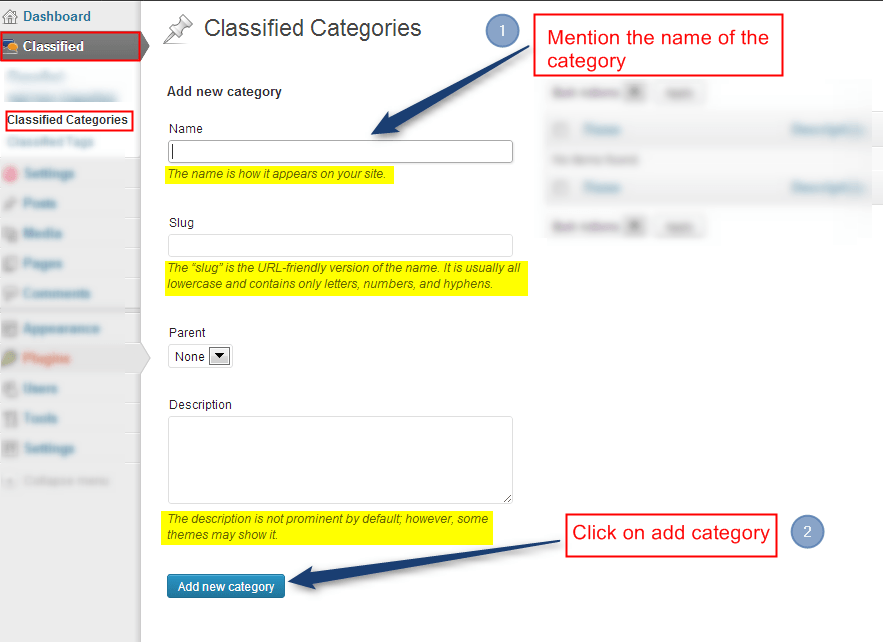
4. How to add Categories (from Back End)
An admin can follow the steps and add categories on the website.
Dashboard –>Classified –>Classified Categories
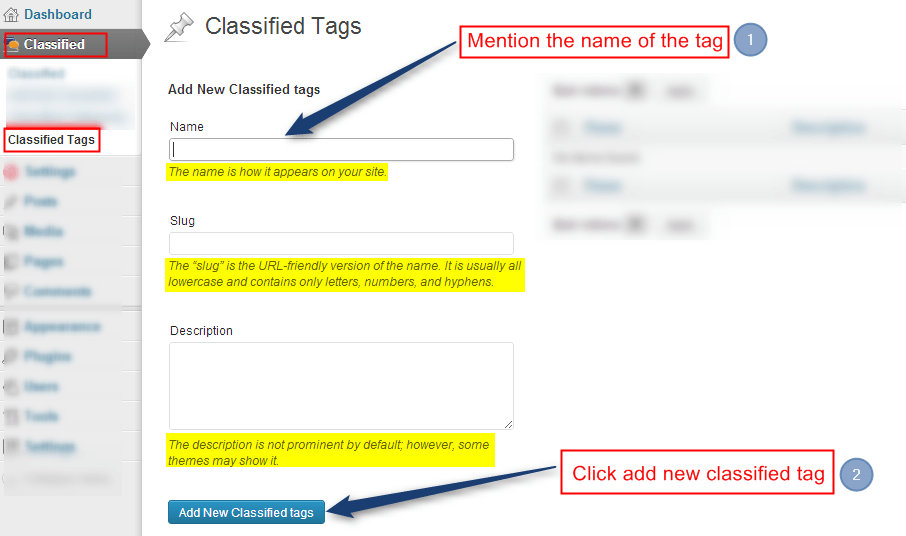
5. How to add Categories Tags (from Back End)
An admin can follow the steps and add tags for better search results.
Dashboard –>Classified –>Classified Tags
Watch this Video: Adding Multiple Ad Categories With Classicraft Theme
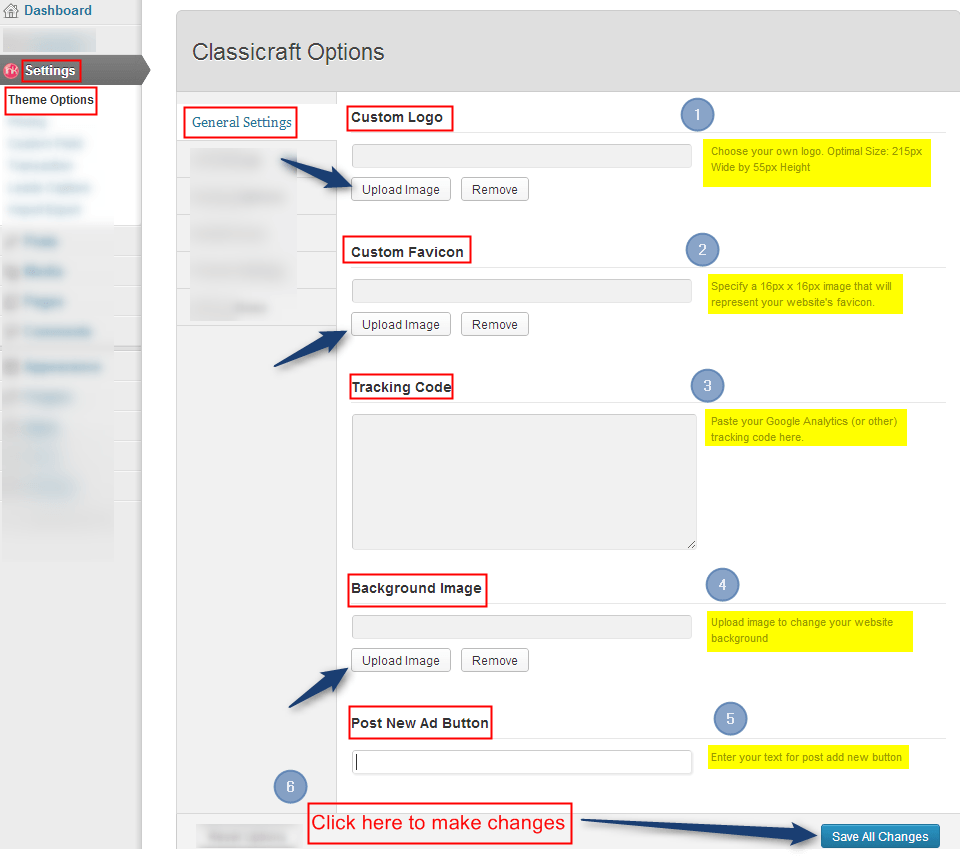
6. How to upload background images, favicon & logos
Follow the steps and upload background images, favicon & logos on the website.
Dashboard –>Settings –>Theme Options –>General Settings
Watch this Video: Classicraft Theme Option Panel
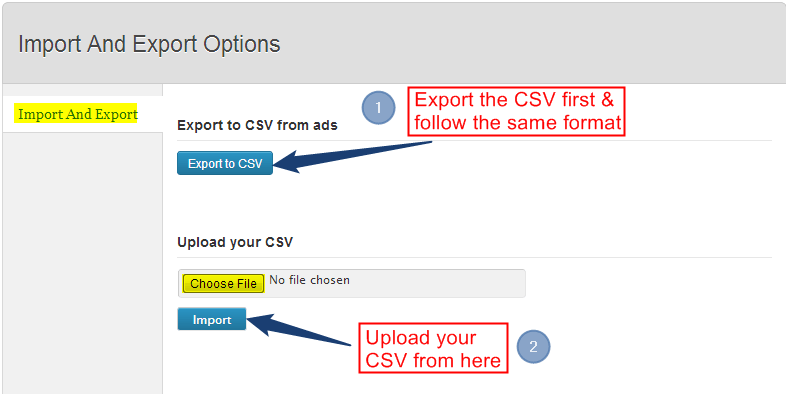
7. How to Import/Export CSV in ClassiCraft
Follow the steps and upload background images, favicon & logos on the website.
Settings –>Import/Export
A listing owner can export/import his own CSV through “Settings” option under the dashboard. Under the settings, there is an option of “Import/Export”. Select this option and first export the CSV document in the system. After downloading the document checkout:
- The format of the CSV document.
- Name of the column fields.
- Follow the same format in your own CSV. After making CSV, click on “choose file” option. This will upload the CSV and at last click on “Import” button.
8. How to set up Payment Gateways: PayPal and PayFast?
The Classicraft theme allows you to receive money either in your PayPal or PayFast accounts. You must have an account on either of the sites or on both.
To configure PayPal settings, you need to visit your Dashboard->Settings->Advance Settings->Payment Setting
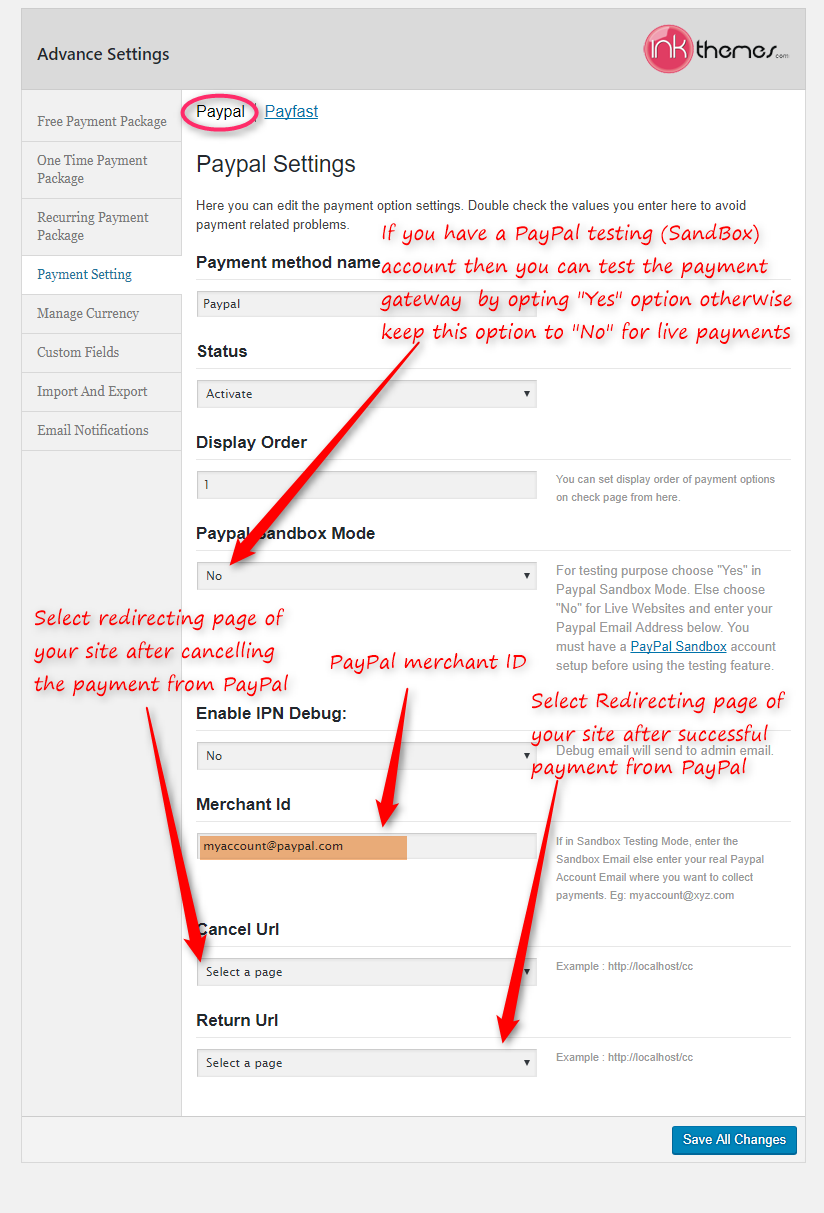
If you have a PayPal Sandbox (testing account) then, you can test the working of payment gateway on your live site. All you need to do is just opt “Yes” in the PayPal Sandbox Mode option.
Similarly, you can configure the PayFast account, check screenshot given below:
Just like PayPal, you can test the PayFast payment gateway working if you select “Yes” in PayFast SandBox Mode.
Read more about PayFast testing from here.
9. Selecting Payment Packages
There are three types of payment packages available-
• Free Classified Ad Payment: A listing owner doesn’t have to pay anything for creating the business ads and his ads would be active for a period of time mentioned in the theme options. This classified ads is free of cost.
• One Time Classified Ad Payment: Once the listing owner chooses this option the ads will be published as a paid classified ads for a period of time mentioned in the theme options. When the ad expires it goes to the draft mode where it can be reactivated again. When the time period of ads expires, listing owner will get an email notification to reactivate his classified ads. Also he can choose to feature his ads on homepage slider/category slider by paying an extra amount. Moreover, the listing owner will receive the leads in his dashboard.
• Recurring Classified Ad Payment: If the listing owner chooses this payment package then as long as the listing owner pays, the ads will be active. The time the listing owner stops paying his ads will be expired. Also with this package, the listing owner can choose to feature his ads on homepage slider/category slider. The listing owner will receive the leads in his dashboard.
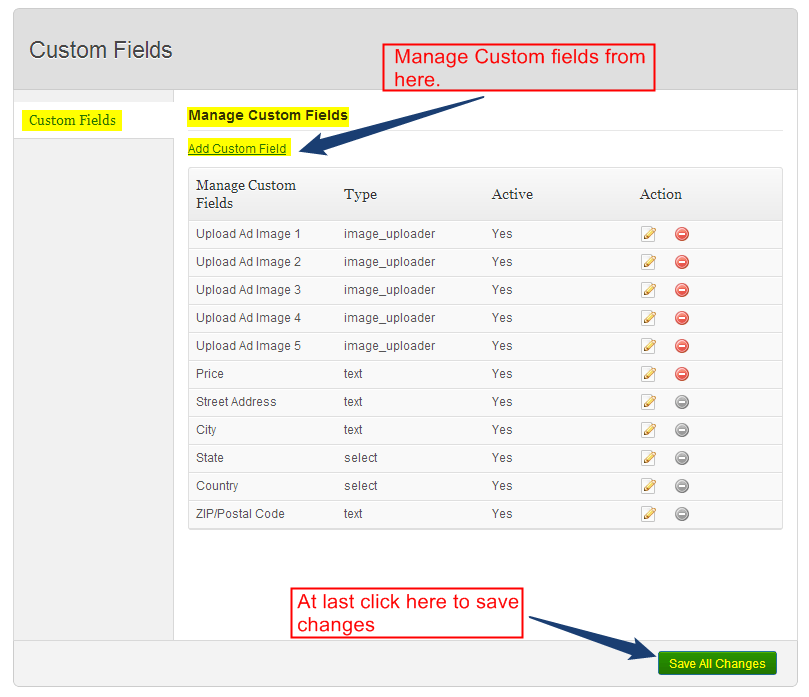
10. Customization of Fields
Follow the steps and customize the listings, lead capture form etc. on your website.
Dashboard –>Classified Settings –>Custom Fields
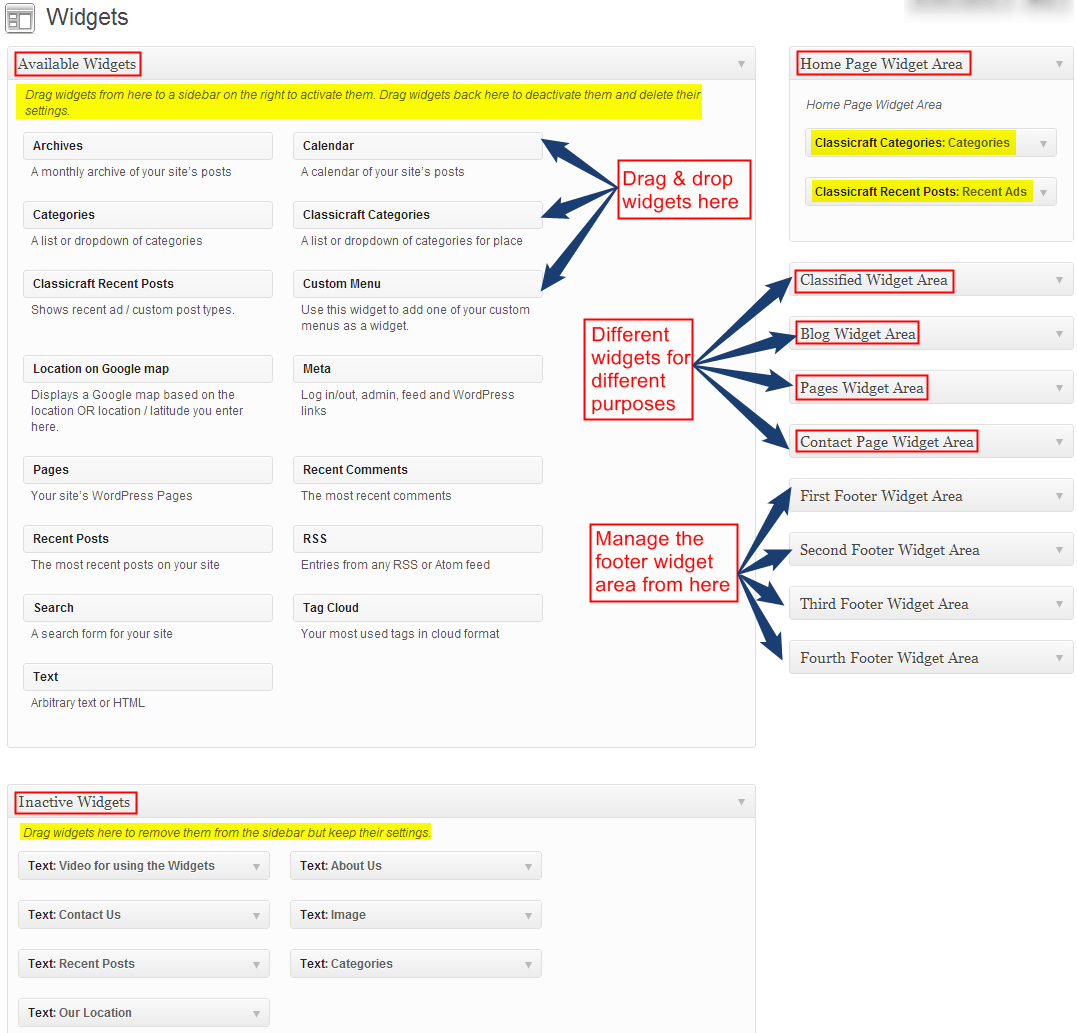
11. How to add Widgets
Follow the steps and add widgets in the sidebar:
Dashboard –>Appearance –>Widgets
12. How to build menus with Menu Manager
ClassiCraft has a prebuilt feature of displaying all the pages and subpages in the menu. However, you can build your custom menu through the steps given below:
Dashboard –> Appearance –>Menus –>Click on “Create Menu” button & enter the menu name.

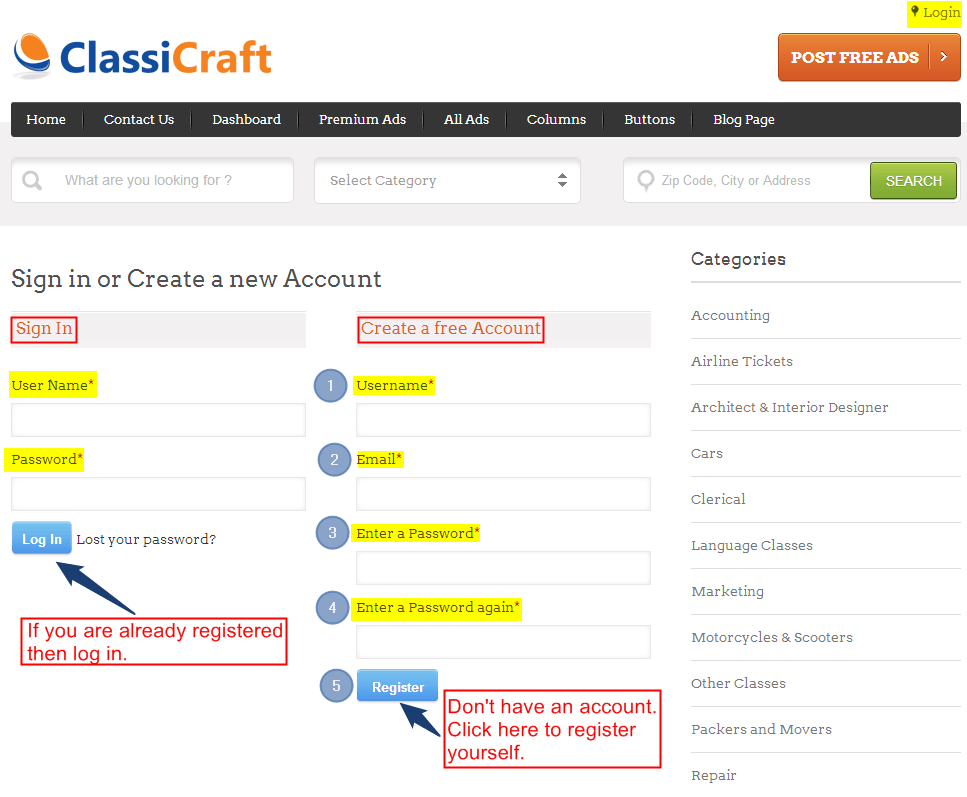
13. User Registration Module from Front End
Follow the steps and create a free account on ClassiCraft
1. Go to the website and click on “Login” button.
2. Create a username and fill the respective details like password, email, etc. to get registered.
Completed with the tour of Classified website creation with WordPress?
So, quickly grab this wonderful WordPress theme ‘ClassiCraft’ & earn some extra dollars by sitting at home 🙂
If you got some queries or suggestions, must comment in the following comment box.
