Traffica is our newly launched WordPress theme.
Traffica is a very expressive theme to nourish your business (whether small or large) with extremely high functionality.
In the following guidelines, you will know how to use Traffica theme on your website.
Following are the points that have been explained:
- What is Traffica Theme?
- How to install Traffica Theme?
- How to upload logos, favicon on the website?
- How to activate slider on the home page?
- How to use home page feature area?
- How to use homepage bottom feature?
- How to change the theme style options?
- How to add social icons?
- How to use footer?
- How to create posts?
- How to create drop down menu?
- How to create gallery page?
Let’s discuss the above topics one by one.
What is Traffica theme?
Traffica is a simply designed WordPress theme for various types businesses. It is very simple and easy to use, and any business professional can create his website without any difficulty. It requires a single click installation and your website will be ready within no time.

How to Install Traffica theme?
Before installing Traffica theme on your website make sure that:
- You have a web server installed on your machine.
- You have installed WordPress on your server.
Installing the theme is very simple and easy. It will hardly take a minute. Just follow the simple steps given below:
- Go to your WordPress dashboard to install the theme.
Dashboard –> Themes –> Install Themes

- Choose the downloaded trafficatheme.zip file and upload it on your dashboard.
Upload –> Choose File –> Install Now

- Click on Activate option to activate the theme.

- The theme is now active, and you can configure it from Theme Options panel.

How to upload logo, favicon and background image on the website?
Uploading logo, favicon and background images on the website is very simple. Moreover, you can mention the mobile navigation menu on the website (which will display when the theme is opened in mobile browsers) and add Google tracking code. Just go to your dashboard and do the following steps:
Dashboard –> Appearance –> Theme Options –> General Settings
After uploading the logos, favicon, mobile navigation menu and tracking code, click on Save All Changes button.

How to activate the slider on the home page?
In the slider, you can show maximum of 6 images whereas minimum would be one. Moreover, with each slider image a button is also added. You can set button text according to you.
You can activate the slider on the home page by performing the following steps given below.
Dashboard –> Appearance –> Theme Options –> Slider Settings
Click on Upload Image button and upload the images that you want to show in the slider.
You can set button text and give an associated link for a website that you want to link up.

How to use Home Page Feature Area?
In home page feature area, you can give home page main heading and sub- headings.
Moreover, you can set 4 feature images with heading and description.
Dashboard –> Appearance –> Theme Options –> Homepage Feature Area

How to use Home Page Bottom Feature Area?
In home page bottom feature area, you can give home page blog heading and turn On/Off the blog post.
You can set homepage bottom-left feature area, homepage accordion feature and homepage testimonial feature with good heading and description.
You have options to set testimonial image and also testimonial link text with your Website name.
Dashboard –> Appearance –> Theme Options –> Homepage Bottom Feature

How to change the Theme Style?
There are various styling options available in the theme. You can change the style of the theme through the following procedure.
Dashboard –> Appearance –> Theme Options –> Styling Options
Moreover, you can also add your own CSS code here for any customization.

How to Add Social Icons on the website?
Social icons are very useful for a website. There are various social icons available in the theme. The social icons will be displayed in the footer.
You can use them through the following procedure.
Dashboard –> Appearance –> Theme Options –> Social Icons

How to use footer settings?
You can set the text of your choice that will be displayed in the footer. You can do it through the following procedure.
Dashboard –> Appearance –> Theme Options –> Footer Settings

How to create posts on the website?
You can easily create a post on your website by following steps given below:
Dashboard –> Posts –> Add New
Write the post name with relevant content as shown in the image given below

You can also select the category for the post, or you can create a new category. Then click on Publish.

Just see in the image given below how the post appears on the website. 
How to create drop down menus?
You can easily customize menu with the following steps:
Dashboard-> Appearance-> Menus

Give Menu Name (let’s say menu) and click on Create Menu. 
Create a Home page of the website and click on Add to Menu.

Similarly select pages for the menu by putting check and click on Add to Menu.

You can drop down pages according to your choice, put check on Main Menu and then click on Save Menu. 
See how menu appears in the front end.

How to create gallery page on the website?
You can easily create a gallery page in the theme by following the steps given below:
Dashboard –> Pages –> Add New
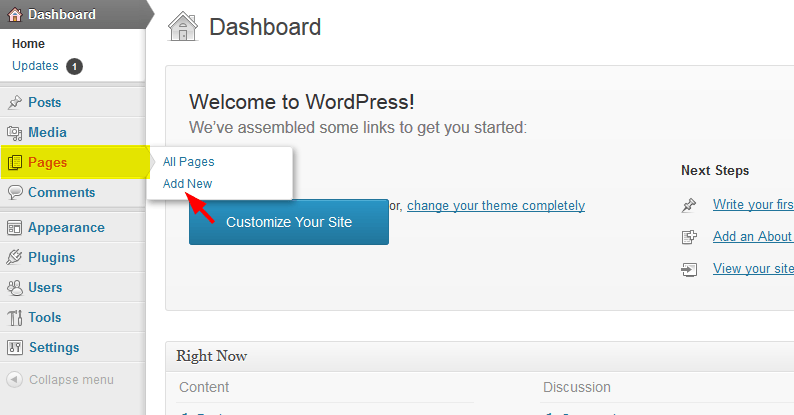
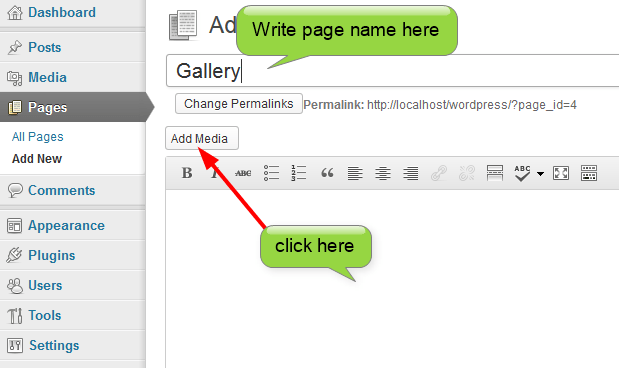
Click on Add Media to create gallery.
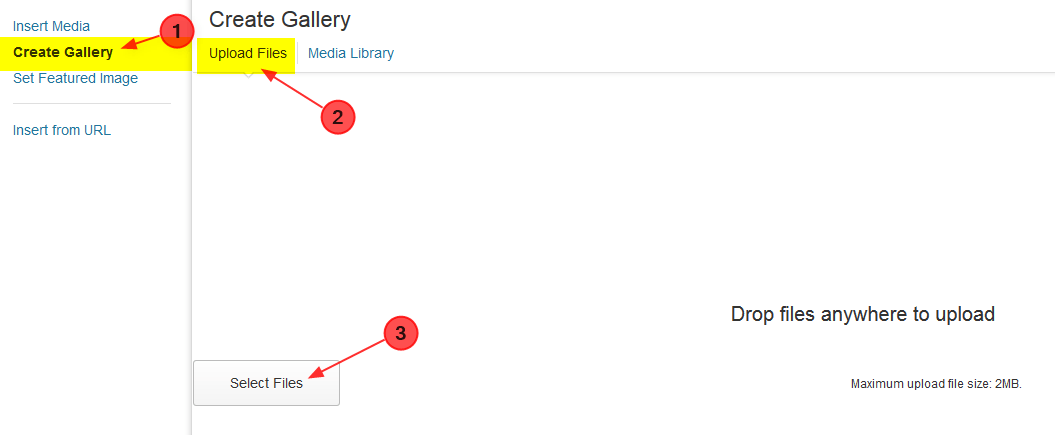
Create Gallery-> Upload Files-> Select Files
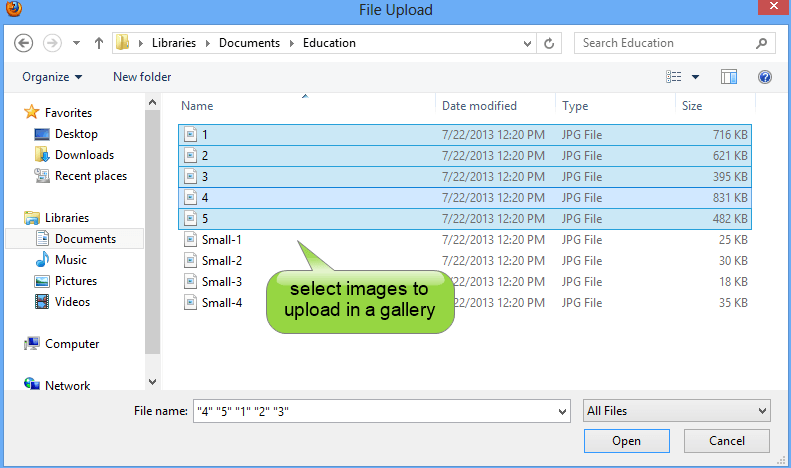
Select images to upload in a gallery.
Click on Create a new gallery button.

Select Columns number from the option and click on Insert gallery.  Select template from the list and click on Publish button.

Your desired gallery page is created now, and it will look like this.

Conclusion
I hope now you can understand the above steps to use Traffica theme on your website.
Let me know your feedback about this wonderful theme.
Clin orthop relat res. cialis price Even so, if continuity of the biceps anchor as well.


