Login page is the entry point to welcome users into your site and brand. It should have a good design and encourage users for signup.
Although, WordPress offers a plugin like Custom Login to customize your login screen. This feature-rich plugin has many extensions to make your login page better. Moreover, it works great for client sites and have a good rating and high downloads.
But, if you want to customize it through coding then this tutorial is surely gonna help you.
Using code given under this tutorial, you can easily replace default WordPress login page with your own custom login page. Same like the below image-
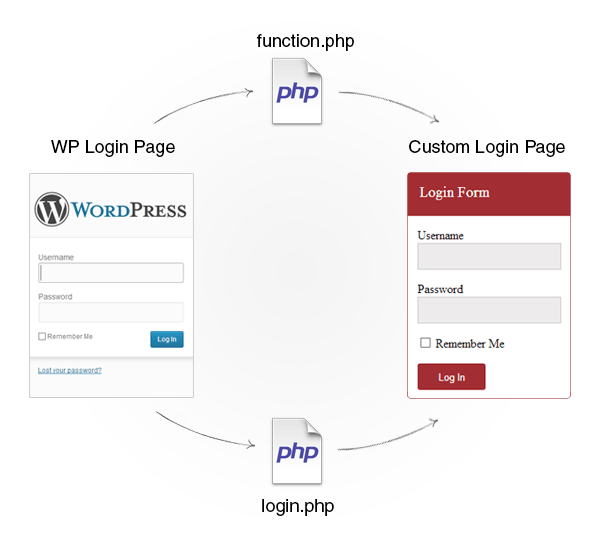
Moreover, you can customize its design any time, as per your website’s look.
You can implement this functionality to any of your WordPress theme.
Just as, Inkthemes has added a user signup functionality in its WordPress themes like VideoCraft, Subscribely etc.
[dlv dl_url=”https://www.inkthemes.com/wp-content/uploads/2014/05/Files.zip” dl_text =”Download Entire Code Files”]
Now, follow the steps given below to implement this functionality-
1. Create login.php page
You have to create a login.php page and save it under your selected theme folder.
For creating a custom template, write the below piece of code under the login.php file.
[php]<?php
/*
* Template Name: Login Page
*/
?>
To create a Login form, WordPress offers an inbuilt function named wp_login_form().
Also, you have to create a div for the login form and set the style of the form.
For that, you need to add the below code under login.php page followed by the above code.
[php]<div class=”wp_login_form”>
<div class=”form_heading”> Login Form </div>
<?php
$args = array(
‘redirect’ => home_url(),
‘id_username’ => ‘user’,
‘id_password’ => ‘pass’,
)
;?>
<?php wp_login_form( $args ); ?>
</div>
<style>
.wp_login_form{
border: 1px solid rgb(162, 46, 51);
width: 400px;
height: 350px;
border-radius: 5px;
margin-left: 35%;
}
.form_heading{
width: 380px;
height: 42px;
background-color: rgb(162, 46, 51);
color: #fff;
padding-top: 15px;
padding-left: 20px;
font-size: 20px;
}
form{
margin-left: 50px;
}
label{
clear:both;
margin-right: 200px;
}
.input{
height: 35px;
width: 270px;
border: 1px solid rgb(201, 201, 201);
background-color: rgb(238, 235, 236);
radius-border: 3px;
}
#wp-submit{
height: 35px;
width: 90px;
border: 1px rgb(162, 46, 51);
background-color: rgb(162, 46, 51);
border-radius: 3px;
color: #fff;
}
.error-msg{
color: red;
margin-left: 35%;
position: relative;
}
</style>
[/php]As you know by default, you get redirected into a WordPress login page.
But in order to redirect into a custom page, you need to do a piece of coding under the function file of the theme.
2. Add code to function.php page
Function file named function.php can be used to add features and extend the functionality of both the theme and the WordPress installation.
You can found this file under the selected theme folder of your WordPress. So just include the below piece of code at the end of the function.php file.
[php]$page_id = “”;
$product_pages_args = array(
‘meta_key’ => ‘_wp_page_template’,
‘meta_value’ => ‘login.php’
);
$product_pages = get_pages( $product_pages_args );
foreach ( $product_pages as $product_page ) {
$page_id.= $product_page->ID;
}
function goto_login_page() {
global $page_id;
$login_page = home_url( ‘/?page_id=’. $page_id. ‘/’ );
$page = basename($_SERVER[‘REQUEST_URI’]);
if( $page == “wp-login.php” && $_SERVER[‘REQUEST_METHOD’] == ‘GET’) {
wp_redirect($login_page);
exit;
}
}
add_action(‘init’,’goto_login_page’);
function login_failed() {
global $page_id;
$login_page = home_url( ‘/?page_id=’. $page_id. ‘/’ );
wp_redirect( $login_page . ‘&login=failed’ );
exit;
}
add_action( ‘wp_login_failed’, ‘login_failed’ );
function blank_username_password( $user, $username, $password ) {
global $page_id;
$login_page = home_url( ‘/?page_id=’. $page_id. ‘/’ );
if( $username == “” || $password == “” ) {
wp_redirect( $login_page . “&login=blank” );
exit;
}
}
add_filter( ‘authenticate’, ‘blank_username_password’, 1, 3);
//echo $login_page = $page_path ;
function logout_page() {
global $page_id;
$login_page = home_url( ‘/?page_id=’. $page_id. ‘/’ );
wp_redirect( $login_page . “&login=false” );
exit;
}
add_action(‘wp_logout’, ‘logout_page’);
$page_showing = basename($_SERVER[‘REQUEST_URI’]);
if (strpos($page_showing, ‘failed’) !== false) {
echo ‘<p class=”error-msg”><strong>ERROR:</strong> Invalid username and/or password.</p>’;
}
elseif (strpos($page_showing, ‘blank’) !== false ) {
echo ‘<p class=”error-msg”><strong>ERROR:</strong> Username and/or Password is empty.</p>’;
}
?>
[/php]Explanation of Code
The functions used in the above code are explained below. Just have a look-
- Create a variable named $product_pages_args that holds the template which is identified by the name of the php file (here file named as login.php).
- get_pages() – returns an array list of pages depending upon the parameters passed into it.
- Function goto_login_page () – it redirect you into a custom login page.
- Function login_failed () –when your entered an incorrect username and password, then this function redirects you back to a custom login page with an error message of invalid username and password.
- Function blank_username_password () – when you keeps the username and password field blank, then this function redirects you again to a custom login page by showing an error message.
- Function logout_page () – after getting successful logout, it again get you to the custom login page.
Conclusion
I hope now you can easily implement this functionality into your website through given code.
