Have you dwelled on how to create an online clothing store with WordPress theme? If you have your dream theme in mind, it’s great. In case, you’re all blank or confused then without a second thought go with Andrina WordPress Theme.

Get Free Version Of Andrina Buy Pro Version Of Andrina
A Step By Step Tutorial To Create An Online Store With WordPress Theme
- Andrina Theme: Free Version Vs Paid Version
- Installation of WordPress Theme to Create a Clothing Store Website
- Homepage Customization Of The Website Using WordPress Theme
- Start Customization on Customizer Panel
-
- Logo
- Homepage Settings
- Homepage Loading Animations
- Slider Settings
- Featured Section
- Homepage Blog Section
- Homepage WooCommerce Shop Section
- Contact Details Bottom Stripe
- Social Icons
- Bottom Footer Settings
- Google Analytics Tracking Code
- Captcha Setting For Contact Form
- Styling Options
- SEO Options
- Site Identity
- Background Color
- Background Images
- Menu Options
- Widget Options
-
Real-Time Preview of Andrina

So, let’s take a drive on “How To Create An Online Clothing Store With Andrina WordPress Theme” without hiring and paying a hefty amount to the developer.
What to choose “Andrina Lite or Andrina Pro”?
You will definitely fall in love with Andrina Lite. But with Andrina Pro, it will a little more.
We have an answer to all your questions on “why to choose to Andrina Pro”
With Andrina Lite, you are served with the features that are giving you the best of both worlds. But there’s a lot more to explore like more colors, sliders, additional styling etc. And you get these with Andrina Pro.
There are a lot more differences which you might want to consider before making a final choice. Now have a glance at the table below which will give you the quick and complete insights.
Andrina Lite Vs Andrina Pro
| Feature | Free Version | Pro Version |
|---|---|---|
|
WooCommerce Compatibility |
— | ✔ |
|
Advanced Typography |
— | ✔ |
|
Price Plan Section |
— | ✔ |
|
Unlimited Featured Boxes |
— | ✔ |
|
Sliders on Homepage |
2 Slides | 6 Slides |
|
Social Icons |
4 Icons | 10 Icons |
|
Advanced Styling Options |
—- | ✔ |
|
Homepage Animations and Transitions |
—- | ✔ |
|
Live Customizer |
✔ | ✔ |
|
Google Analytics Tracking Code |
—- | ✔ |
|
SEO Optimized |
—- | ✔ |
|
Homepage Blog Section |
—- | ✔ |
|
Dedicated Support |
✔ | ✔ |
1. Installation of WordPress Theme To Create A Clothing Store Website
For an online clothing store, we will be first installing a WordPress theme. This theme will act as a complete layout of our website. We are using Andrina here as it has got the famous 2 minutes installation.
Let us take you step by step from here :
- Download the .zip file of the Andrina theme.
- In the WordPress admin area, click on Appearance → Themes.
- Under Themes option, you have to click on Add New Themes.
- Then click on Choose File and upload the downloaded .zip file of Andrina
- Finally, you will have to click on the button of Upload Theme to start the installation.

Then you simply have to activate Andrina theme from the WordPress admin panel. And yes, installing a WordPress theme is that simple.
Appearance→Themes→Activate Andrina WordPress Theme

2. Homepage Customization Of The Website Using WordPress Theme
Now when you have learned how to install a WordPress theme on WordPress server, we’ll start adding your customization to the homepage.
Under the admin Dashboard, you can find the option of Appearance. Once you click on it, then a drop-down sub-menu will have an option of Customize. From this real-time customizer, we’ll add the sliders, logos and all other elements to the homepage.
Admin Dashboard→Appearance→Customize (Refer the image below)

-
Start Customization on Customizer Panel
And yes, you have reached the Customize Panel. Here you are going to do all the customization.
Now we’ll be customizing Andrina to show you how to give an astonishing look to the e-commerce website.

This is how the entire customizing panel looks like.
Technically it is WordPress Customizer. But the latest one!
People often call it Front-End Customizer.
This is one single interface for the appearance of the website and a lot of functionalities like WooCommerce section, CSS etc.
We’ll dig this customizer panel for you in depth.
So, you’ll find the option for Custom Logo to add or modify logo of your clothing website.
Then there are also Home Page Setting and Home Page Loading Animations to create effects to welcome viewers.
Of course, you will find Slider Setting to add images and glitters on transitions on your eCommerce website.
The next in the row is going to be Featured Area, here you can decide what are the services or sections to highlight.
As we move further, there’s a Home Page Blog Section to add the featured blogs on the homepage.
Next, in WooCommerce Product Section, you can simply create a store section. Here you can add images along with price tags and various offers.
Here you will find Social Icons to add to your e-store website.
There are going to Footer Settings from where you can design the footer with drag and drop of the element.
For added functionalities, this customizer has accommodated Google Analytics Tracking Code, Captcha Setting, SEO Options.
If you are good with the codes, then go for Additional CSS. And if you are not too techy, then Styling Options in the customizer is perfect for you.
-
Add Your Business Logo To Your Clothing Website
Under the Customizer Panel, Custom Logo is the first field to work on. So, you gotta click on Custom Logo and then enter the URL paths of your logo into the appropriate fields under “Custom Logo”.
Customizer Panel→Custom Logo→Enter Url to Add New Logo; Change or Remove Logo (Refer the images below)
-
Create Awesome Layout For The Homepage
Home Page section makes your homepage dynamic. Under Home Page Settings, you can choose what to display on the homepage like a static page or latest posts.
Customizer Panel→Home Page Settings→Homepage Display


-
Create Transitions And Animations On The Homepage
Under this setting, you can either turn the loading animation on or off, depending on your taste. So, it’s a matter of a click to add or remove animations on your clothing store website.
Customizer Panel→Home Page Loading Animations Settings→On/Off


-
Add An Image Slider Using Slider Settings
Just Upload the Images to the Slider from the Customizer Panel and the images would start to appear on the Homepage of the Website.
Customizer Panel→Slider Settings


Slider Settings → Slider Animation Section
This section is to upgrade the slider to the next level with animations, speed, text area and more. Here, you can set the transition speed for the slider. Add up the animation effects. You can further add up headings, sub-headings and text description to the slider using Slider Animation Section.

Slider Settings → First Slider
Here, you can add up the image, heading, sub-heading, text description, button link and slide link to the slider.

-
Highlight Services On The Homepage With Featured Section
In the featured section on the homepage, you get box type layout where you can add a captivating image, it’s heading, and description. Then, you can attach a URL to it so, whenever clicked, it will redirect to the attached URL or link.
Customizer Panel→Home Page Feature Section


Home Page Feature Section→Feature On/Off Section
This allows you to manually turn on or off the featured section as per the needs.

Home Page Feature Section→First Feature Area
You can add here the image which you want to display, then its heading and description along with the redirection link.

Home Page Feature Section→Unlimited Feature Box
This feature of Andrina Theme lets you create an unlimited number of featured boxes on the homepage.

-
Feature Blogs On The Homepage To Captivate Viewers
There are 3 types of blog section which has been included in the theme so that it can be exhibited in the different formats, which will be displayed on the front page of the theme.
Customizer Panel→Home Page Blog Section


Customizer Panel→Home Page Blog Section→Blog Section Settings
This section of Home Page Blog Section lets you add the heading of the first blog to be displayed on the homepage. Moving further, you can add the blog category. You can do the same in the second blog section. Then there is also an option to on/off the display of blog section on the homepage.

-
Set-up Your Clothing Store Using WooCommerce Shop Product Section
Finally, after a whole round-up of customization, you can now give space to your clothing store on the homepage Sp, the viewers can right away shop for their favorite products on the homepage.
WooCommerce Shop Product section is the key ingredient to create an online clothing store. Using this you can display products on the homepage, their categories and more.
Customizer Panel→Home Page WooCommerce Shop Section

-
Add Your Contact Details To The Website
When you are done setting up your e-store with Home Page WooCommerce Product Section, the next in the row will be Contact Details Setting. This will enable the display of your contact details such as contact number, email address on the homepage.
Customizer Panel→Contact Details Bottom Stripe


-
Make Your Web Presence Stronger With Social Icons
By entering the social links you can easily add the social icons on the homepage.
Customizer Panel→Social Icons

![]()
-
Add Widgets To The Bottom Footer Widget Setting
Use this option to add copyright text on the homepage. You can also set your first footer section from here and add text or image.
Customizer Panel→Bottom Footer Widget Section


Bottom Footer Widget Section→Widget Area Setting
You can make your footer section interesting by placing widgets to it. Now when the complete layout is adorned with so many elements the bottom-most footer too needs attention. So, you can add Search Widget, Contact Details and a lot more to the footer using this panel. Moreover, this section also allows you to either turn on/off the widget display on the homepage.

Bottom Footer Widget Section→Copyright Text
This section in the footer will help people know about your authenticity. You simply have to input the text in the text area, save it, it’s done!

-
Add Google Analytics Tracking Code To Get The Real-time Stats Of Your Website
Add Google Analytics tracking code here from the Customize Panel to track your website statistics regularly.
![]()
![]()
-
Use Captcha Settings On Contact Form For Anti-spamming
Set your Google reCaptcha Site key and Secret key for contact page Template. You can on or off your reCaptcha field with on/off options.


-
Styling Option And Custom CSS For Additional Styling Elements
You can change the style of your website with the “Styling Options”. We have provided eight color options with Andrina theme, you can change them according to your requirement. There is Custom CSS option where you can write HTML or CSS code and make small tweaks to the website.


-
SEO Settings To Make Your Clothing Website Search Engine Friendly
This section specifically makes your website search engine friendly. Here you can meta keywords, meta description, meta author name.


-
Site Identity To Globalize Your Brand With Unique Logo
Use this option to add Site Title, Tagline and Site Icon on your website tab. You can also upload a site icon by selecting an image.

-
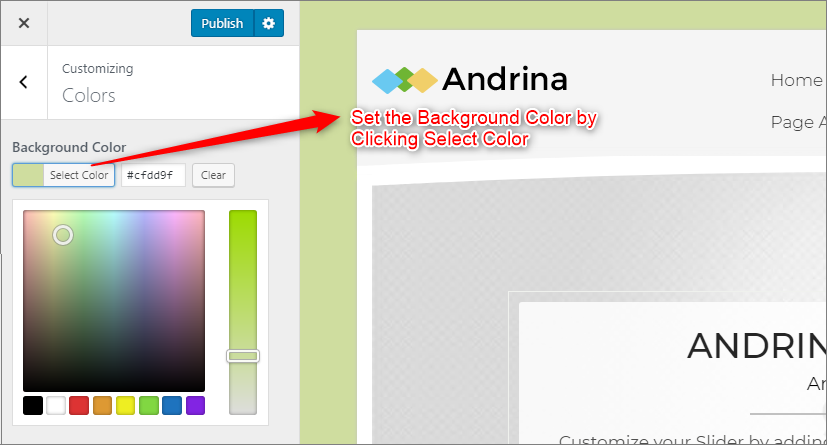
Add A Background Color For A Wow Impact
This feature is to add your style taste to your website. It gives you a palette from where you can pick any color to fill the background of your clothing website’s homepage.
-
Add A Background Image For Better Appearance
So, in the above feature, we learned how to add background color and here we’ll learn how to add a custom background image to the homepage.

-
Build Menu For Your Online Clothing Store
Andrina Theme had a prebuilt feature of displaying all the pages and subpages in the menu.
However, you can also build a custom menu using the Menus option under the “Appearance” Section.
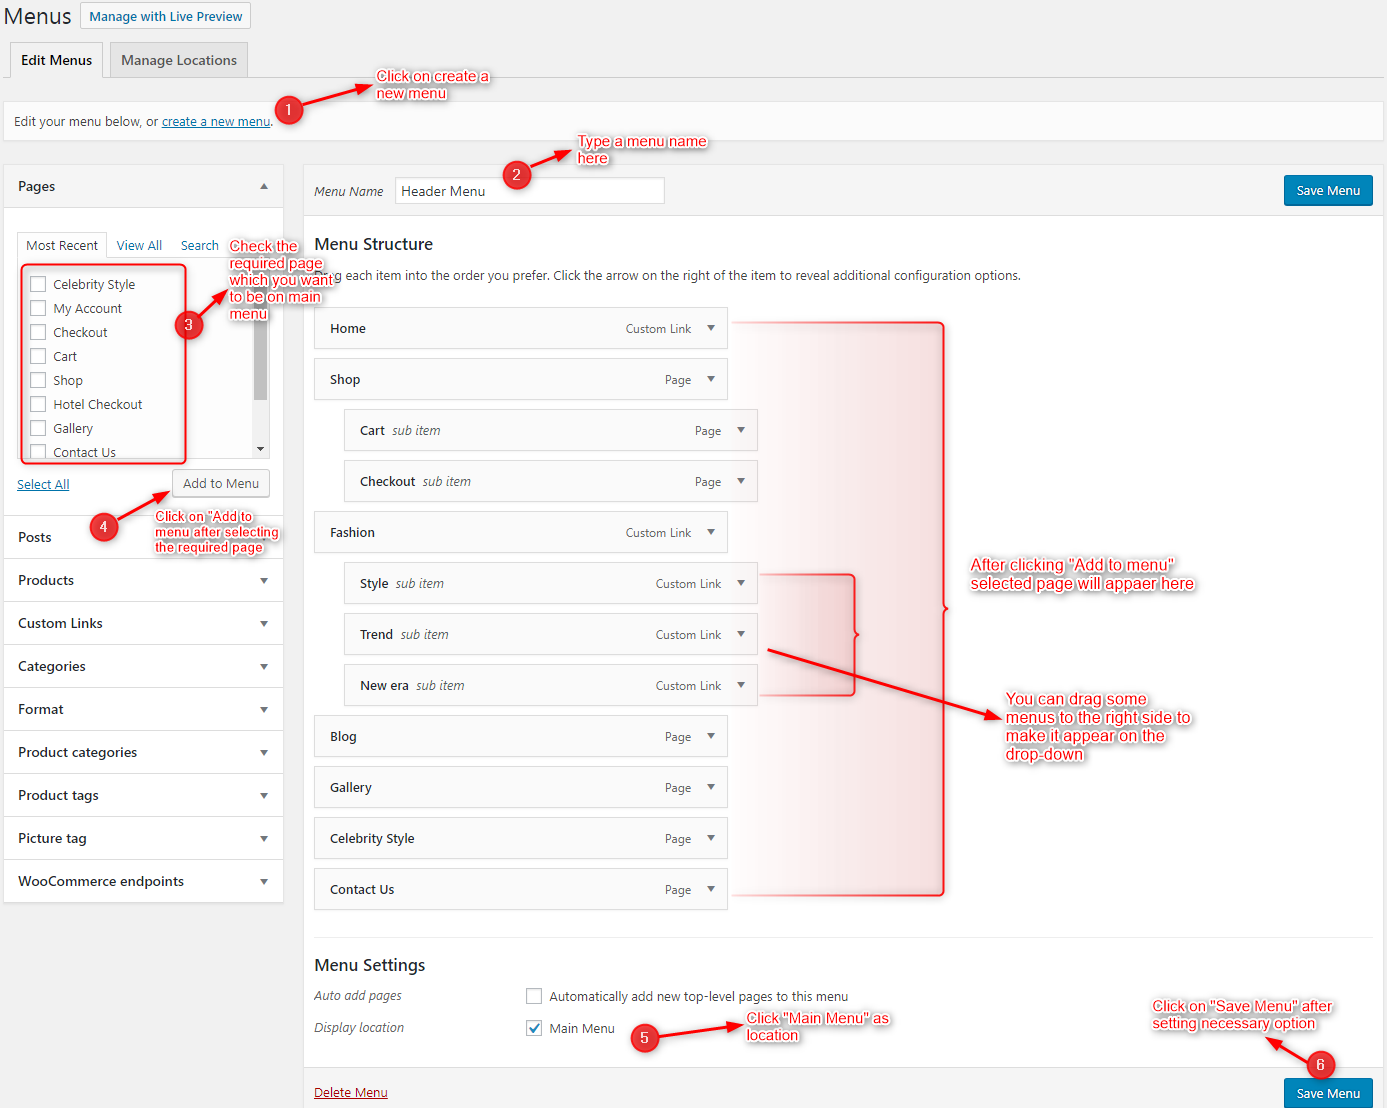
Menu Section→Create a New Menu→Type Menu Name→Check Mark the Desired Pages on Menu → Add to Menu
For making a menu, you need to get to the menu section first. Then, you have to click on create a new menu button. Second is naming your new menu in the Menu Name Tab. After this, on the left, a checkbox section will appear with the pages. So, you have to checklist the pages you would want in your menu. Finally, you have to click on Add New Menu Button. This is how you will create a new menu.
Building Dropdown Menus
For a drop-down menu, you have to either create a new menu following the above steps or can modify a menu. You simply have to look for the structure and then whatever you want it to drop down you can shift it to the right side.(Refer the image below)
-
Add Widgets To Your Clothing Website
In your clothing website, you can add widgets either in the sidebar or in the footer section. However, the path to widget section goes like:
Dashboard→Appearance→Widgets
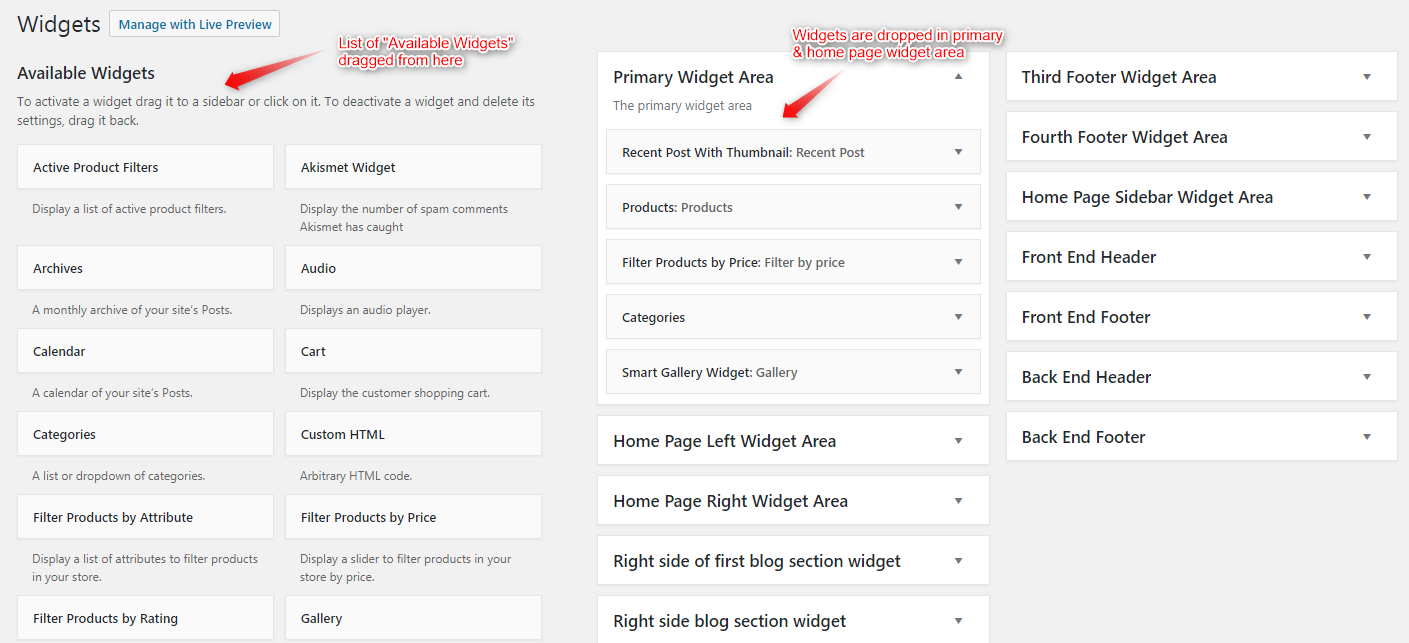
Adding Widgets in Sidebar
For adding widgets in the sidebar all you have to do is select Widgets option from Appearance panel, then drag the widget you need & drop it in primary widgets area or in secondary widgets area according to your requirement, at the end click save button and your widgets are ready to use.
Dashboard➡Appearance➡Widgets➡Drag & Drop Widgets in Primary/Secondary Widget Area
(Refer the image below)
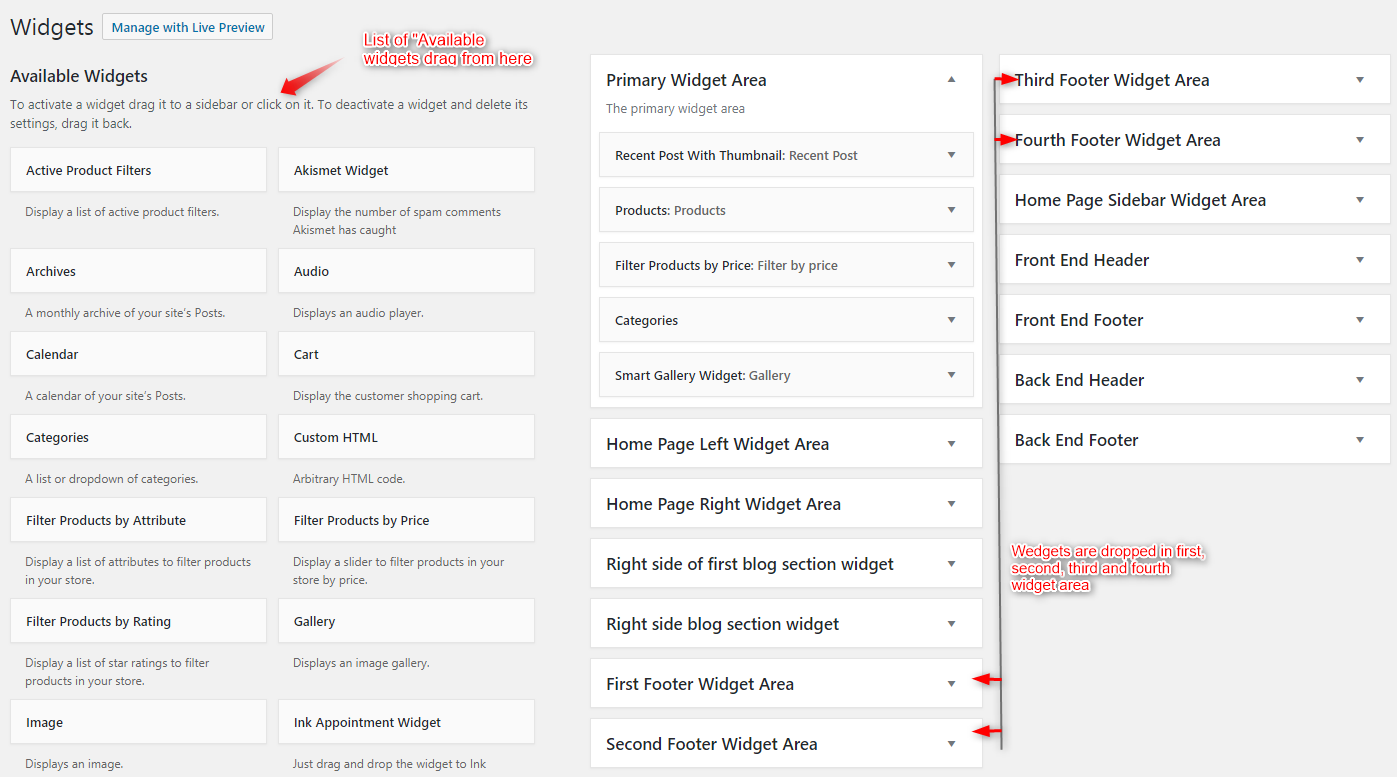
Adding Widgets In Footer
For adding widgets in Footer you can follow the same steps of adding widgets to the sidebar. However, we’ll give you a quick glance of it.
Appearance Panel➡Widgets➡Drag & Drop Widgets to the Footer Area➡Save Button
(Refer the image below)
We’ve come to the closing of our step by step tutorial on how to create an online clothing store with WordPress theme. Now, we’re sure that this DIY is going to give you an edge over your competitors with an online platform.
While creating a website with Andrina, if you need any kind help, you can contact us here:
