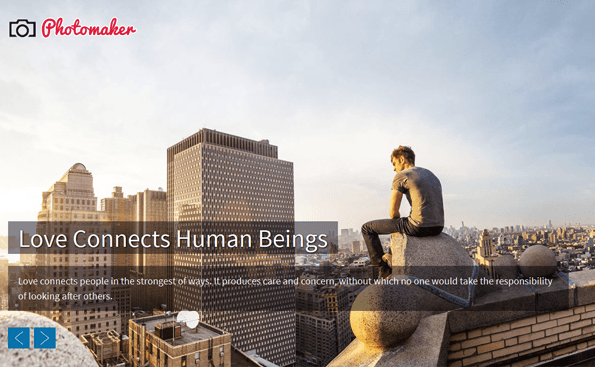
In the following article, you will know how to use the photography WordPress theme “PhotoMaker” to build your photography business website. In the theme, you can see full-screen moving sliders where you can showcase perfect pixel images. You can effectively show off your creative photography and portrait contents grabbing your audience attention.
The WordPress Theme is super-cool with various amazing features. Nice presentation of galleries. Pixel-perfect images, mega view portrait display. Effective Footer-Sidebar Widget Settings. Post/Pages ultra-easy Custom Settings. You can customize these features according to your own requirement with the help of its Powerful Theme Setting Options.
Learn the complete website designing with the points given in below Tutorial. Read the tutorial and make your own beautiful stunning photo-featuring WordPress website fast and quick.
Following are the points that have been explained:
- What is a PhotoMaker theme?
- How to install PhotoMaker theme?
- How to create the menus?
- How to create pages (page templates) for the menu?
- How to create drop down menu?
- How to create posts on your website?
- How to set up the gallery?
- How to use the various functions of the theme options panel?
- Uploading Logos, Fevicon, and Background image.
- Homepage slider settings.
- Setting up the Contact Page Map.
- Using the Styling Options.
- Using Social Icons.
- Footer settings.
Let us discuss the above topics one by one.
What Is a PhotoMaker Theme?
PhotoMaker is a FullPage WordPress Photography Portrait WordPress theme to show off your creative photos and gallery stunningly. It gives a king size view of your creative work in front of your audience. Your Photos and Portrait appears amazing on a Full-Screen slider. A gallery is perfectly and clearly visible in a beautiful grid structure. Theme Layout and design is just amazing to grab your audience attention.
The foremost feature is its adaptive view, which makes it perfect to show off photos and portraits related to any niche.. It’s beautifully designed for niches related to any business that needs exposure to showcase its work, products, and services through a website to attract customers.
The theme exactly focuses to leverage your business with its enthralling beauty and enormous features.
PhotoMaker allows you to create your photography website within no time.
The PhotoMaker theme is multi-featured and easy to use and any business professional can create his website without any difficulty. It requires a single click installation and your website will be ready within no time.
How to Install Photomaker Theme?
Before installing a Photomaker theme on your website make sure that:
- You have a web server installed on your machine.
- You have installed WordPress on your server.
Installing the theme is very simple and easy. It will hardly take a minute. Just follow the simple steps given below:s
- Go to your WordPress dashboard to install a theme.
Dashboard -> Appearance -> Themes -> Add New

- Choose the downloaded photomakertheme.zip file and upload it to your dashboard.
Upload -> Choose File -> Install Now


- Click on ‘Activate’ option.
- A theme is now activated and you can configure it from the theme options panel.
How to create menus?
Creating the menus is very simple. Follow the directions provided below: Go to Dashboard -> Appearance -> Menus
Then, Click on ‘create a new menu’ -> Enter Menu Name, let’s say ‘menu’.

Hence a new menu is created. Now, you can select the menu location.

Click on Save Menu
How to Create a Page Template?
Go to Dashboard -> Pages -> Add New
There are four templates available in PhotoMaker theme for particular sections. These sections are as follows:
- Blog Page
- Contact Page
- Portfolio Page
- Services Page
You can simply use these templates by creating a page and selecting a particular template for it.
For example-
Creating contact page

Click on ‘Publish’ and the contact page will be created.

Moreover, you can create many pages of a particular type by entering the number of required pages in the ‘Order’ box.
Similarly, you can create other page templates.
How to create drop down menu?
Creating the drop-down menu is very simple.
Creating the drop-down menu is very simple.
Go to Dashboard -> Menu -> select a menu to edit -> Select
- Check mark all the pages that you want to add to the menu.
- Click on Add to Menu

The pages will be added to the menu and you can simply drag and drop pages as shown below to create a drop-down page for any of the pages.
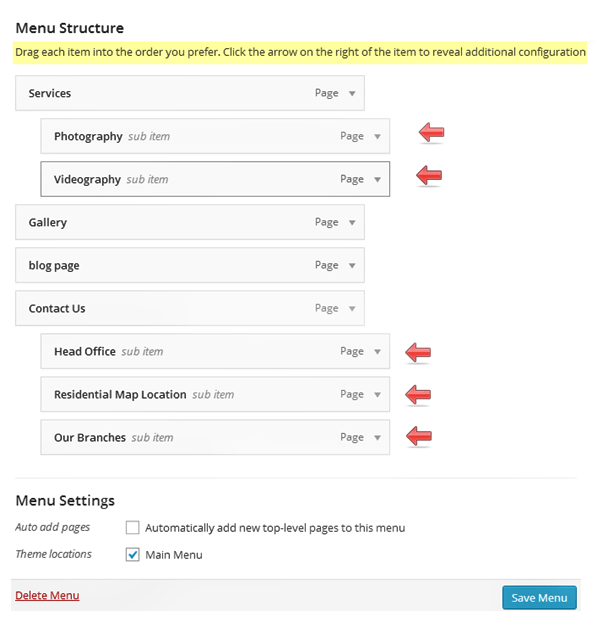
Click on Save Menu
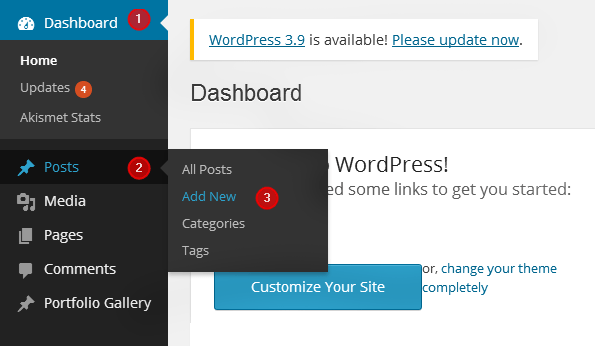
How to create posts on your website?
Go to Dashboard -> Posts -> Add New
In this Photography theme, you can publish various formats of posts such as Videos, Images, Quotes.
You can simply create any post and select the category of your post.
Follow these steps to post a video:
- Copy the embed code of a video
- Paste the embed code in the section provided for the same as shown in the image below
- Select the Video format

- Click on the publish button.
In this way, you can create various types of posts and display them.
How to set up the Portfolio Gallery?
Go to Dashboard -> Portfolio gallery -> Add New -> Click on add media and select an image for the gallery section -> Mark the category of the image or ‘Add New Category’


Click on ‘Publish’
How to use the various functions of the theme options panel?
-
How To Upload Logos, Fevicon, And Background Image?
Dashboard -> Appearance -> Theme options -> General Settings

-
How To Do The Slider Settings?
Dashboard -> Appearance -> Theme options -> Home Slider Settings
You can add ten slider images to the Slider Section that will display one by one with vertical scrolling. Form the slider settings only, you can insert a text in a slider, and provide a short description of each slider image differently.

Click ‘Save All Changes’.
-
How To Organize The Contact Page Map?
Dashboard -> Appearance -> Theme Options -> Contact Page Map
Here, add Google map iframe code and save the changes. The map will be displayed in the contact page map section.

-
How To Use The Stying Options?
You can change the theme colors using the styling options.
Dashboard -> Appearance -> Theme options -> Styling Options

-
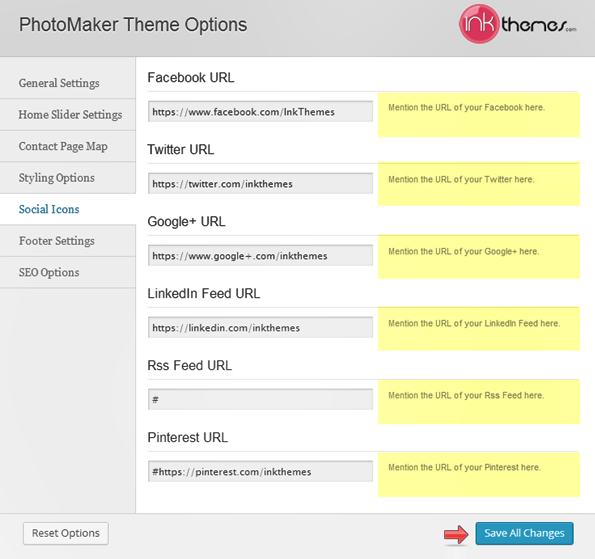
How To Add Social Icons
Social icons are very useful for a website. There are various social icons available in the theme. The social icons will be displayed in the footer.
You need to follow these simple steps.
Dashboard -> Appearance -> Theme Options -> Social Icons
-
How To Use The Footer Settings?
Dashboard -> Appearance -> Theme options -> Footer Settings

Here you can enter a text that will be displayed in the footer of the Homepage.
Thanks for purchasing PhotoMaker theme. If you have any questions that are beyond the scope of this documentation, you can freely ask it on our support forum.
Here is the link you need to follow. https://www.inkthemes.com/community.
You might also be interested in:
